

3 Ways to Keep Pliers from Leaving Marks on Wire
How do you keep pliers from leaving marks on your wire? This is one of the most common questions that I hear from beginner wire weavers. So, today we’re going to talk about three ways you can avoid marking your wire with your pliers.
This post may contain affiliate links. If you click on a link and then make a purchase, I may earn a small commission (at no cost to you). As an Amazon Associate I earn from qualifying purchases. To learn more, please see my full disclaimer.
1. Pad the jaws of your pliers to keep them from leaving marks on your wires
This is the perhaps the easiest way to avoid, or at least minimize, tool marks on your wire. So, it’s the method I recommend most frequently to brand new wire weavers.
Chances are, you already have some painters tape in your garage or some self-stick pressure tape in your medicine cabinet. And it just so happens that both of those materials work well for padding the jaws of your pliers.
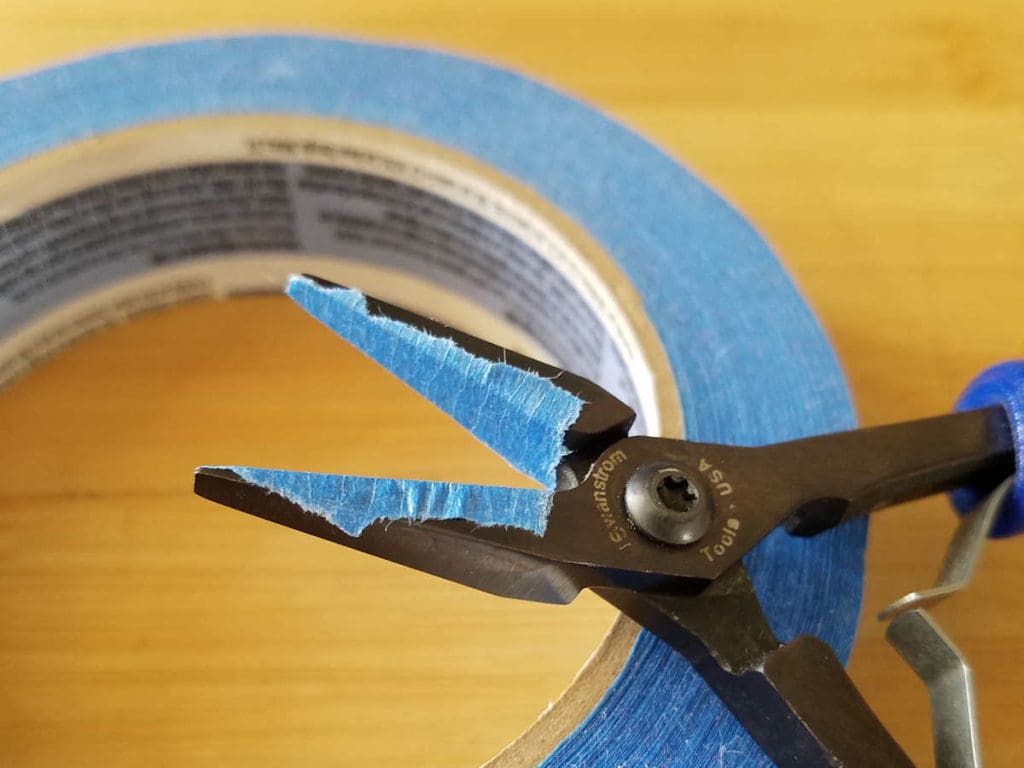
Painters Tape
Painters Tape is probably the easiest and most widely available material that you can use to pad your pliers. Simply wrap the jaws of your pliers with one or two layers of painters tape, as shown below.
Pros
- Widely available
- Inexpensive
- Quick and easy to apply and remove
Cons
- May leave a sticky residue on your tools if you leave it on for very long
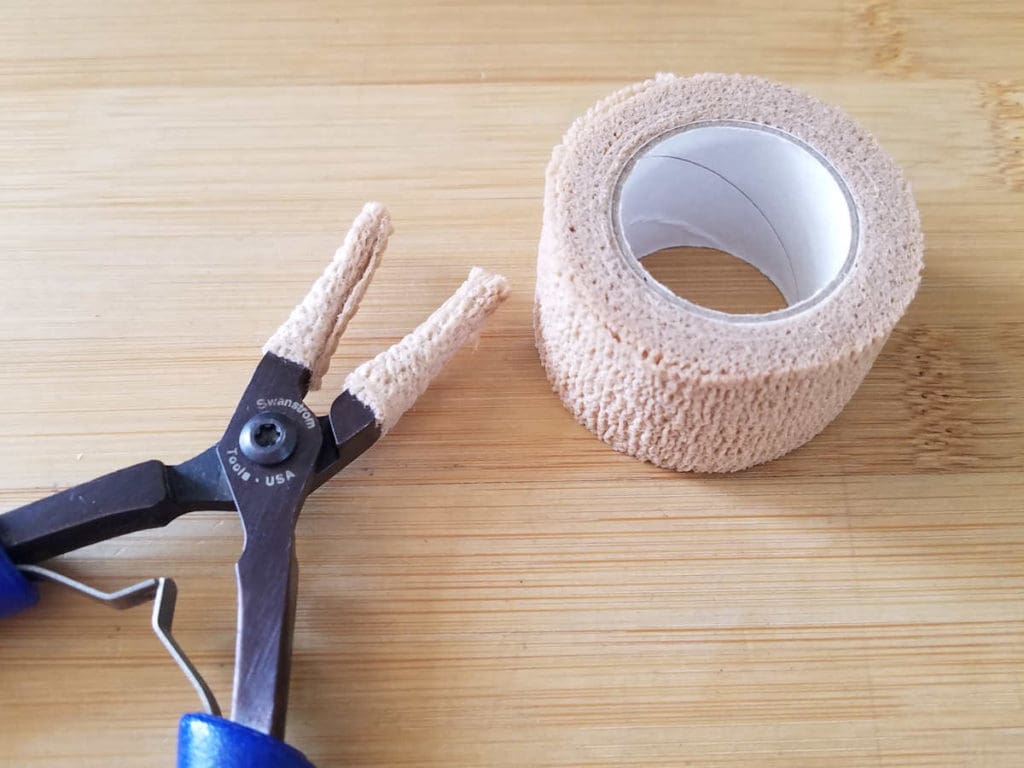
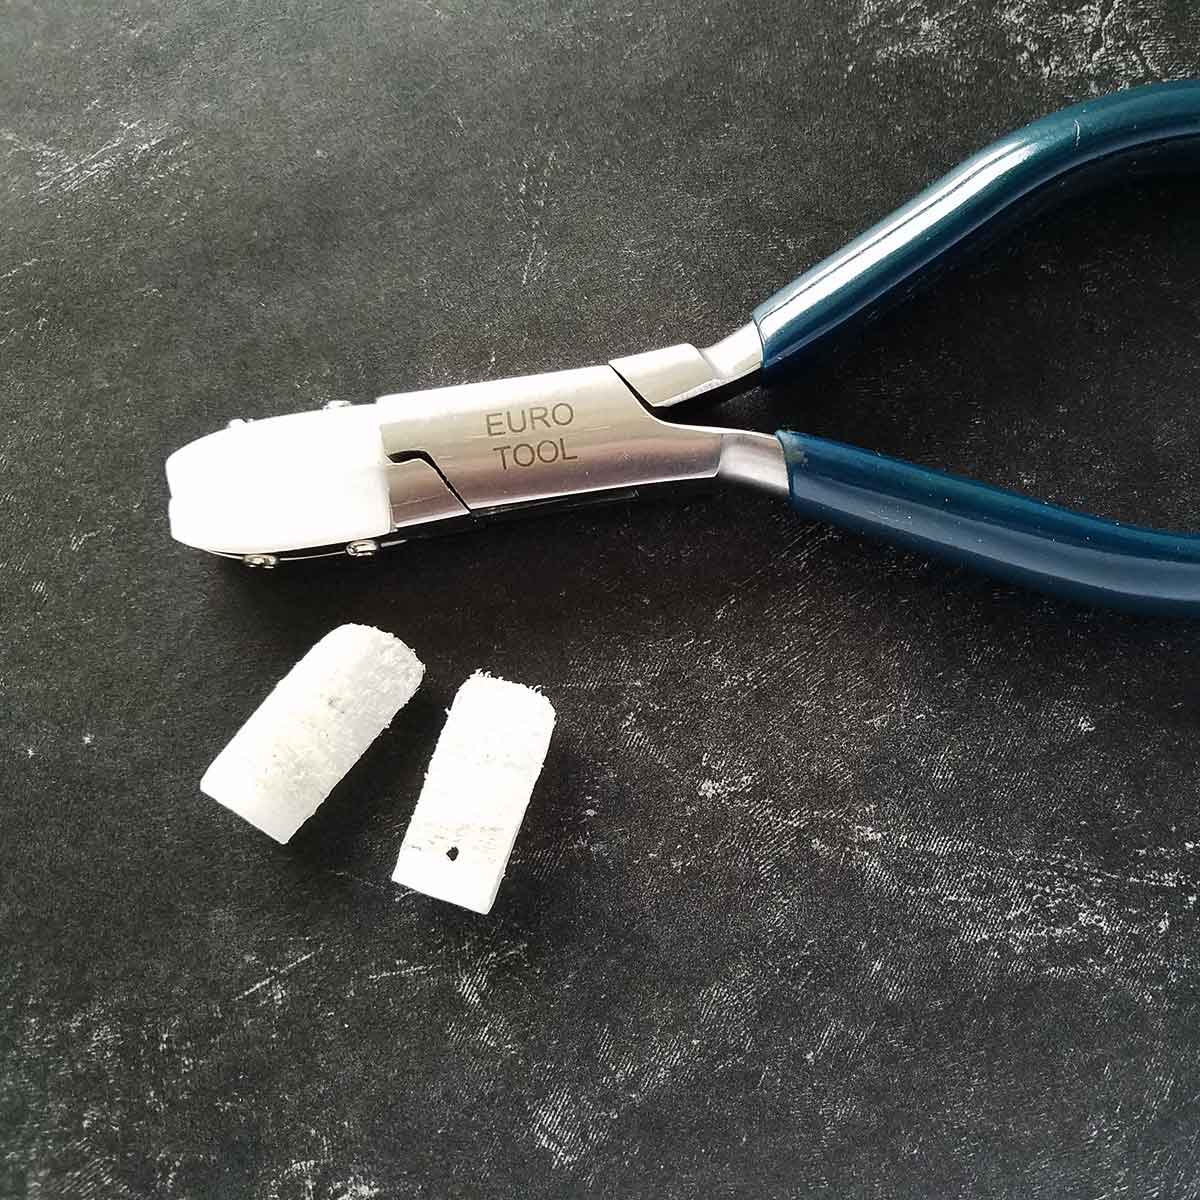
Self-Stick Pressure Bandage Tape
Personally, I find that stretchy self-stick pressure tape (the kind used for sports wraps, pictured below) also works well for protecting my fingers when I’m doing a lot of weaving. So I always keep a roll of this tape on my workbench.
To use it to pad your pliers, just wrap a couple of layers of the tape around each jaw, as shown below. This tape sticks to itself, so it’s super easy to use.
Pros
- Widely available
- Inexpensive
- Quick and easy to apply and remove
Cons
- This tape adds bulk to your pliers, which can make it difficult to see when doing very fine detailed work.
- I don’t like the sticky feel of this tape, so I use it sparingly. And only when I really need it.
Tool Magic
Another material you can use to add some padding to your pliers is a product called Tool Magic. This product is designed specifically for the purpose of padding jewelry pliers. It’s basically a liquid latex-like substance that will dry to form a soft sleeve over the jaws of your pliers.

Tool Magic needs to be reapplied periodically because the material will eventually wear off. I’ve never used this product personally, because… well, I’m cheap. But lots of jewelry makers do use and love this product. It’s worth a try if you want a uniform protective coat for your pliers that won’t leave a sticky residue on your tools.
Pros
- Creates a fitted, secure, and uniform sleeve on your plier jaws
- Doesn’t leave a sticky residue
Cons
- Needs to be reapplied regularly
- Expensive
2. Polish the jaws of your pliers to minimize marring your wire
Another way to minimize marking your wires with your pliers is to polish the surfaces of your jaws and slightly round off the corners.
This method is my least favorite of the three tricks for avoiding tool marks that I’m sharing today. But it’s a valid technique if you’re willing to put in the time and energy required to do it.
You’ll need some Sandpaper or Sanding Sticks in increasingly fine grits. These are materials that you should always keep on hand anyway. They’re equally useful for shaping your wire and removing tool marks on finished pieces. If you’d like to learn more about my thoughts on this, I talk about using sanding sticks to shape and polish wire in my Ride the Wave bracelet tutorial.
When choosing sanding materials, always look for those that are designed for use on metal. Then carefully smooth and polish the work surfaces of your pliers. Slightly rounding off the squared corners on your tools will also help minimize tool marks on wire.
I don’t have any photos to share for this technique because I’m kind of a stickler about not modifying my tools. So, this is not a method that I use personally. It does work, though. So if you have the time, patience, and the proper sanding materials to polish the gripping surfaces of your pliers, go for it.
3. Lighten your grip to keep pliers from marking your wire
The best way to keep pliers from leaving marks on your wire is to learn to control your grip. Wire weaving is a discipline that requires a great deal of hand control and finesse. And the biggest mistake that I see beginners make is that they naturally tend to maintain a death grip on their tools.
I discussed the death grip tendency at length in my Chasing Hammer series. And the same principles of working with relaxed, soft hands applies to using jewelry pliers just as it does to using jewelry hammers.
The key to mastering your grip on your tools is to first become aware of any tension in your hands. If your hands are physically sore after a session at your workbench, I can guarantee that you’re holding your tools too tightly.
Relax. Breathe. And imagine that, instead of a pair of pliers, you’re holding a tiny fragile bird in your hand. You want to grip your pliers just firmly enough to hold them comfortably and steadily in your hands. But not so firmly that you can see or feel muscle tension in your hands.
Another important thing to keep in mind is that the metals used to make jewelry are significantly softer than the steel used to make your tools. So, it’s important to understand the properties of your wire. Lots of my students come from a beading background. And quite often, their first experience with jewelry wire is with memory wire, which is used for bead stringing.
Memory wire is made with spring-hard steel, which is the hardest jewelry wire on the market. This wire is so hard, in fact, that it will completely destroy most wire cutters. Did you know that?
Memory wire needs to be cut with special shears that are designed to cut spring steel. And because this is the first wire that many jewelry makers have worked with, it helps to spread the notion that working with wire requires a lot of hand strength. But that couldn’t be further from the truth.
Working with non-ferrous jewelry wires such as silver, gold, copper, bronze, and brass — the kinds of wire that we use for wire weaving — requires a lot less hand strength and a lot more finesse than you realize. In order to master wire weaving, you’ll need to develop more sensitivity and more awareness of the feel of your wire through your pliers. And these are skills that can only be developed through lots of practice, trial, and error.
If you’d like to learn more about the types of jewelry wire used for wire weaving, be sure to check out this post. And if you’re wondering which tools you really need to get started with wire weaving, I recommend these eight basic hand tools for beginners.
Finally, be sure to read this follow-up post where I talk more about exactly how to develop a feel for your jewelry wire. In that post, I teach you a quick and easy exercise that will help you calibrate your grip. Practice this exercise before you start working on a project, and you’ll know exactly how much pressure you can use to hold your wire without leaving tools marks.
Discover More Behind Door 44
Thanks so much for joining me today! I hope you found this post helpful. Learning to keep pliers from leaving marks on your wire is an important step toward wire weaving mastery. So we dive deep into this subject in this post.
I like to share useful wire weaving tips and tricks on my social media channels, and we have some great conversations about wire jewelry in my private Facebook Group. Also, be sure to connect with me @door44studios on Instagram, and Facebook to keep up with everything that’s happening behind Door 44. And if you haven’t already done so, be sure to subscribe to my YouTube channel where you’ll find new wire jewelry videos weekly.

Pin the This Post for Later

Great article!!! All terrific suggestions, and I think the “fragile bird” analogy sang loudly to me – perfect to try out, given my heavy-handedness. Thanks, Wendi!
You’re welcome, Denise. I’m so glad that resonated with you! I learned the “fragile bird” analogy from a horseback riding instructor many years ago. That was the analogy she used to teach kids to ride with softer hands on the reins, and it worked wonders. I watched many lightbulbs turn on for our young riders when we coached them to loosen their death grip on the reins! LOL
This is a great article, thanks so much for taking the time to help all of us that are interested in this most beautiful art of wire weaving or wire work. I hope I can explain a way that works sometimes for me. If I can, I try to put most of the pressure on the jaw that is in the back of what I’m trying to squeeze. And the front jaw (the side that is the front of your project) if I possible, I try not to use the edges of the jaw but center it in the middle flat area, be that at the tip or the middle of that jaw in the front and apply minimal pressure on that area as you can.
That’s a great approach, Nan. Thanks for sharing your tip!
I tap on don’t sell my personal information and it comes up asking me if I want to opt out
Well I would like to follow you but I don’t want my information being sold. Sorry to say
Thank you
Kim Moffet
Hi, Kim. I understand your concerns as I share them. I don’t want my personal information being sold either. I can assure you that your personal information won’t be sold by me or by any of the services that I use to run this website. That’s not why I collect email addresses. I use that information strictly to keep in touch with my readers and to let them know when I have new content to share. If you’re not comfortable sharing your email address, you can always follow me on social media or you can subscribe to my YouTube channel. You won’t get my updates as soon as my email subscribers because they’re always the first to know about any Door 44 updates. But you’ll still get full access to my public content.