How to Splice a New Wire Into Your Weave
It happens to the best of us. You’re happily weaving your core wires together. And suddenly your weaving wire breaks. Or if you’re like me, you simply run out of wire on your bobbin. Today we’re going to talk about how to seamlessly splice a new wire into your weave. It’s easier than you might think! Trust me.
In my last post, I showed you how to do the Modified Soumak weave over two core wires. And now I’m working on a simple bracelet tutorial that features that weave. That tutorial isn’t quite ready to publish yet, so I was afraid I wasn’t going to have a blog post for this week. But then I ran out of weaving wire in the middle of my bracelet prototype. That gave me the perfect opportunity to show you how to splice a new weaving wire into an existing weave.
This technique works on just about any weave over two or more core wires. And there’s not really anything that you need to do differently from one weave to the next. So you can apply this technique to just about any project. You may just have to think it through if you’re doing a more elaborate weave than the two that I tend to use, which are the Modified Soumak and Figure 8 weaves.
This post may contain affiliate links. If you click on a link and then make a purchase, I may earn a small commission (at no cost to you). As an Amazon Associate I earn from qualifying purchases. To learn more, please see my full disclaimer.
Video Tutorial
Would you prefer to watch a video demonstration of this technique? Watch me make a seamless splice on three common weaving patterns. And while you’re there, be sure to subscribe to my YouTube channel.
As Seen on Youtube:
Step 1: Prepare the Area for the Splice
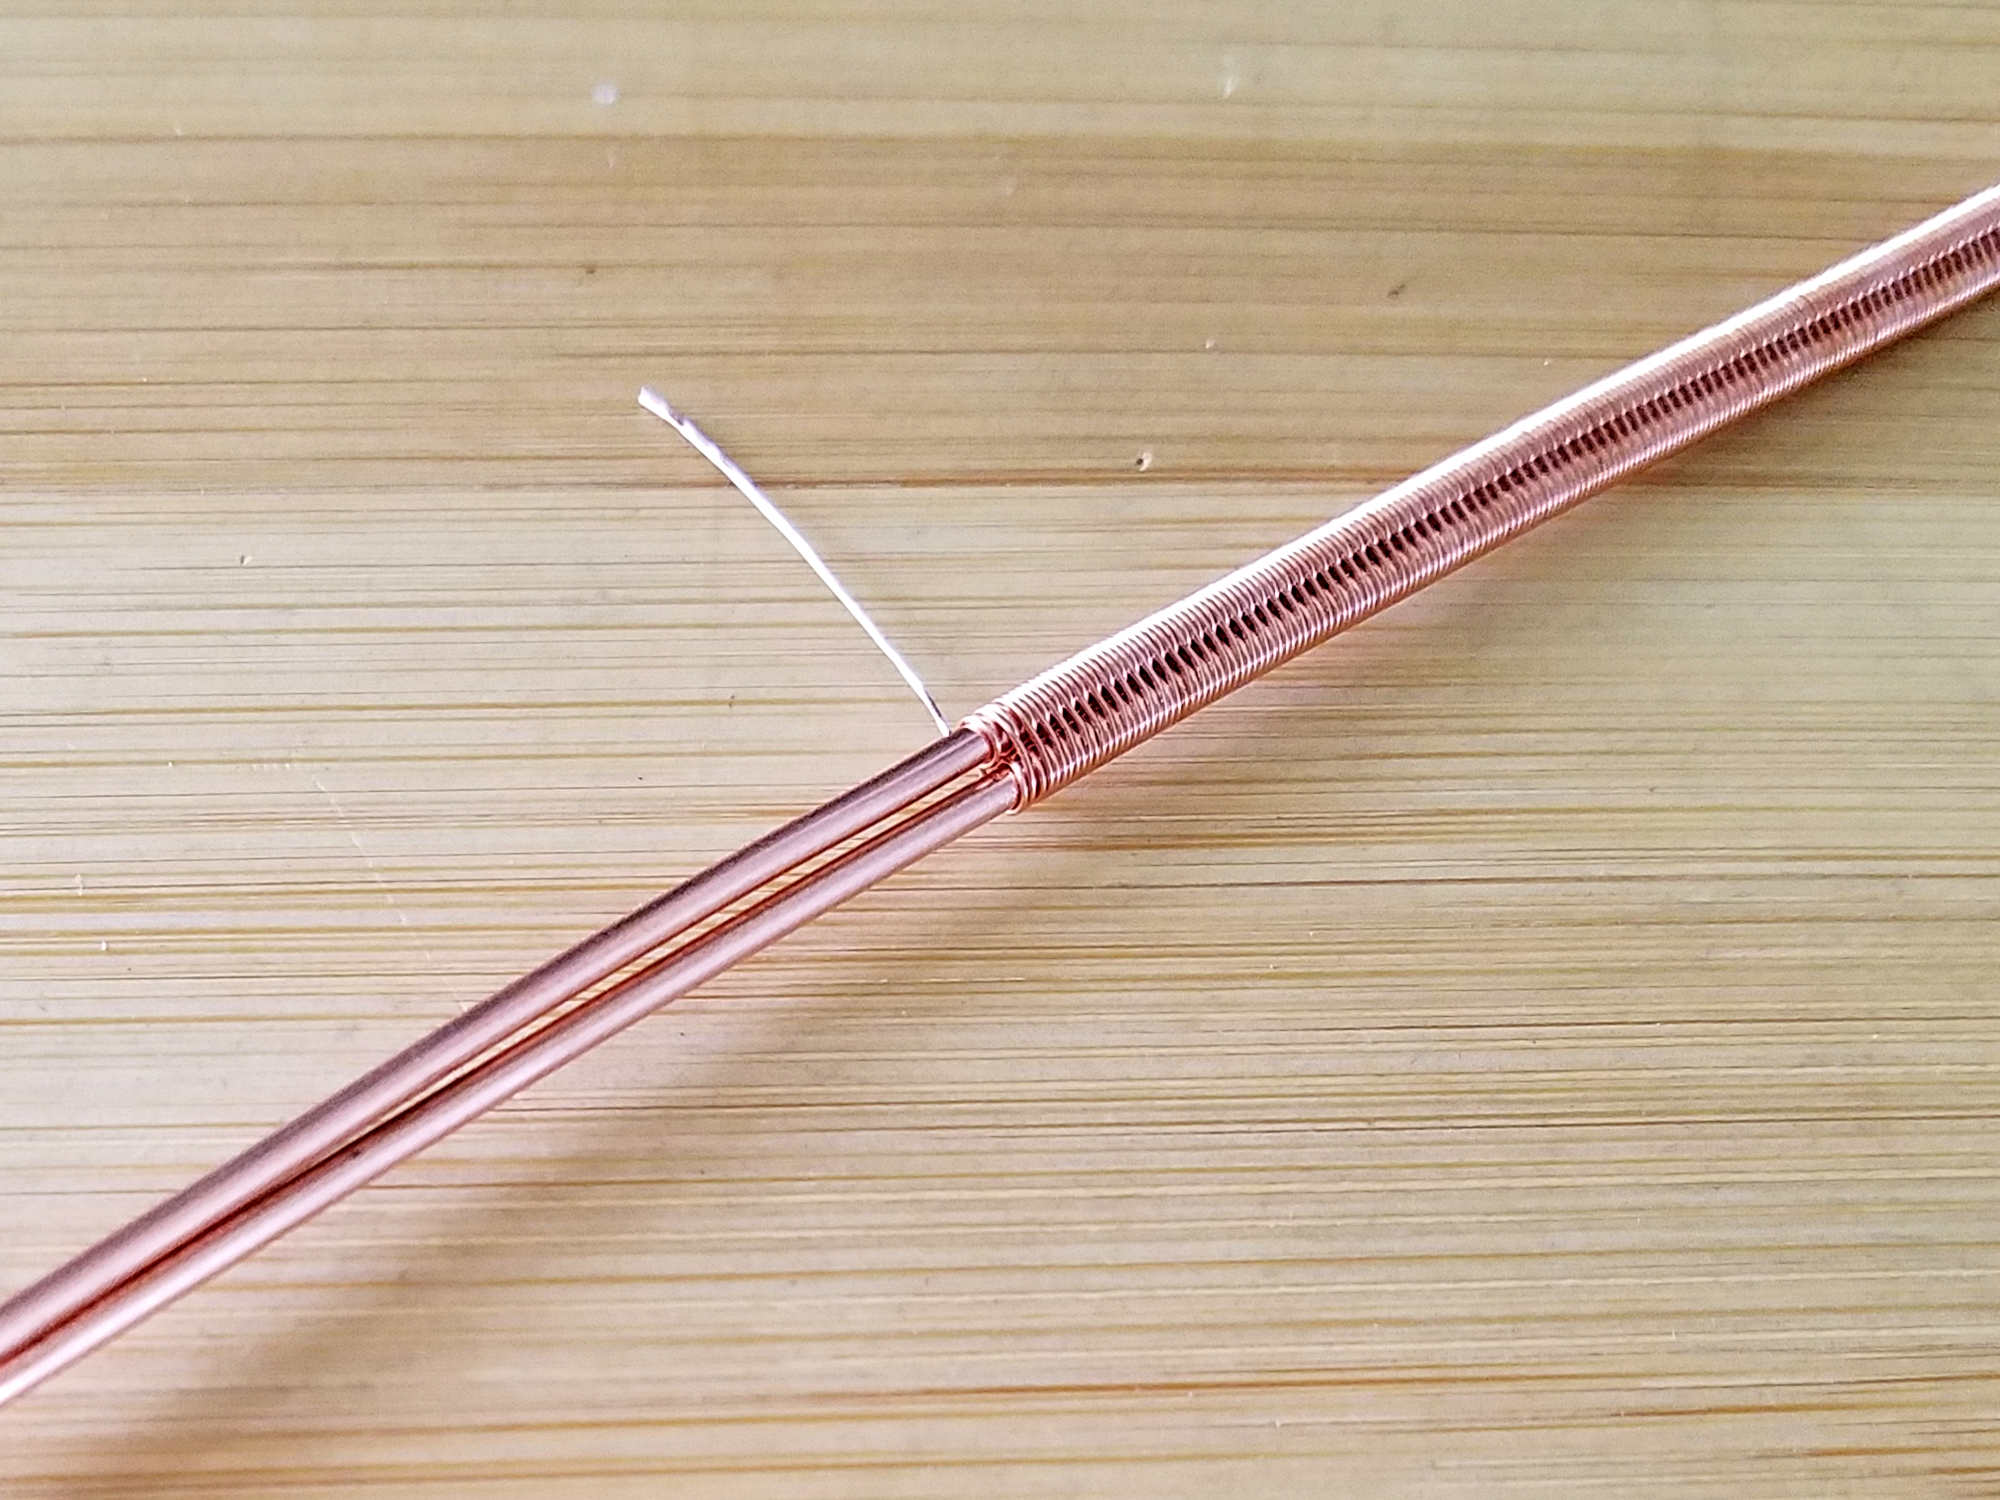
The first thing you want to do before splicing the new wire is to make sure that you have a clean, neatly compressed weave and a tail on your old weaving wire that is at least one inch long, as shown below.
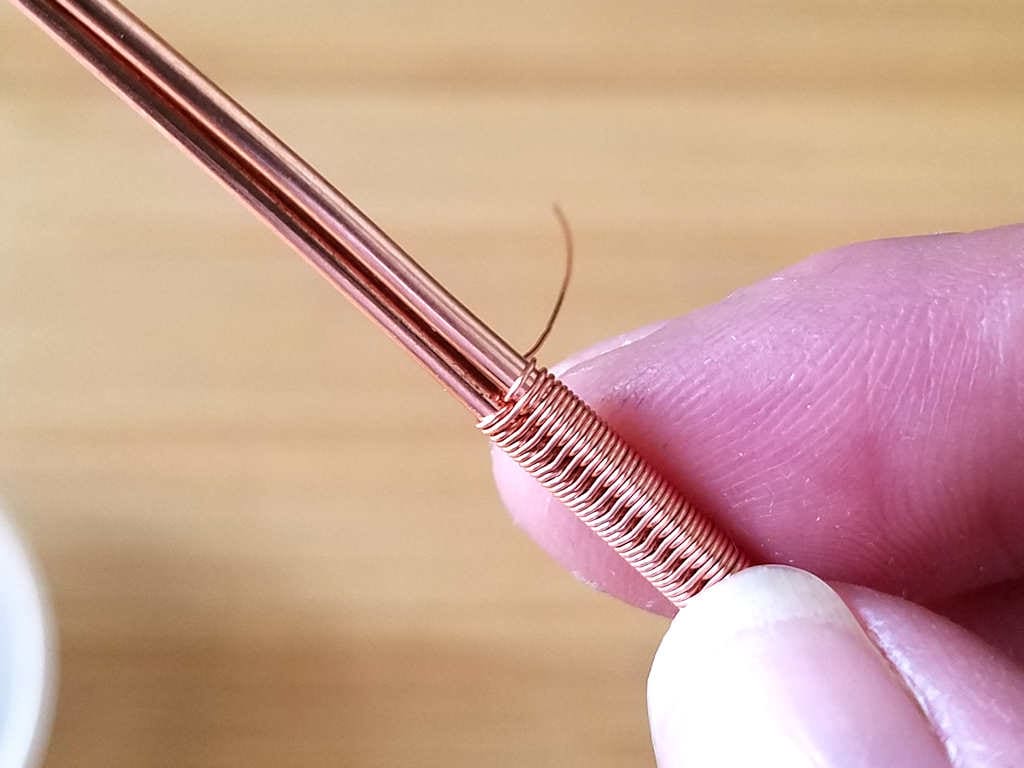
I like to splice my new wire in the middle of a pattern repeat. Notice in the image above that I stopped weaving with my old wire just after completing the single wrap pass.
If your weaving wire broke, you may need to unwind it a bit to get a long enough tail and to reach a good stopping point in your weave. It’s always better to splice new wires in the middle of your work. So if you’re weaving over three or more core wires, choose a point on either side of the center core wire. If you’re weaving over just two core wires as I am, make sure the tail of your old weaving wire ends up between the two core wires, as shown above.
Step 2: Splice the New Wire Into Your Weave
Remember, our goal is to make the splice as seamless as possible. We’re going to pick up our weave exactly where we left off. To do that, slide the tail of your new weaving wire right up next to the tail of the old weaving wire. Only you want the new tail to be facing the opposite direction.
When done properly, you’ll have one tail coming out on the back side of the weave and the other tail coming out on the front side of the weave, as shown below.
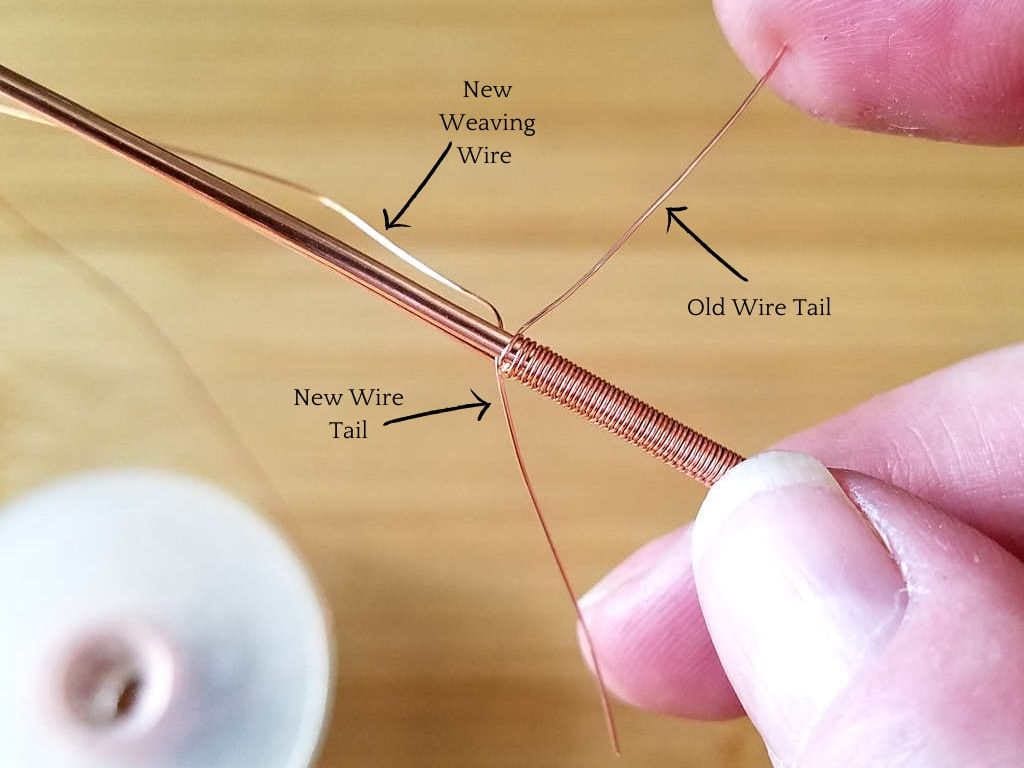
This is the most important part of this process, and it’s where I see beginners really struggle to figure out the splice. Just remember that you always want one tail on each side of the weave. If you have both tails on the same side, your splice will be clearly visible on the finished weave.
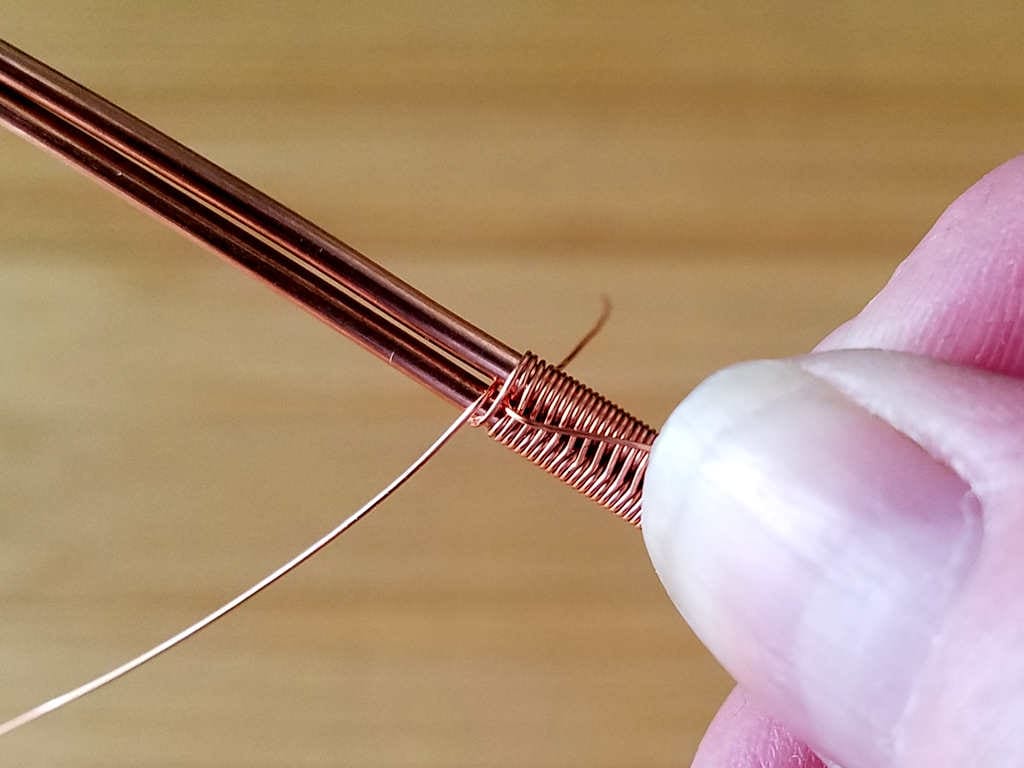
Step 3: Pick Up Your Weave Where You Left Off
All you have to do now is continue your weave in pattern, exactly where you left off. Hang onto the tail of your new weaving wire with the thumb of your free hand, and begin weaving.
In my case, I stopped weaving with my old wire on the single wrap pass, and I continued in pattern with a double pass across both core wires using my new weaving wire, as shown below.
Weave two or three pattern repeats and then compress your weave. Then examine you weave carefully to make sure it’s neat, compact, and seamless.
If everything looks good, keep weaving. If not, make any necessary corrections or adjustments. This can be a bit fiddly sometimes. It’s important to keep the same amount of tension on both sides of your splice.
If you have any visible gaps or holes around the splice area, try it again with a bit more tension on your weave. That will help the weave stay tightly compressed. And it will minimize any visible gaps in your splice.
Step 4: Break the Tails on Your Weaving Wires
At this point, you can either finish your weave or just complete a half dozen or so pattern repeats before breaking the tails of both weaving wires. Notice I say to break the tails rather than trim them.
No matter how good your flush cutters are (and I have some very high quality Swanstrom super flush cutters similar to these), cutting your weaving wire will always leave a tiny bit of wire poking up out of the weave. But when you break your weaving wire tails, they’ll typically break off either flush with or just below the weave.
Here’s how to break your wire tails. Grip one tail firmly with your thumb and forefinger. Pull the wire taught and swirl it around in a small circle as shown below. I always move my wire in a clockwise direction, but it really doesn’t make a difference. It’s just a habit I’ve developed over the years.
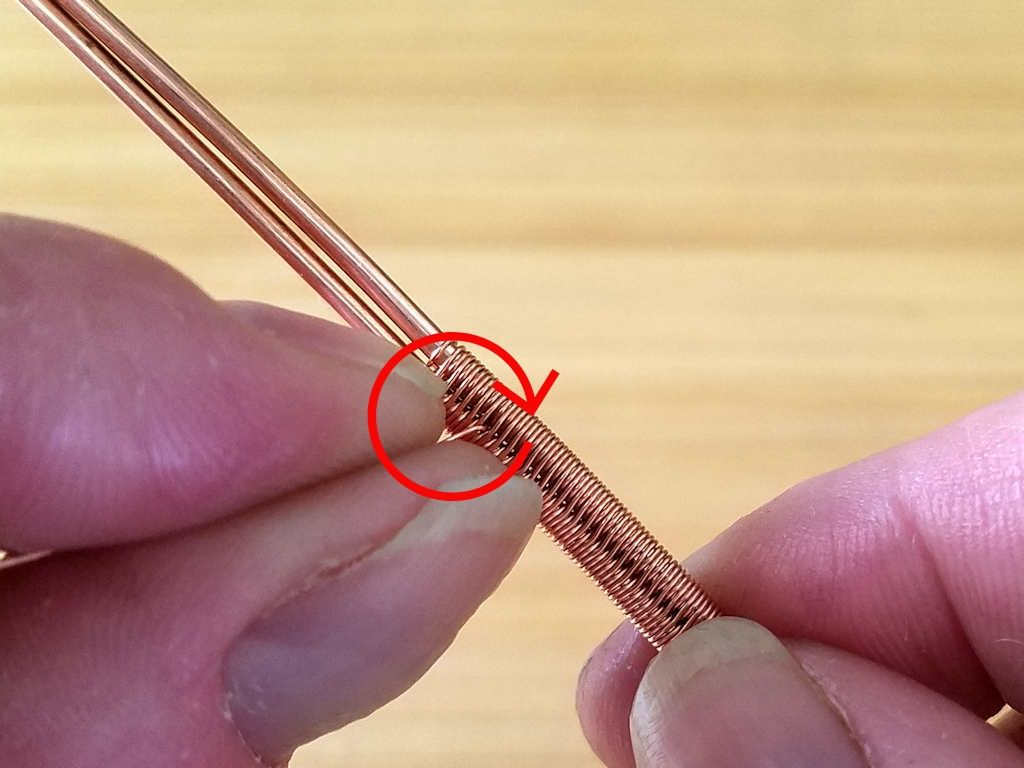
Make sure you keep even tension on the wire as you work it. The tension and swirling motion will gradually work harden the wire, and it will break within a few seconds. With a bit of practice, you’ll even start to feel exactly when the wire is about to break.
Rub your finger lightly over the splice point. You shouldn’t be able to feel the broken end of the wire tail at all. But if you can, just tuck it down around the core wire with a sharp tool. I use my Tulip beading awl for this purpose as the point is small enough to really get down into the weave.
Repeat this step to remove the remaining wire tail. Your weave should look something like the one pictured below after both tails have been removed.
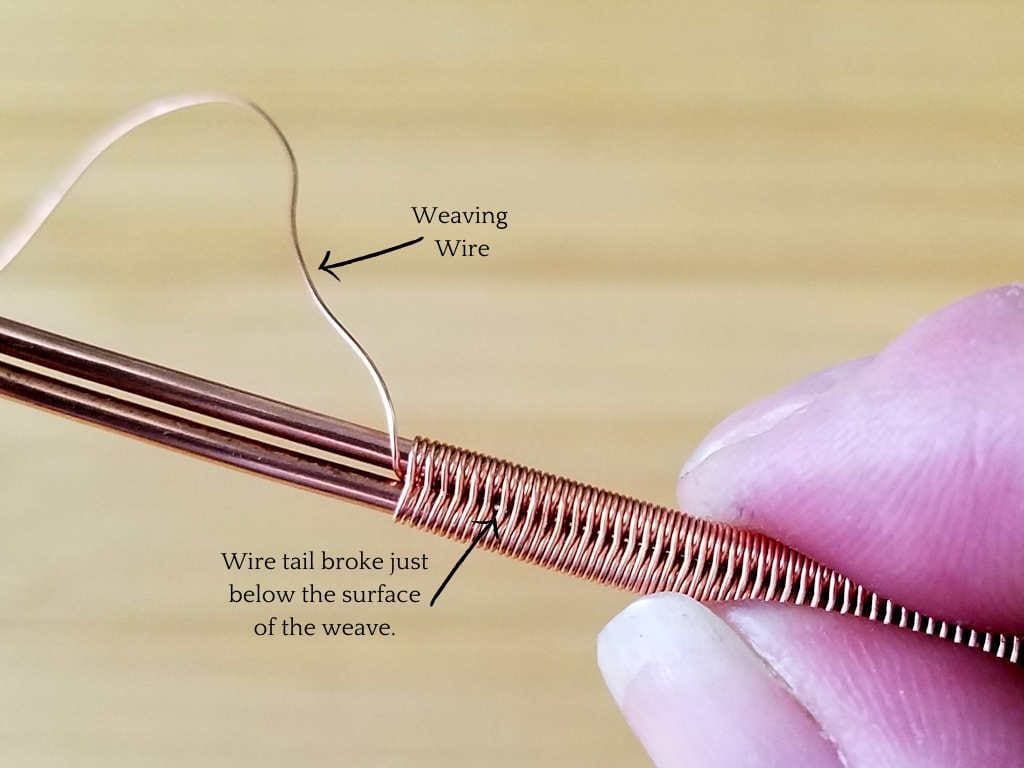
Notice that the weave pattern continues seamlessly and the broken wire tail is barely visible even when magnified in the photo above. This seam is virtually invisible on the finished piece when viewed with the naked eye. And because the tails broke off below the surface, the weave feels as smooth and seamless as it looks.
That’s all there is to it! Now you’ll never have to worry about breaking your weaving wire or running out of weaving wire again. It’s easy to splice a new wire in at any point in your weave.
Discover More Behind Door 44
Thanks for joining me today. I hope this simple splicing technique spares you some frustration down the road. Broken weaving wires are just part of the gig. It even happens to me every now and then, and I’ve been weaving for years. So don’t get discouraged by breaks. Just splice in a new wire and keep on weaving!
Want to learn more techniques like this?
I like to share useful wire weaving tips and tricks on my social media channels, and we have some great conversations about wire jewelry in my private Facebook Group. Also, be sure to connect with me @door44studios on Instagram, and Facebook to keep up with everything that’s happening behind Door 44. And if you haven’t already done so, be sure to subscribe to my YouTube channel where you’ll find new wire jewelry videos weekly.
Until next time, go make something beautiful!

Pin This Post for Later
Was this post helpful? If so, please help spread the word about Door 44 Studios by pinning this post to your jewelry making boards on Pinterest. Also, please feel free to share links to my posts with anyone you know who wants to learn to make wire jewelry!