

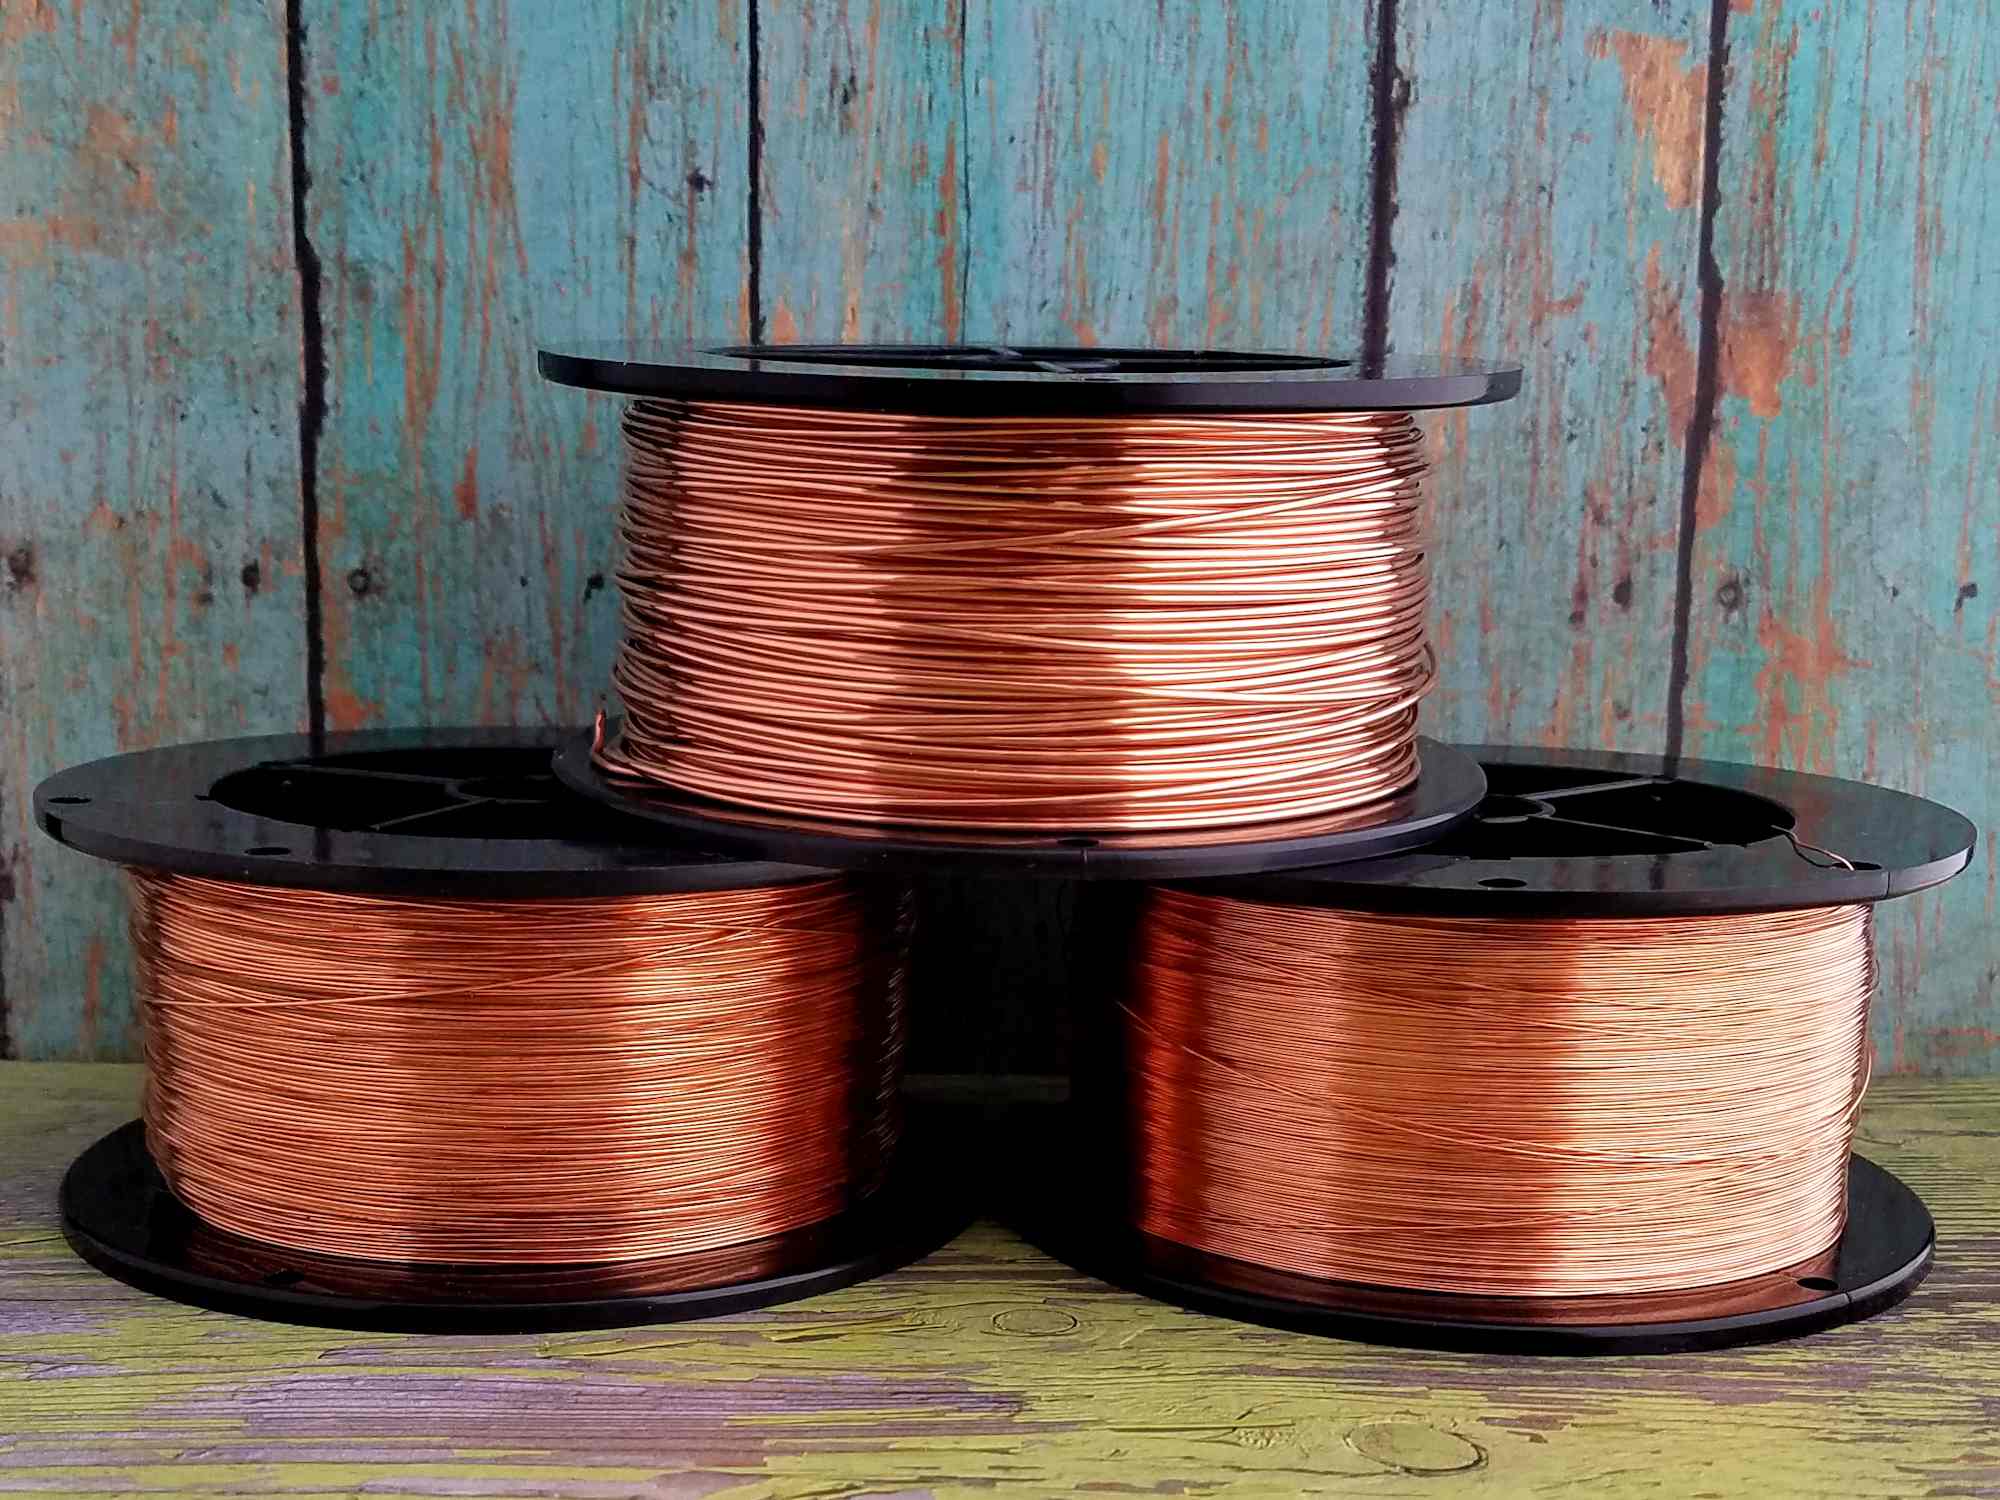
Jewelry Wire: Everything You Need to Know
Choosing the right jewelry wire for a specific project can be confusing. Especially if you’re new to wire weaving. I get it. I’ve been there, and I’ve made all the mistakes. And then some! There are so many specialty wires on the market today that it’s easy to become overwhelmed. So, it helps to narrow all those overwhelming choices down to a few simple categories.
I tend to rank jewelry wire in three different categories:
- Solid jewelry wire
- Filled jewelry wire
- Plated, coated, or anodized craft wire
Two other types of common jewelry wire are beading wire and memory wire. And neither of those two types of wire are suitable for wire weaving. So, for now, we’re just going to focus on the three main wire categories that I named above.
First, let’s define some of the terms you’re going to run across as you begin shopping for jewelry wire. Then we’ll take a closer look at each of three categories of wire that I mentioned above. I’ll discuss their pros and cons along with when (and when not) to use them. So, by the time you’ve read through this whole post, you’ll have a solid understanding of exactly what kind of wire you should look for as you begin your wirework journey.
This post may contain affiliate links. If you click on a link and then make a purchase, I may earn a small commission (at no cost to you). As an Amazon Associate I earn from qualifying purchases. To learn more, please see my full disclaimer.
Hardness
You’ll often hear the terms ‘temper’ and ‘hardness used interchangeably in reference to jewelry wire. But in most cases, hardness is correct term. When you’re shopping for wire, you’ll find that you can purchase wire in three different levels of hardness: hard, half-hard, and dead soft.
There’s a lot of lingo that relates to hardness. So, let’s talk about the most common terms that you’re likely to run across.
Hard Jewelry Wire
Hard jewelry wire is very stiff and springy. It’s difficult to form, but it will also retain its shape well once it is formed. One example of hard wire that you’ve likely encountered along your jewelry making journey is memory wire. Generally, you don’t want to purchase hard wire for wire weaving unless you have a very specific structure in mind that requires a high degree of strength and shape retention.
You’ll also find that certain decorative materials like gallery wire and metal tubing have a hardness rating of hard. And that’s because of the manufacturing processes used to make those materials. As a wirework beginner, though, you probably won’t encounter these materials frequently. For now, you’ll want to stick with half-hard and dead-soft wire.
Half-Hard Jewelry Wire
Half-hard wire works well for structural elements of wire woven jewelry. But it can be more challenging to work with — particularly for beginners. I use half-hard wire mainly for jewelry findings like clasps and ear wires. It also works well for making sturdy frames that you can layer with other wirework elements. But because all wire will naturally increase in hardness as you work with it, you don’t necessarily need to maintain stock of both half-hard and dead-soft wires.
I’ve found that dead-soft wire works for about 90% of my needs, so (with the exception of a couple of wire gauges) I no longer maintain stock of both half-hard and dead soft wires in every wire gauge. For the most part, dead-soft wire works well for my tutorials. For the rare exceptions where I do use half-hard wire in my tutorials, I also share tips for work hardening dead-soft wire so it can be substituted for half-hard.
Dead Soft Jewelry Wire
Dead soft wire is the most malleable of the three wire tempers available on the market, and this is my favorite hardness. Dead soft wire is the easiest type of wire to work with, so it’s what I recommend for beginners. If you are constrained by space, as I am, or if you’re just starting to build up your wire stock, I recommend buying dead soft wires first.
As with half-hard wire, a dead soft wire will work harden as you use it. That’s why your weaving wire will sometimes break unexpectedly in the middle of a weave. But the beauty of the work hardening process is that you can turn almost any dead soft wire into half-hard wire with a little effort and no special tools. And that brings us to some additional terms that we need to define.
Work Hardening
The term work hardening is exactly as it sounds. As you work with wire (and this applies to any type of wire, regardless of its original hardness) it will gradually become harder. So as you straighten a piece of dead-soft wire with your fingers or with a tool like nylon jaw pliers, it will get harder with every pass through your fingers or nylon jaws. Work it enough, and it will become half-hard wire. Or even hard wire.
Hammering also work hardens jewelry wire. That’s partly why I use hammering in so much of my work. It not only adds depth and dimension to a piece, but it also adds strength and durability. Twisting is another means of hardening wire. And because I tend to use all of these techniques though the course of creating my jewelry, most pieces are sufficiently hardened by the time they’re finished. Regardless of the wire hardness that I started with.
Breaking Point
All metals have a breaking point, which is why it’s important to become very familiar with whatever alloy you choose to work with. As you get to know your chosen wire, you’ll learn to feel when the wire is nearing its breaking point. You can only harden wire up to that point, and then it quickly becomes brittle. Overworked jewelry wire will break under the slightest pressure.
You can use this fact to your advantage, as I do when I want to finish weaving wires cleanly. Trimming weaving wire with wire cutters often leaves a sharp point just above the surface of your weave. And those points are sometimes difficult to tuck in with a tool if they’re in a very tight space. Breaking your weaving wire, on the other hand, leaves that point either flush with or just below the surface of your weave. And that’s why I recommend breaking your weaving wire instead of trimming it in my tutorials.
Annealing Jewelry Wire
Here’s another potential area for confusion for new wire weavers. You take a piece of 16ga half-hard wire and ball the end of the wire up with your torch. But now your wire is super soft and bendy on the end with the ball. The rest of the wire is noticeably softer as well. What happened?
You just annealed your half-hard wire and returned it to a dead soft hardness. Annealing is a metallurgical process that can either soften or harden a metal, depending on how (and for how long) you apply heat. For our purposes, however, think of annealing as a means to soften hard metals.
By heating jewelry wire with a torch to the point where the wire glows red, you essentially return the wire to its softest and most malleable form, dead-soft. In order to use that annealed wire as a structural element, such as a core wire for weaving, you’ll need to work harden it back up to a more rigid hardness. You can do that by continuously drawing it through your fingers or your nylon jaw pliers until it re-hardens. Or you can hammer it with a rubber or rawhide mallet. Twisting the wire also hardens it.
I have a lot of great tips for hardening wire, which I demonstrate frequently in my video tutorials. So, if you haven’t already done so, be sure to subscribe to my YouTube channel. Just click the button below to subscribe now.
Subscribe to my YouTube channel
Grab My Free Wire Guide!
I’ve already covered a lot of information in this post, and there’s a lot more to come. So, if you’re feeling a little overwhelmed, be sure to download the printable PDF version of this article. That way you’ll always have it available on your device. And you can refer back to it as needed.
My printable Jewelry Wire Guide is available in my free resource library. Just complete the form below to get instant access to the wire guide, as well as several other helpful wire jewelry resources.
Get my free jewelry wire guide
When you join my newsletter
Okay. Now that you have a better understanding of how wire hardness works, let’s look at those three broad categories of wire that I mentioned in the beginning of this post: Solid jewelry wire, filled jewelry wire; and plated, coated, or anodized craft wire.
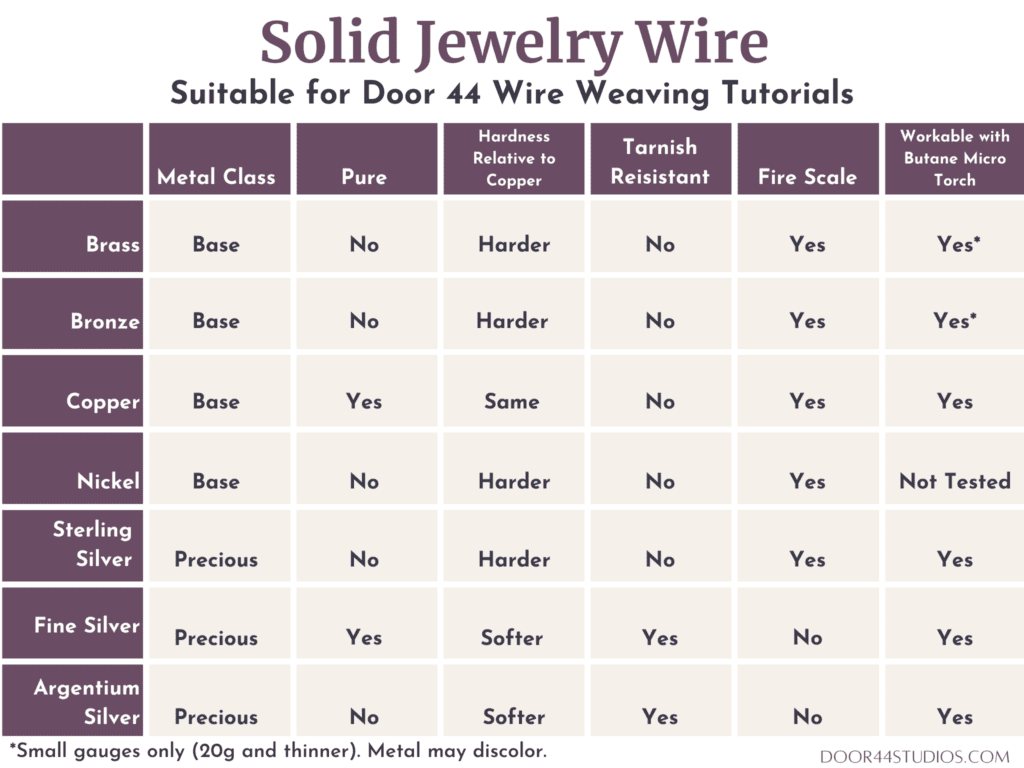
Solid Jewelry Wire
This is the only type of jewelry wire that I use. And it’s what I recommend you use as well.
As the word ‘solid’ suggests, this type of wire consists of a single bare metal that’s not been plated, anodized, enameled, or otherwise treated with some sort of surface coating. There are a lot of different solid jewelry wires available on the market. Unfortunately most of them are not available at your local craft store.
The best place to buy solid jewelry wire is from a jeweler’s supplier like Rio Grande or Monsterslayer. Both of these vendors are excellent sources for buying solid jewelry wire in bulk. But if you want to buy in smaller, more affordable quantities of wire when you’re just starting out, I recommend Creating Unkamen.
All three sources carry an assortment of quality jewelry wires that will meet virtually every wire weaver’s needs. For bulk purchases, Monsterslayer often has better prices. But I tend to buy my bulk wire from Rio Grande because they usually list the alloy contents of their metals in their product descriptions. When I want to experiment with a new type of wire that I don’t keep in stock, I turn to Creating Unkamen because I can get smaller quantities of wires that I may not like or use again.
Solid jewelry wires are broken down into two general categories: base metals and precious metals.
Base Metal Jewelry Wires
Base metals are common metals or alloys like copper, brass, and bronze. Copper is a pure metal while brass and bronze are alloys made up of one or more metals blended with additional minerals or elements.
I know. This is getting pretty technical. You don’t have to become a metal expert to make beautiful wire jewelry, but you do need to have a basic understanding of the materials that you’ll be working with.
Brass Wire
This is a tricky metal to put into a nice neat little box. Brass jewelry wire is also called Jeweler’s Brass, Red Brass, or Nu Gold. I’m not a fan of yellow metals, so I don’t use a lot of brass wire for my jewelry. It will work for most of my designs, though. So, give it a shot if you want to achieve a look that’s similar to gold, or if you want an antiqued brass finish.
The trouble I have with brass is that there are multiple alloy formulas all marketed as brass. This makes it very difficult to predict how hard the wire will be or how it will respond to heat.
I recently tried balling some jeweler’s brass wire with my butane torch, and I had mixed results. I was able to ball smaller gauges of wire. But I found that the wire discolored quite a bit. The balled ends ended up looking more like copper than brass.
Keep that in mind if you want to try using brass wire for my tutorials. It should work fine for something like my Chalice Necklace, for instance, but I don’t recommend it for my Twig Earrings. Also be aware that although you can buy half-hard and dead soft brass wire, it will feel very different than half-hard and dead soft copper wire.
Because of the zinc content, brass wire is a lot harder and springier than copper. So, it will take more physical effort to form it and to get a nice tight weave. Jeweler’s Brass does have a color very similar to 14K yellow gold, though. If that color appeals to you, give it a try and let me know how it turns out. I’d love to see your work as well as learn from your experience with brass wire.
Bronze Wire
The difference between bronze and brass isn’t always clear. Like brass, bronze wire consists of an alloy blend of copper and another material like tin, aluminum or even silicone. Also like brass, it’s difficult to predict how a bronze wire will behave. And without knowing the exact alloy contents of your bronze wire, it’s also possible to contaminate your tools and pickle with iron. This can cause discoloring on your silver wire if you use the same tools and pickle pot for both metals. This is because some aluminum alloys contain small traces of iron.
Because brass and bronze wires are so hard to nail down in terms of their exact alloy blends, I tend to steer clear of these two metals. You’re welcome to try them, though, if you like the look of yellow metals. Bronze wire has an appealing antiqued gold look to it that I actually like. It is a harder wire to work with, though, and I don’t recommend heating it with a torch. As with brass, I don’t recommend this wire for any tutorials that require the use of a torch, such as my popular Twig Pendant. It should work fine, though, for something like my Chalice Earrings or my Lyonesse Pendant tutorials.
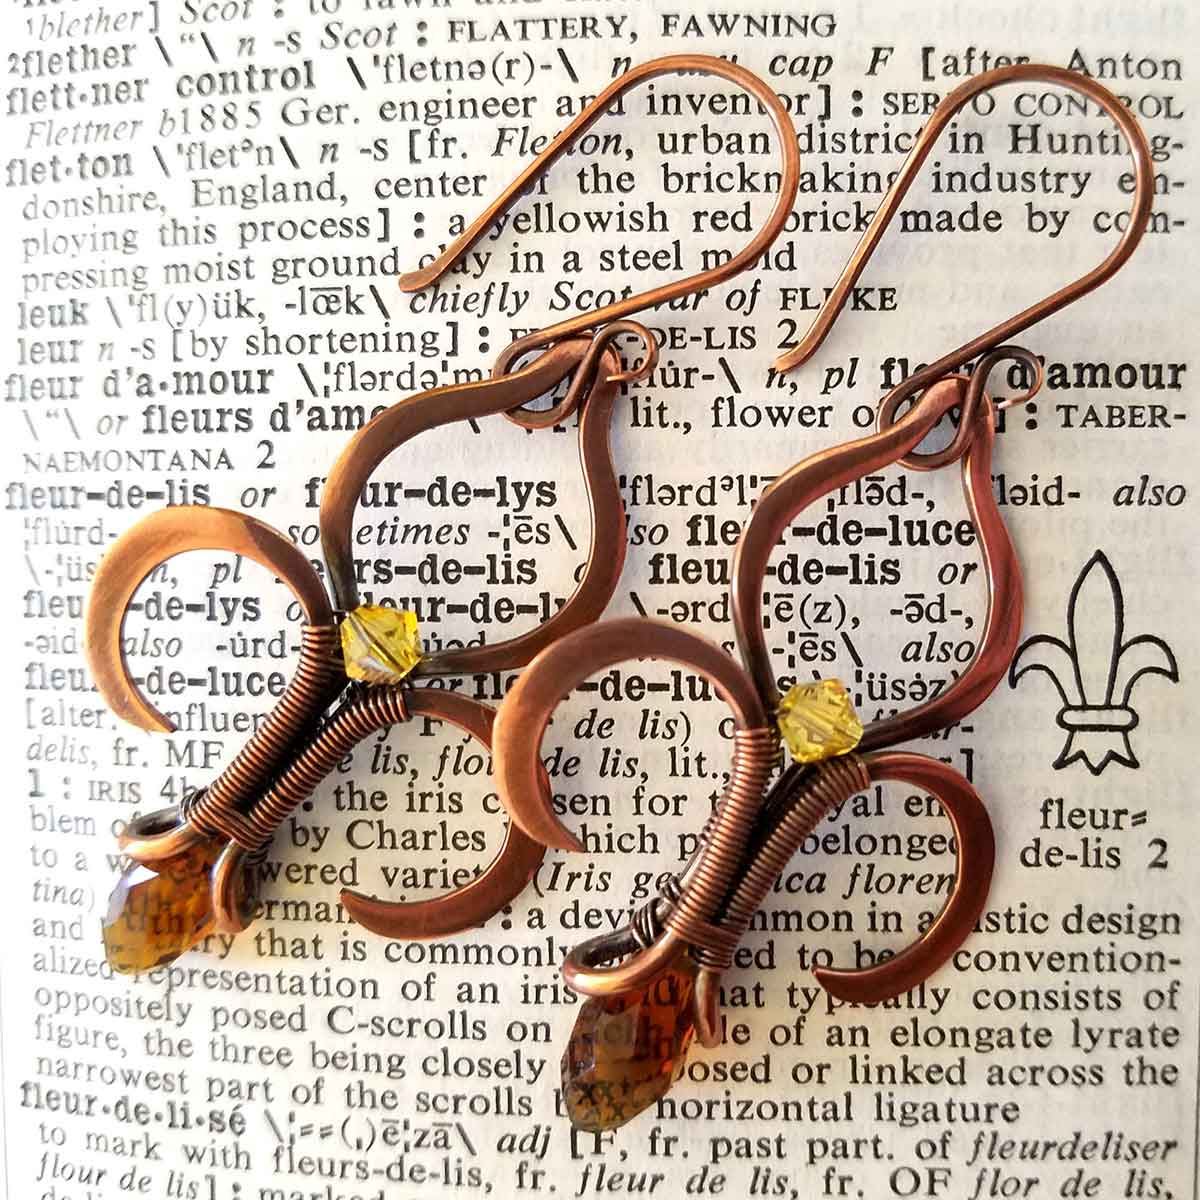
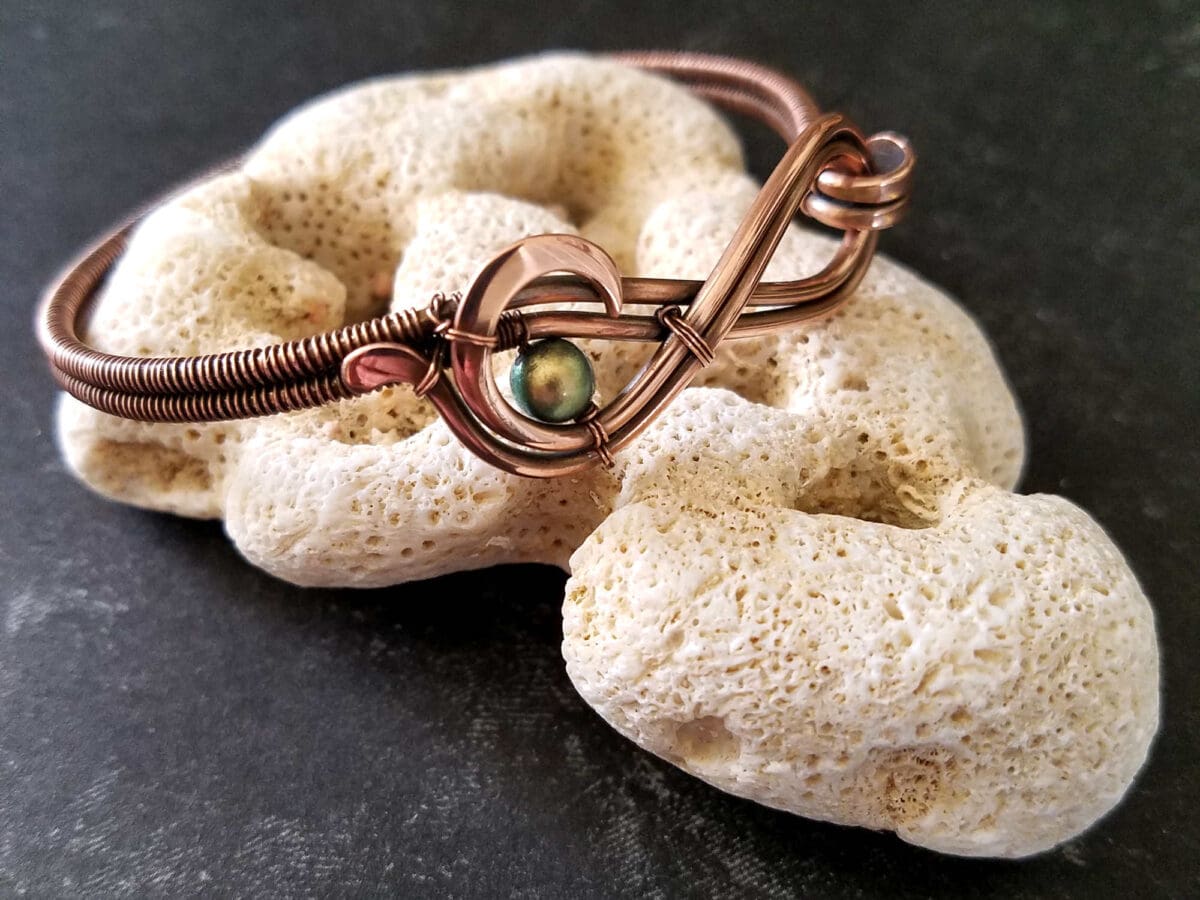
Copper Wire
This is my favorite metal. I rarely work with anything but copper. It’s not always the easiest metal to work with, though. Torch balled ends pit, and the wire will spit at you while you’re creating those balls. That’s a little unnerving when you use a torch for the first time. Copper also builds up an unpleasant fire scale, which has to be removed through an equally unpleasant pickling process. I don’t love these inescapable qualities of copper. Still, I’m drawn to this metal like a moth to a flame.
I like the way it feels on my skin. I love the color of bright new copper, and I like to watch it mellow to a warm brown tone as it oxidizes over time. It’s more interesting than silver or gold, in my opinion. I’m also more comfortable working with copper than I am with any other metal. Perhaps that’s due to the fact that I have a lot more experience with copper than with any other metal. Or maybe it’s just my metal. Maybe it has something to do with conductance or frequency resonance. I don’t know, but it’s always my first choice — to create with and to wear.
Copper is also one of just two pure metals on this list. The other one is fine silver. Perhaps the purity has something to do with my attraction to it because I also enjoy working with fine silver. That attraction doesn’t seem to be based on any sort of rational thought process. It’s clearly an emotional attachment, and that I can’t explain.
Copper wire is harder than fine silver but softer than sterling silver. I don’t care to work with sterling silver for that reason, and that’s perhaps why I make silver jewelry so infrequently. As for fine silver, it’s simply not strong enough for certain structural applications, so I find myself having to keep too many different silver wires on hand to make my jewelry in silver.
Copper is, by far, the most predictable, versatile, and functional wire I’ve found for the style of jewelry that I make. Whenever I stray from copper, I inevitably come back to it because it works better (for me) than any other metal I’ve tried.
The point I want you to take away from this is to choose the metal that you love most. The one you like to create with as well as wear. That’s the one that will be your metal, and you’ll learn to adapt to or work around any physical limitations, such as oxidizing, fire scale, or difficulty with torch balling.
Most wire weavers tend to work with either copper or silver wires. Or some combination of both.
Nickel Wire
Also called Nickel Silver or German Silver, this wire doesn’t contain any actual silver. Nickel wire typically consists of some proprietary blend of copper, nickel, and zinc. Nickel jewelry wire can be an affordable alternative to silver, but keep in mind that many people are allergic to nickel. That’s why you often see “nickel free” printed on commercial jewelry packaging.
Nickel wire is harder than copper. It’s comparable in hardness to bronze and brass wires. And it will behave much like bronze and brass wires, too. So, it will work fine for any Door 44 Studios tutorial that doesn’t require using a torch. But it won’t ball up nicely with a small torch for my Twig series tutorials. And its springy nature will also make it difficult to achieve neat and tidy weaves.
Stainless Steel Wire
Stainless Steel jewelry wire is another potential substitute for silver. The nice thing about stainless steel is that it doesn’t oxidize like the other base metals we’ve discussed so far. It’s also a preferred metal for masculine jewelry. Stainless steel wire is difficult to work with, though. It’s awfully hard on your hands.
I once made a couple of 16ga and 18ga stainless steel chainmail pot scrubbers for a friend with a large collection of cast iron cookware. Those scrubbers work wonderfully for cleaning cast iron pans, and they’re virtually indestructible. But I swore I’d never make another one after completing that custom order. My hands were stiff and sore for days following that project.
I’ve never tried to weave with fine gauge stainless steel wire but based on my past experience with this metal, I seriously doubt that it will be easy to achieve a neat and clean weave with it. Even dead-soft stainless steel wire is springy. Springy wire wants to retain its original shape, so getting it to conform to a different shape will always be difficult. Not impossible, but difficult. I’ve seen a lot of attractive stainless steel chainmail and wire wrapped jewelry, but I can’t think of a single wire weaver who uses it.
free guide
Jewelry Wire Demystified
Before you go, be sure to grab my FREE Jewelry Wire Guide for Makers. It’s a great reference to keep on your work bench, and I’ll send it straight to your inbox!
Precious Metal Wires
Precious metal wires include various types of silver as well as gold and platinum. Personally, I’ve never used gold or platinum wires, and I don’t foresee doing so in the future. Those materials are very expensive and they’re simply not my jam. I like to experiment and have fun with wire. And knowing how conservative I am when it comes to spending money on materials, I’d never be able to have fun with gold or platinum wire. They’re a bit too precious for my tastes.
Silver wire, on the other hand, is a pleasure to work with. It’s significantly more expensive than copper. But if you plan to sell your jewelry, silver might be a great choice for you. Because it has a higher perceived value than copper, you can sell silver jewelry for higher prices. And, if you price your jewelry properly, that can mean a better profit margin. If pricing is a struggle for you, I get it. So, I’ve shared five valuable insights that will help you price your handmade jewelry.
I enjoyed making silver jewelry for a while, but I used a combination of sterling silver and fine silver in my work. And I eventually found it tiresome to keep silver wire in stock because I needed to keep so much stock on hand. The more jewelry I made, the more frequently I found myself reaching for copper until I finally just stopped offering silver jewelry altogether.
The choice between silver and copper is personal. It’s going to be different for everyone. So, start with affordable copper. Then try working with silver once you’ve honed your wirework skills. At that point, you can decide which metal is right for you or for your jewelry business.
Let’s talk about the different types of silver wire that are available on the market.
Silver Jewelry Wire
There are three types of silver jewelry wire on the market today. Sterling Silver, Fine Silver, and Argentium silver which is a proprietary silver alloy made with reclaimed silver. Let’s look at the pros and cons of each type of silver jewelry wire.
Sterling Silver Wire
Sterling silver is 92.5% pure silver. Hence the designation, 925 Silver. The remaining 7.5% consists of other metals. This is usually copper, but it could also contain other metals including zinc. Because of that small percentage of other metal alloys, sterling silver behaves much like copper when heated. When forming balls, it will pit and spit, and it develops a thin, but hard, fire scale that you’ll need to remove with a pickle bath.
Sterling silver will also tarnish naturally. This isn’t necessarily a disadvantage if, like me, you tend to prefer an antiqued finish. I patina all of my copper and silver jewelry. So, I don’t mind the tendency to tarnish. What I do find challenging with this wire is its hardness. Even dead soft sterling silver is harder and springier than copper wire. This makes sterling silver unsuitable to use as weaving wire. It’s very difficult to achieve a neat and tidy weave with small gauge sterling silver. So, I use fine silver wire for weaving when I make silver jewelry. Fine silver is much more pliable, so it weaves beautifully. The springiness of sterling silver wire can be an advantage from a purely structural standpoint, but it is a bit more difficult to form than copper wire.
Here’s another problem I have with silver jewelry wire. When you use both sterling silver and fine silver in the same piece of jewelry, how do you determine the silver content? Many customers want to know the purity of silver and gold jewelry. That can be difficult to determine for a piece that uses both pure (fine) silver and a silver alloy (sterling silver).
These two cons are in addition to the complication I mentioned earlier about keeping silver wire in stock. I often use my weaving wire to support a bead by threading that wire through the bead multiple times. This works well with 28ga or even 30ga copper wire because it’s strong enough to support the weight of small beads. Fine silver isn’t strong enough, though, so I found that I needed to keep small gauge sterling silver wire on hand to use in those instances. This added extra steps to my fabrication process and extra wire gauges to keep in stock in my very limited storage space.
These are obviously my own personal reasons for choosing copper over silver, but they’re also things you need to take into consideration. Think about what your goals are as a jewelry maker, and consider these factors as you decide which metal(s) you want to work with most.
Fine Silver Wire
This metal is 99.9% silver, so like copper, it’s a pure metal. Fine silver is kind of awesome to work with. It feels like butter in your hands, and it’s almost endlessly malleable. This wire also balls up beautifully with a torch. It doesn’t develop a fire scale, and it’s naturally resistant to tarnish. But even fully work hardened fine silver isn’t as hard as half-hard copper straight off of the spool. So it’s definitely not an appropriate metal to use for structural forms.
This is why most silver wire weavers use sterling silver for core wires and fine silver for weaving. I recommend that you do the same when making my designs in silver. I understand the appeal of silver jewelry, and I even enjoy wearing silver jewelry on occasion. But I don’t enjoy making silver jewelry.
Again, this is my personal preference. You may love working with silver wire, so don’t let me keep you from trying it. You should really work with as many metals as you can get your hands on before you decide which one(s) you want to focus on in your creative hobby or business.
I tend to look at the materials I choose in terms of ROI, and silver is a low ROI for me. It requires a larger investment in inventory and time, and I ultimately don’t get as much pleasure out of working with silver as I do when working with copper. That’s really what it boils down to for me.
Argentium Silver Wire
Argentium silver is a proprietary silver alloy that falls somewhere between sterling silver and fine silver in terms of purity. This is an unusually bright white silver that resists both tarnish and fire scale. It balls beautifully with a torch, much like fine silver. It’s also stronger than fine silver, but not as springy as sterling silver.
This is a metal that I’ve not worked with much. I’ve never tried using it for core wires, so I don’t know if it would be a suitable substitute for sterling silver in that regard. That may depend on which grade of Argentium wire you choose. There are two grades: 93.5% silver and 96% silver. The 935 grade Argentium is probably closer to sterling silver in terms of strength and hardness while the 96% is closer to fine silver in those same terms.
Argentium silver can also be heat hardened, so it may be a suitable substitute for sterling and fine silver if you have access to a kiln. I don’t have the space for a kiln presently, but knowing that Argentium can be hardened makes it an intriguing possibility that I plan to explore just as soon as I have a dedicated studio space.
Rio Grande provides some very useful resources on this metal. Start with this fact file, and then take a look at some of their other Argentium silver resources. Just go to their Resource Center and type ‘Argentium silver’ in the search bar.
Filled Jewelry Wire
Filled wires are an affordable alternative to solid precious metal wires. Silver filled wire can be a suitable alternative to sterling silver wire. You’ll also find several shades of gold filled wire. 14k gold filled wire seems to be the most common. You may have to shop around to find other grades.
This jewelry wire gets its name from the fact that the core of the wire is a different metal than the outer layer. So silver or gold filled wire is ‘filled’ with a base metal core (typically brass or copper). Filled wire differs from a plated wire in the thickness of the precious metal surface layer.
Filled wires come in at least two different grades: 1/10 and 1/20. These fractions refer to the overall thickness of the precious metal layer. Hence, that layer is either 1/10th or 1/20th of the weight of the wire. 1/10 filled wire contains twice as much silver or gold as 1/20 filled wire. That means it costs more. But it’s also going to be more versatile because of the thicker layer of precious metal.
That being said, I don’t recommend filled wire for my tutorials. You can lightly hammer and texture the body of filled wire. But paddling the ends will inevitably expose the base metal core. And that base metal will tarnish whereas the precious metal may not. This is the biggest problem that I see with using filled wire in my style of wire weaving. It will inevitably result in an uneven finish over time.
Plated, Enameled, Anodized, or Coated Craft Wires
Like filled wire, these wires have a base metal core that’s coated with a very thin layer of precious metal, metallic color coating or glass-based paint. The surface layers of these types of wire are much too thin and fragile for most wire weaving applications. Enamel and poly coatings will crack and chip away while anodizing and plating can be easily scratched. These surface layers are so thin that the slightest scratch will expose the base metal and hammering will completely destroy the finish.
Wires that fall under this category often have terms like ‘tarnish resistant’ and ‘color’ (as in gold color or silver color) in their product descriptions and on packaging labels. Also, don’t be fooled by wires that say ‘bare copper’. If that wire is an unnatural copper color like hot pink or navy blue, it’s not bare. It’s enameled.
All of these wires fall squarely under the craft wire category. As such, they’re not suitable for my style of wire weaving. You won’t be able to achieve satisfactory results for any of my designs using craft wire. I do know of some amazing wire weavers who use these types of wire successfully. So craft wire can certainly be used for some styles of wire weaving. Just not my style.
Sadly, these types of wire are the only kind that you’re likely to find in your local craft store. And that leads to a lot of frustration for beginners who buy wire that seems like it should work well for wire weaving, only to find out that it’s not suitable for that particular application. I wish the big box stores would sell solid bare jewelry wires as it would make my job so much easier!
Beading Wire
This highly flexible wire isn’t a single wire at all. Beading wire consists of multiple strands of superfine wire twisted or braided together. The multi-strand wire is often encased in a plastic sheath. If you’ve ever seen aircraft cable at the hardware store, beading wire is essentially a miniature version of that.
This wire is designed specifically for bead stringing, and it must be secured with crimp beads. It’s not suitable for wire weaving.
Memory Wire
Memory wire gets its name from its ability to retain its shape. This is the hardest jewelry wire on the market. It’s made of spring hardened steel, which is great for simple bead stringing projects but completely inappropriate for wire weaving. The only exception I can think of might be if you wanted to use a fine gauge weaving wire to wrap beads onto a memory wire core. That’s about the extent of what you can accomplish with this type of wire in a wire weaving context.

Tool Tip!
Never attempt to cut memory wire with your regular wire cutters. It will absolutely destroy your cutting jaws. Most jewelry wire cutters are designed to cut non-ferrous wires (copper, silver, brass, and bronze). You need special shears to cut steel memory wire. You’ll find them anywhere that sells memory wire, including your local bead shop, Wal-Mart and most big box craft stores.
Summary
This turned out to be a long article with a lot of information to absorb. So, let’s review it quickly. I put jewelry wire into three categories:
- Solid jewelry wire
- Filled jewelry wire
- Coated craft wires
Solid wire is the only type that’s suitable for the Door 44 style of wire weaving. The chart below lists the pros and cons for the various solid jewelry wires you’ll find on the market today. Solid wire is best purchased through a specialty supplier such as Rio Grande, if you’re buying in bulk. Or for smaller quantities, Creating Unkamen.
Filled jewelry wire and plated, enameled, poly coated, or anodized craft wires are better suited for styles of wire weaving where the cut ends of the wire are always hidden.
Additionally, I discussed wire hardness. Jewelry wire comes in three degrees of hardness:
- Hard
- Half-hard
- Dead soft
Hardness can easily be changed through work hardening or annealing. Annealing can either harden or soften wire, depending on how (and for how long) heat is applied to the wire. Most wire weavers anneal wire in order to soften it, and they harden wire by working it.
Every type of wire has a breaking point. It’s important to be familiar with the kind of metal you’re working with so you know when you’re nearing that point. All wire will harden up to the breaking point, and then it quickly becomes brittle. Overworked wire breaks very easily. You can use this characteristic to your advantage when finishing off your weaving wire.
Finally, there are two other kinds of wire used for making jewelry. Beading wire is a very flexible multi-strand wire, sometimes encased in a plastic sheath. Beading wire is used primarily for bead stringing and must be finished with crimp beads.
Memory wire is a spring hardened stainless steel wire that is also used mainly for bead stringing. This is the hardest of all jewelry wires on the market today, and it requires special shears to cut it. Never cut memory wire with your regular wire cutters.
Recommended Post
Now that you’re familiar with the different types of jewelry wire on the market, the next question is often, which wire gauges should I use?
I can help answer that question as well. Be sure to check out this post to learn which wire gauges are used for the three major style categories of wire jewelry.
Discover More Behind Door 44
Thank you for joining me today. I hope you found some useful information in this post. If not, let me know what I can do better to serve you. If so, share this post with your fellow jewelry makers.
Want more great wirework tips?
I like to share useful wire weaving tips and tricks on my social media channels, and we have some great conversations about wire jewelry in my private Facebook Group. Also, be sure to connect with me @door44studios on Instagram, and Facebook to keep up with everything that’s happening behind Door 44. And if you haven’t already done so, be sure to subscribe to my YouTube channel where you’ll find new wire jewelry videos weekly.
Until next time, go make something beautiful!

free guide
Jewelry Wire Demystified
Before you go, be sure to grab my FREE Jewelry Wire Guide for Makers. It’s a great reference to keep on your work bench, and I’ll send it straight to your inbox!
Pin this Post for Later
I Thank you for the explanation
You’re very welcome! Please let me know if you have other questions I can address in a blog post. I’m always happy to get feedback from my readers.
Thank you very much for this valuable information. God bless you. Kelli
You’re very welcome, Kelli. Thanks for stopping by Door 44 Studios!
Brilliant article for a beginner like me…so glad i found you Wendi behind Door 44 – thank you
I’m glad you found me, too. And it’s always good to hear that this article is helpful. Welcome to Door 44! 😊
Thank you for this very informative article. I love your style and am going to give a try😊
You’re very welcome. Have fun!
Great information, thank you
My pleasure. Thanks for reading!
I have a question regarding copper wire. I am looking to purchase some, but I see a price difference between craft stores and jewelry supplies stores. Is there a reason? Is there any reason, quality differences? Even more with electrical pure copper wire. Could I use electrical wire? Thank you!
That’s a great question, Emilie! There is a difference between the copper wire that you see at craft stores and that you see at jewelry suppliers. Craft stores sell craft wire almost exclusively. That means the copper wire that you’ll find there has some type of coating on it. It’s either plated with silver and then coated with a colored finish to make it look like bright or aged copper. Or, it’s simply copper wire that’s been coated with an anti-tarnish finish, which is a clear poly coating that seals the surface and delays tarnishing. The problem with craft wires is that those coatings have a limited lifespan. And once the finish begins to fail, there’s no way to restore it.
The raw copper wire that you’ll find through a reputable jewelry supplier, like Rio Grande, is pure copper without any type of coating. So, that wire can be annealed, soldered, hammered, and formed. And because it’s uncoated, the finish can be restored with basic polishing techniques indefinitely. So, the difference between craft wire and raw, uncoated jewelry wires is basically the difference between costume jewelry and heirloom-quality jewelry that can be passed down through generations.
You can absolutely use electrical wire. That wire is also typically raw, uncoated wire. Even though it’s most often insulated with a rubber or plastic sheath. The trouble with electrical wire is that it comes in a limited range of gauges and it does require lots of extra effort to remove the plastic sheath and separate the individual wires when using the multi-strand wires that are typically used for electrical work. Electrical wire is also typically harder than the dead-soft wire you can purchase from a jewelry supplier. So, you’ll also need to anneal it in order to make it workable for making intricate jewelry.
So, yes. Electrical wire is definitely an option. And you can pick it up very inexpensively by going to your local metal recycler and buying it by the pound. Just be aware that using recycled wire, although inexpensive monetarily, comes with a very high cost in terms of the time and effort you’ll need to put into preparing that wire for making jewelry. You’ll have to sort it, strip off the plastic sheath, separate the individual strands of braided wires, anneal those wires, and then pickle them to remove the fire scale before you can even begin using that wire for a jewelry project. You’ll also be gambling on which wire gauges you’re going to get because recycled electrical wire can contain anything from 8ga to 28ga, and you really won’t know what you’ve got until you’ve stripped away the sheath.
I understand the hesitation to buy wire directly from a reputable jewelry supplier. It seems like a lot of money to spend initially. But the truth is that a 1-pound spool of wire will last a VERY long time. Unless you’re producing a ton of jewelry for sale, it’ll easily take you a year or more to use up an entire spool of most wire gauges. The gauges I buy most frequently are 18ga, 20ga, and 28ga. And I buy those maybe once a year at my current rate of jewelry production. So, that’s like $75 a year invested in wire for endless hours creating. That feels like a bargain to me. So, try to put the cost of wire in perspective. What’s more valuable? Your time or the dollars spent on supplies?
And if that doesn’t work, let’s do the math. A one-pound spool of 18ga wire from Rio Grande runs about $24 and it contains 202 feet of wire. So, that wire costs about $.12/foot, which is very inexpensive. You won’t find electrical wire at your local hardware store that will even come close to that. A spool of 28ga wire costs the same amount as the 18ga wire because it’s priced by the pound, but it contains 1,990 feet of wire. So, that gauge comes in at a whopping price of $.01/foot!
I get that the up-front cost feels high, but can you see now how much more affordable it really is to buy your wire from a reputable jewelry supplier? What I suggest is to buy a spool of 18ga, 20ga, and 28ga initially. Then save some money and buy two or three more gauges at a time until you have a full spectrum of wire gauges from 12ga to 30ga. Once you’ve built up that inventory, you’re going to find that you rarely need to replenish wire. You’ll spend much more money on beads and gemstones than you’ll ever spend on wire. I promise!
Hi Wendi! I’m a newbie and I want to make a byzantine chainmail bracelet. I too want to keep my costs low in tools and materials. I’m unsure of what metal to purchase. I would like a metal that will hold up well over time, handle water, life events etc. and a metal with a brass like color. I don’t ever intend to take this bracelet off. What is your recommendation? I am willing to change the color if necessary, but I am partial to a brass color or black.
Hi, Jackson. A metal that will hold up well over time, handle water and everyday wear and tear with a brass-like color is a pretty tall order. Both brass and copper are likely to develop a green patina with frequent exposure to water. Bronze is a possibility, but I’ve never worn any bronze jewelry long enough to know how well it will maintain its color over time. I suspect it might turn green, too. Or it will darken to a deep brown/black, which may or may not be exactly what you want.
The beautiful thing about wearing any sort of wire jewelry daily is that it does tend to take on a very warm satin finish due to the constant contact with your skin. So, it’s just a matter of choosing a metal that will retain the color that you’re after. Based on your particular criteria, I would recommend investing in sterling silver for that bracelet. You can blacken silver with the same Liver of Sulfur patina that I use to antique copper. But instead of brushing the high spots to bring back some bright silver highlights, you can just toss it straight into the tumbler totally blackened. It will come out with a high-shine black finish that typically ages well and is easy to maintain. It also won’t stain your skin with constant wear, and it won’t develop the green patina that copper or brass will develop with exposure to moisture.
I made a sterling silver chainmail choker for a co-worker fourteen or fifteen years ago. He also wanted a black finish, so we blackened it with LOS and, as far as I know, he’s still wearing that chain daily without losing the blackened finish. For a gold finish, I would recommend gold filled wire in this instance. I generally steer clear of filled wires for wire weaving because I do a lot of hammering, which can expose the brass core and create potential finish issues down the road. But gold filled wire is perfectly acceptable for chainmail since the cut ends of the wire aren’t exposed.
If you plan to purchase rings for this project, be sure to check out https://urbanmaille.com/. They make the highest quality chainmail rings I’ve ever found. They stopped selling copper years ago. They only sell precious metal rings now, but if you choose to go with gold-filled rings, it will probably be more economical to buy enough premade rings for your project than it will be to buy wire and make your own rings.
Hi Wendy!
I’m new a jewelry making, and am searching for a tarnish resistant wire, that is cost efficient, has low allergy rate, won’t flake or expose the base metal, but isn’t considered “cheap”. I don’t want my jewelry to be thought of as poor quality. Do you have any recommendations? Right now I’m using silver and gold filled to wrap my pendants with, and genuine for earring hooks.
Also, looking for what i can use for spacer beads instead of genuine. It’s so expensive. I had a friend that suggested pewter for spacer beads instead of genuine. Do you have any info on pewter? What do you think about it? Thanks Wendy!
Hi, Emily,
That’s a very tall order. Based on your criteria, silver and gold filled wires are going to be your best best. So, I would recommend sticking with filled wires. Both fine silver and Argenteum silver are considered “tarnish resistant.” Sterling silver is less tarnish resistant because of its copper content, but sterling is going to be your best bet for ear wires because of its strength. You can also use gold-filled wire for ear wires.
As for spacers, the trouble with pewter is that you have to be super careful about lead content, and a lot of manufacturers and wholesalers who sell pewter beads aren’t very forthcoming with alloy specifications. And you’ll also have trouble matching the finish between your wire and pewter spacers. So, again, I’d recommend sticking with genuine silver (you can opt for sterling in this case as well) or gold-filled beads that will more closely match the finish of the wires you’re using.
If you’re planning to sell your jewelry (and it sounds like you are), you just have to take the price of those higher-end materials into consideration when you price your finished jewelry. Most educated shoppers who appreciate handmade jewelry expect to pay more for silver and gold than for copper or brass jewelry. So, that’s usually not a problem. But, as a new jewelry maker, you’ll also need to make sure that your craftsmanship is on par with those higher priced materials because people are generally unwilling to pay higher prices for poor craftsmanship, regardless of the quality of the materials. That’s why I always recommend that beginners start out with solid base metals until they reach a level of mastery that justifies the elevated pricing necessary for precious metals.
I hope that helps! I know it’s probably not the answer you were hoping for, but this is one of the biggest dilemmas for all new jewelry makers. You’ll burn through a ton of material as you hone your craftsmanship, and that can be very expensive if you’re committed to using high end materials. A lot of makers use copper for prototyping and perfecting their designs, and then they’ll switch to silver or gold for their production pieces. So, that’s an option for you as well. But at this early stage in your career, you do need to figure out how to balance your material choices with your skill level.
Personally, I’m a details person. The first thing I notice about jewelry is the craftsmanship. And I’m far more likely to buy a beautifully-crafted base metal piece than a poorly crafted precious metal piece. Based on my experience selling my own jewelry, I suspect most handmade jewelry shoppers feel the same way because I never had trouble selling copper jewelry, even though copper is often perceived to be a “poor quality” material.
Thank you for your time and explanation you provided. Great info. What is the best quality beading wire you recommend? I make my own beaded bracelets and want to make something that will last longer and be more durable than the rubberbands I am currently using.
I don’t use a lot of beading wire, but the best stuff is the braided wire styles of beading wire. That type requires the use of crimp beads, but it’s also, by far, the most flexible and durable style of beading wire on the market. It’s basically miniature aircraft cable, which is ridiculously strong. I can’t recommend a particular brand because it’s been so long since I’ve bought beading wire, but look for the phrases, “braided wire” or “stranded wire” in the product descriptions.
You’re so welcome! Thanks for stopping by my blog. 🙂
This is the best breakdown and description of jewelry wires I ever found. Incredibly well written. I finally understand the difference from a real-world perspective! I have a lot to consider as a new jewelry artist breaking into the business.