

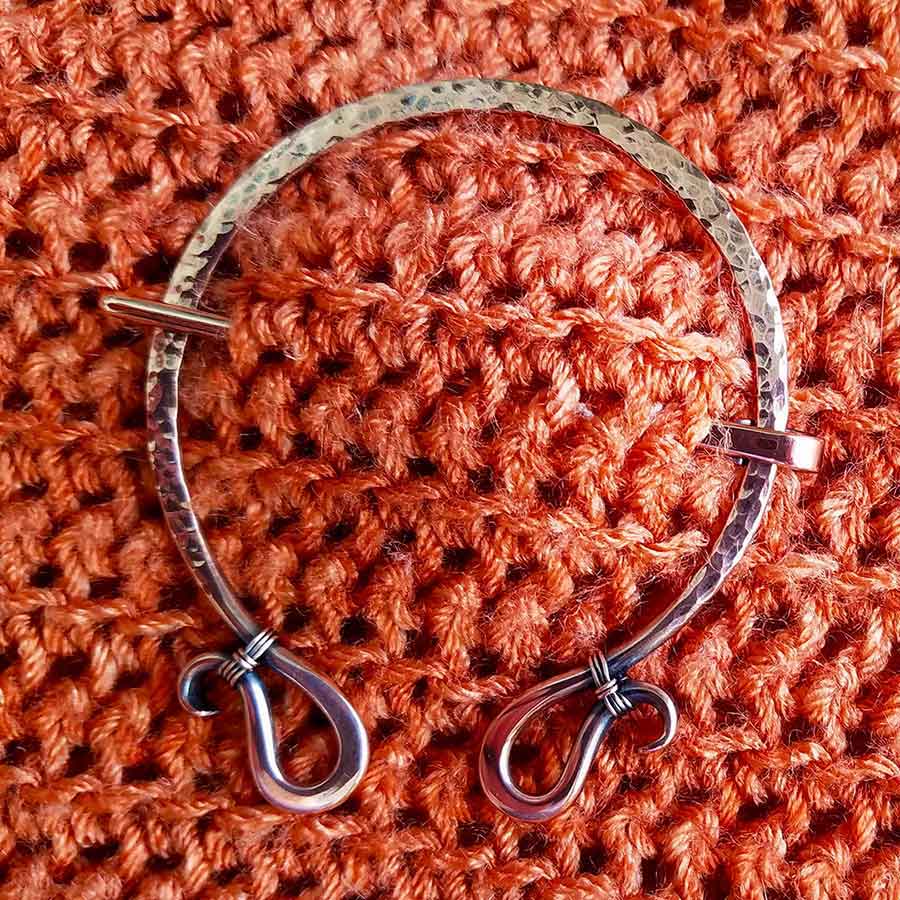
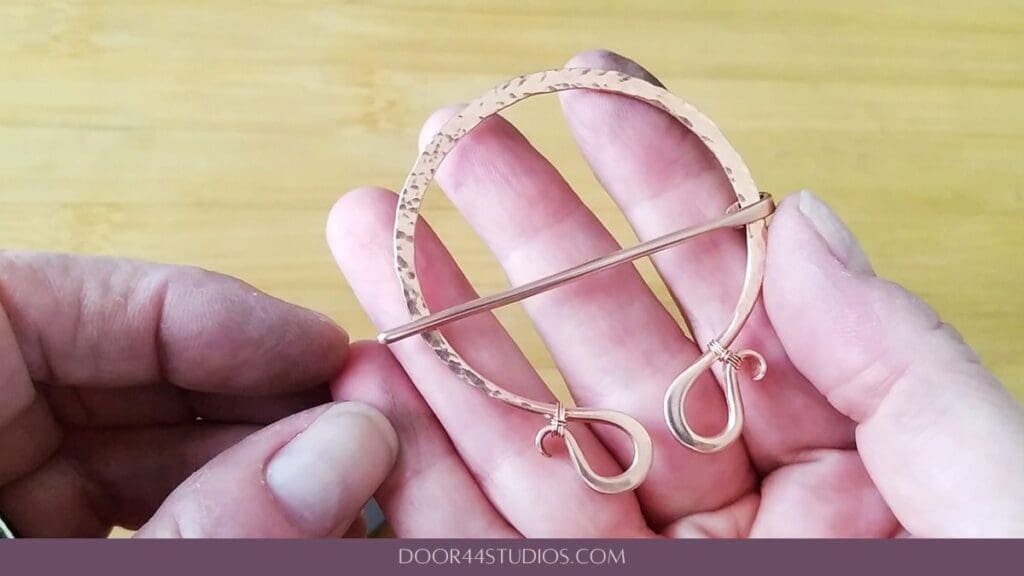
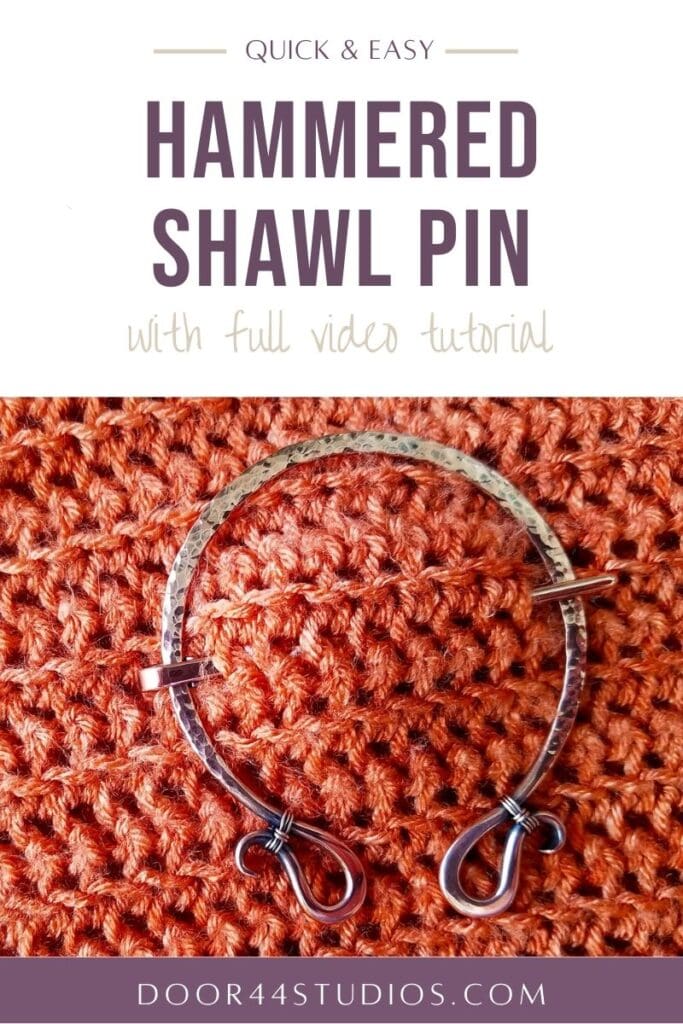
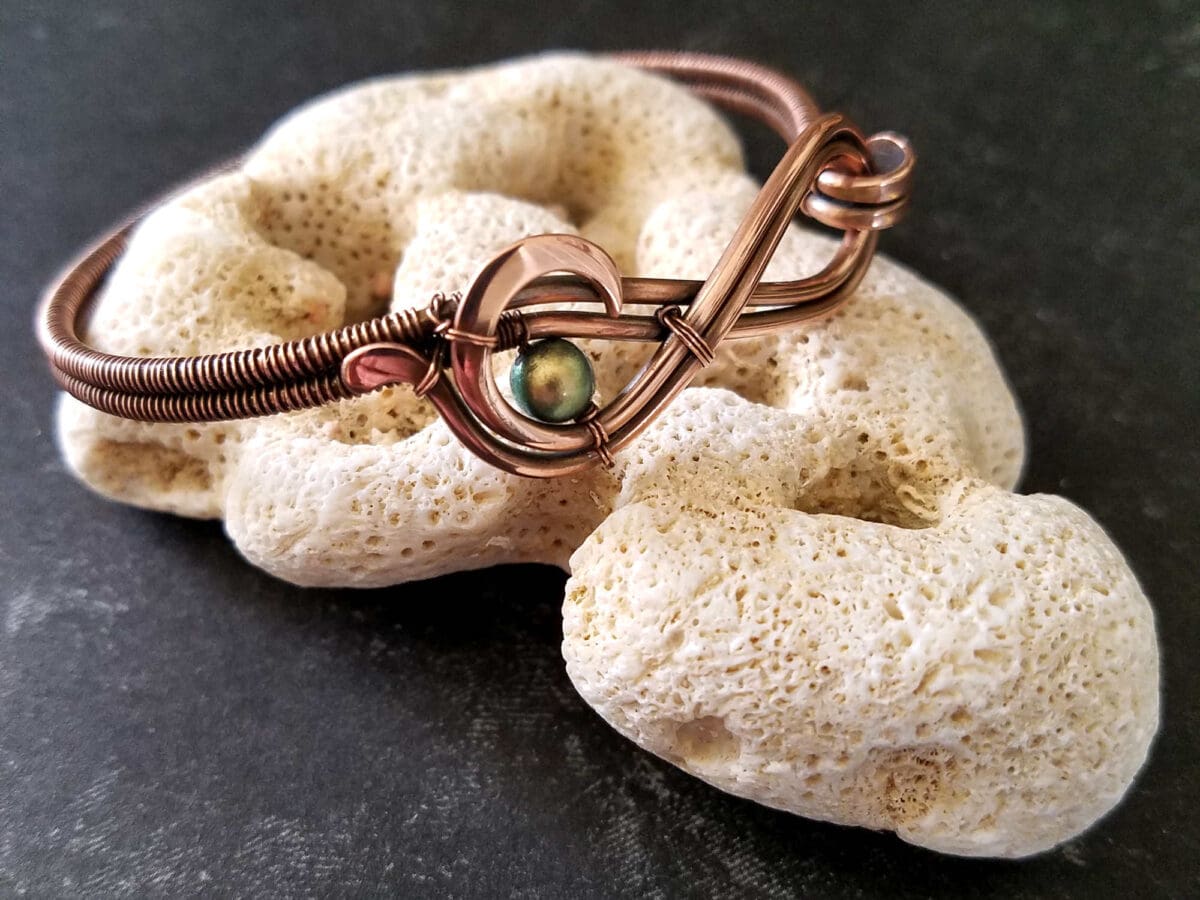
Quick & Easy Hammered Shawl Pin
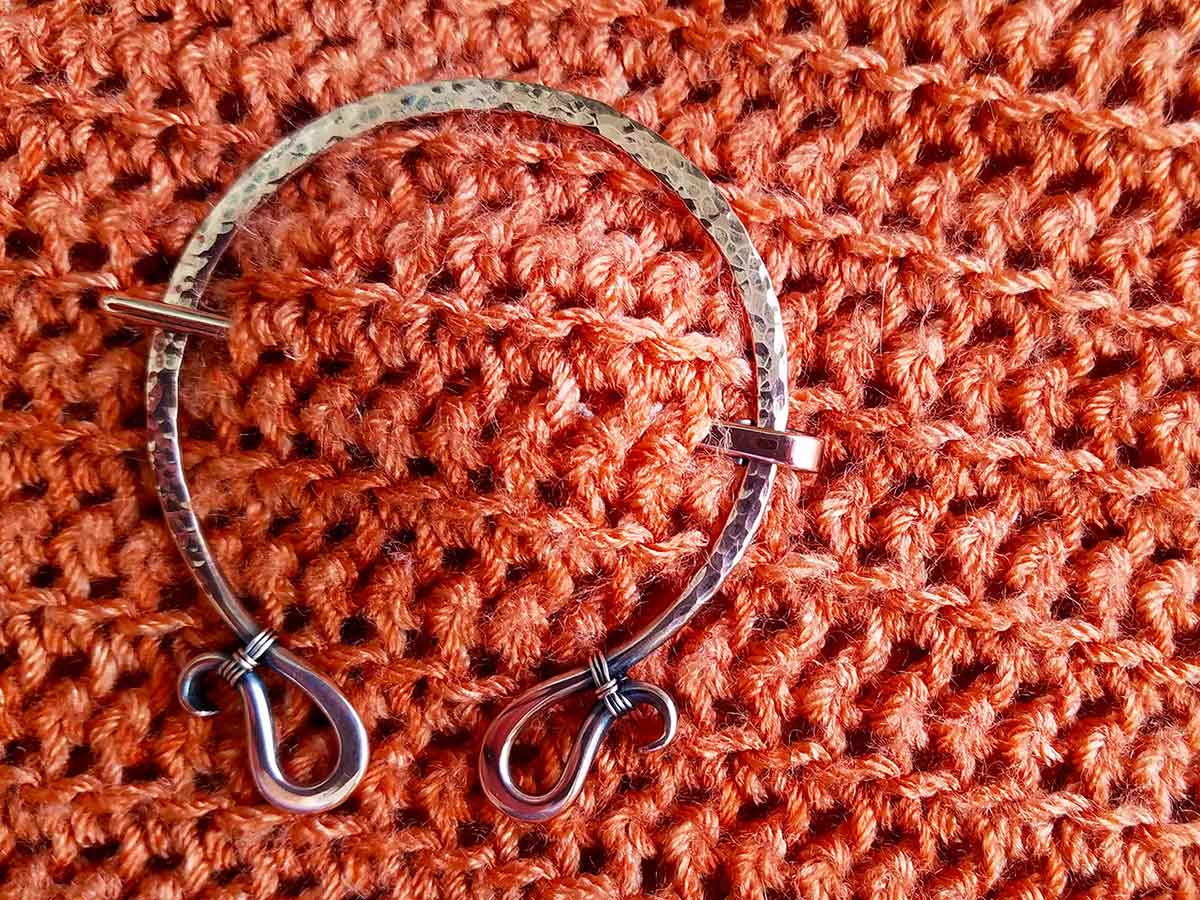


There’s something so classic and timeless about hammered copper. It’s one of those finishes that never seems to go out of style. And it’s surprisingly easy to achieve once you’ve mastered some basic chasing hammer techniques. So, today we’re going to make a quick and easy hammered shawl pin that’s safe to wear with handmade garments. I’ll even show you how to get a smooth, refined finish that won’t snag delicate handmade fabrics.
This pin is a Celtic penannular-style brooch, and the texture is the main feature. So, I’ve kept the design super simple. But the beauty of this design is that it will make a wonderful foundation for more complicated pieces as well. Feel free to layer in some additional wires or add some weaving to create a more complex brooch.
Let’s get started!
Copyright & Disclosure
You’re welcome to make and sell products from this tutorial. When it comes to my written tutorials, however, I reserve exclusive rights to all images and written content. You may not reproduce or redistribute any portion of this tutorial in any way, shape, or form.
This copyright applies to the printable PDF version of the Quick & Easy Hammered Shawl Pin tutorial as well. You may share the free version of this tutorial only by linking directly to this page.
This post may contain affiliate links. If you click on a link and then make a purchase, I may earn a small commission (at no cost to you). As an Amazon Associate I earn from qualifying purchases. To learn more, please see my full disclaimer.
Skill Level: Beginner
This is a basic wirework project that can be achieved by someone who has never worked with wire before.
Because there’s a full video tutorial for this pin, I don’t go into a great detail here on the blog. Experienced wireworkers will have no trouble following along with this abbreviated written tutorial. If at any time you get stuck, be sure to watch the video tutorial here. Or be on the lookout for the much more detailed written tutorial, which will be available soon.
Getting Started
For best results, use solid copper, sterling silver, brass, or bronze jewelry wire. We’ll be working with heavy wire gauges in this project. So, I recommend using dead soft wire for the frame wires. You can also use half-hard wire, if that’s all you have available. But you may find that you need to anneal half-hard wire if you have trouble forming it.
Because we’ll be doing a lot of hammering and shaping in this project, I do not recommend using filled wires. Anytime you hammer the ends of filled wires, you run the risk of exposing the center core wire. That can result in discoloration or an uneven finish, which will become more apparent over time.

Tools & Materials
- 9 inches of 12ga Dead Soft Copper Wire
- 10 inches of 26ga Dead Soft Copper Wire
- Heavy Duty Wire Cutters
- Stepped Bail-Making Pliers
- Chain Nose Pliers
- Needle File
- Chasing Hammer
- Bench Block
- Sandpaper
- Ruler
- Fine Point Permanent Marker
- A 1-3/4-inch (4.45 cm) mandrel – Any round object that you have around your house will work. Things like spice jars or large pill bottles work well.
Finished Size
- WIDTH: about 2-1/4 inches (5.72 cm)
- LENGTH: about 2-1/4 inches (5.72 cm)
Instructions
If you prefer video tutorials or if you’re very new to wirework, watch the detailed video version below. Otherwise, keep reading for the abbreviated written tutorial.
The following instructions are written for the 2-1/4-inch brooch that I demonstrated while writing this tutorial. You can modify the size of your brooch by changing the cut lengths of wire and the mandrel diameter. For the sake of longevity, I do recommend using the heaviest gauge of wire that you’re comfortable forming. 12ga or 14ga wire works best.
Prep Wire for the Main Part of Your Pin
Measure and mark 7.5 inches (19.1 cm) of 12ga wire. Then cut your working wire from the spool. Be sure to use heavy duty wire cutters for this step. 12ga wire is much too thick for a standard pair of jewelry wire cutters.

Tool Tip: Always use the right tool for the job, and this is particularly true with wire cutters. A standard pair of jewelry wire cutters is typically rated to cut up to 16ga non-ferrous, dead soft jewelry wire. That includes things like copper, sterling silver, brass and bronze wires. Steel wire is ferrous (it contains iron). So, it’s much harder than non-ferrous wires. Never cut any type of steel wire (stainless, blackened steel, memory wire, etc.) with your standard wire cutters. Also, avoid cutting wires that are are thicker than 16ga. Doing so will destroy your wire cutters.
The heavy duty wire cutters that I’ve linked to in this post will cut most types of steel wire as well as thicker non-ferrous wires comfortably.
Next, use your chasing hammer and bench block to paddle both ends of your wire, as shown below.
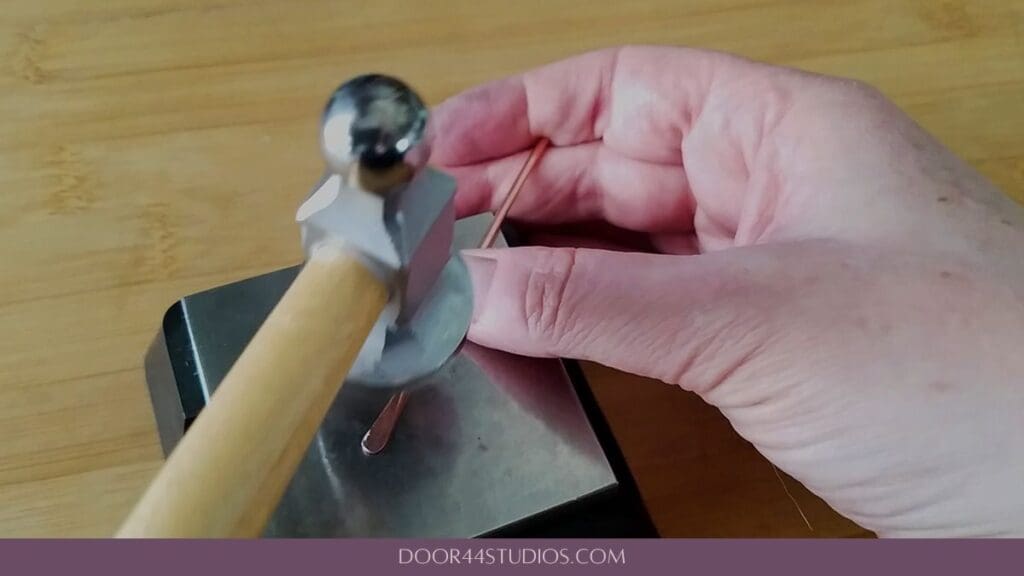
If you don’t know how to paddle the ends of wires, check out Part 1 of my chasing hammer series. I also encourage you to download the chasing hammer planishing guide (file #104) from my resource library. My library is filled with helpful resources, which are free to everyone who subscribes to my newsletter.
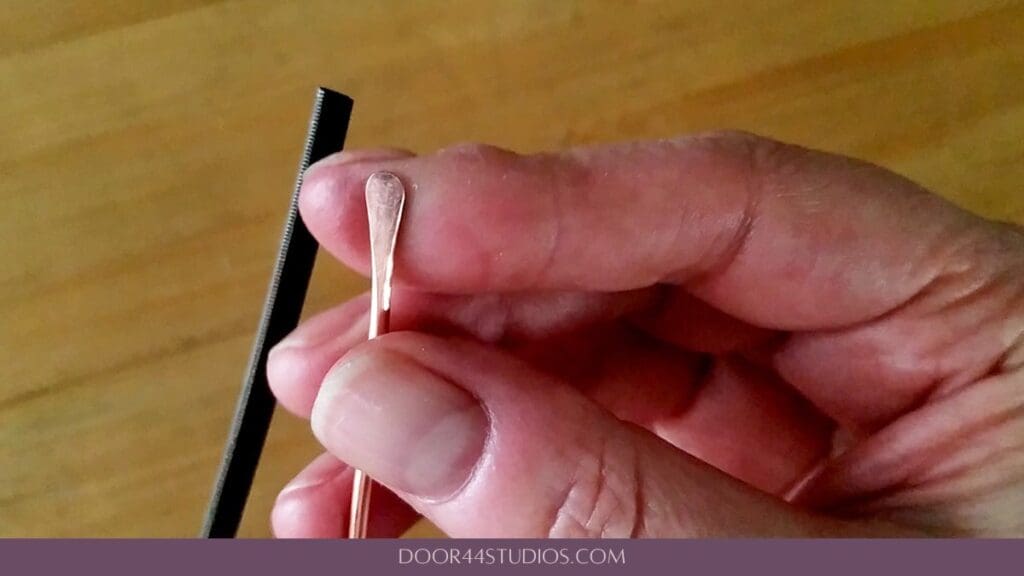
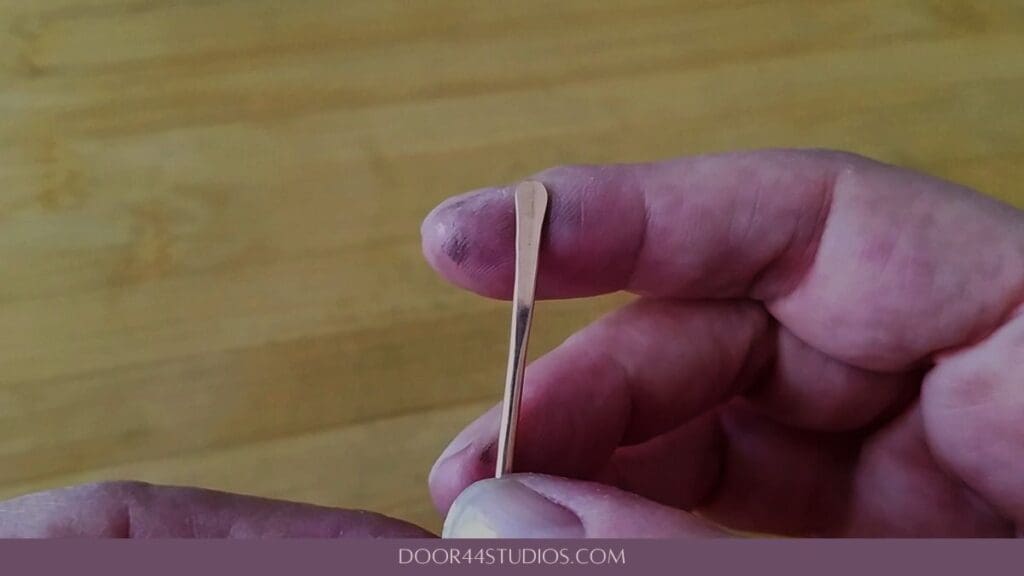
After paddling both ends of your wire, we need to smooth and shape those paddles a bit. Use a needle file to smooth off any rough edges and to refine the rounded shape of your paddled ends. When finished, the paddles should look something like the one shown below.
Form the Scrolled Ends of Your Circlet
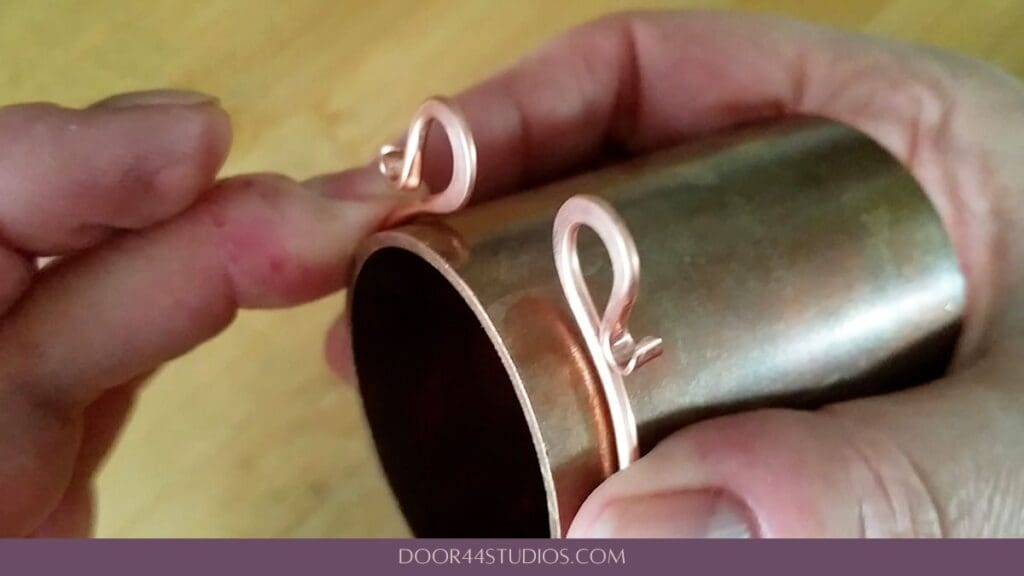
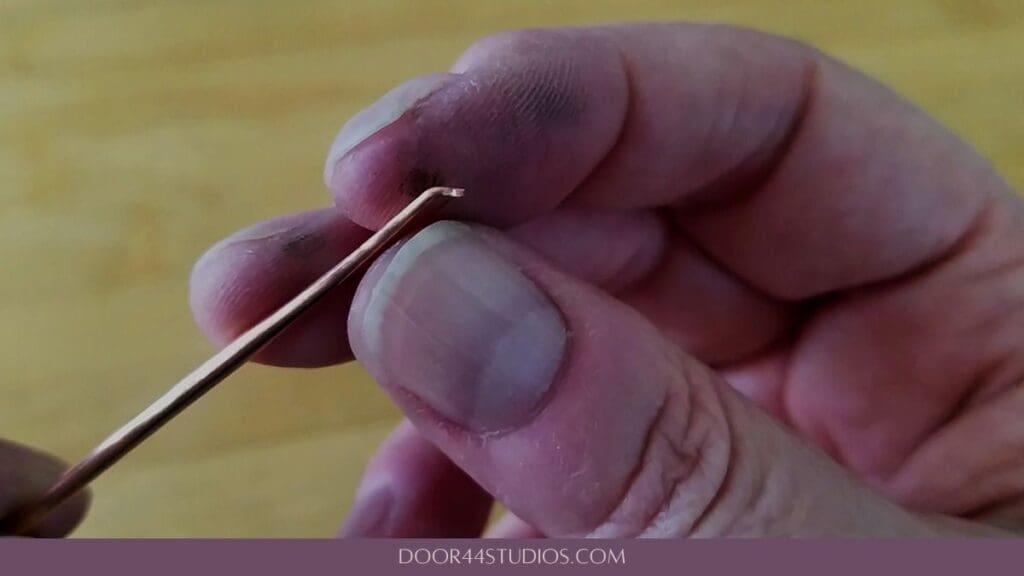
Locate the 3mm step (the second smallest) of your bail-making pliers. Then use that step to form a partial curl on each paddle, as shown. Make sure the ends curl in toward each other. It’s important to keep the curls on the same plane of the wire.
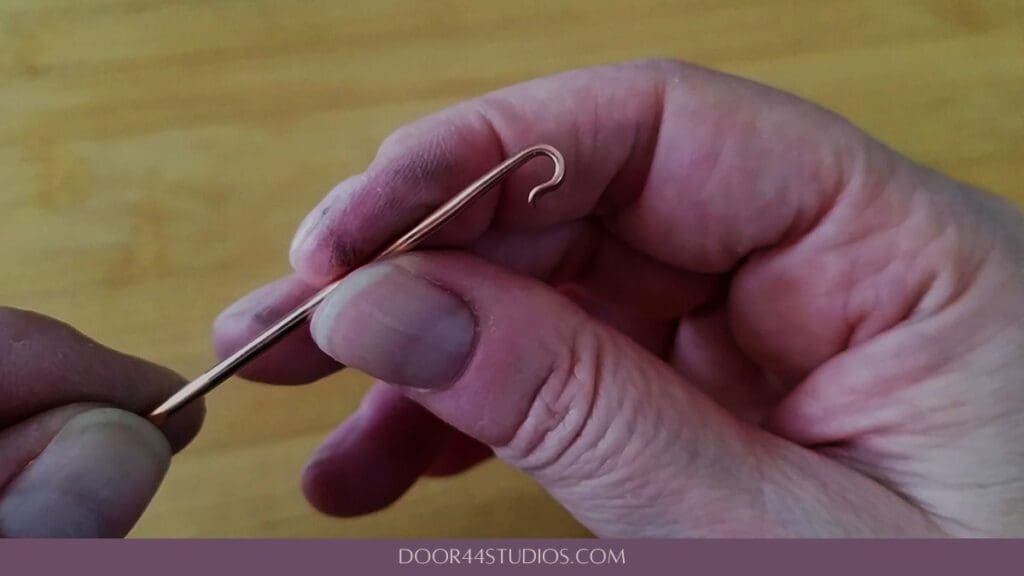
Next, we’ll use the 6mm step (the 4th smallest step) of our bail-making pliers to finish forming the curled ends. Position your wire between the 3rd and 4th steps of your pliers. Make sure the curled end is resting on the smaller step, as shown below.
Then roll your wire tightly around the 6mm step until the curled end touches the wire shank. Repeat on the other side of your wire. When complete, the scrolled ends of your circlet should look something like those shown below.
Now that we’ve formed the basic shape of the ends of our wire, we’ll add some dimension. Use your chasing hammer and bench block to carefully flatten the larger curl on each end. Use your thumbnail on your non-dominant hand to protect the smaller curl from your hammer. Also, make sure you’re hammering on the same side of the wire on each curled end. This will minimize any tool marks that need to be removed later. Once finished, both ends of your wire should look something like the image below.
Shape and Texture the Circlet
At this point we’re finally going to shape our wire into the circlet piece of the finished pin. You’ll need some sort of mandrel with a diameter of around two inches for this step. I use a 1-3/4-inch copper plumbing union, but you can use a round bracelet mandrel, if you have one. If not, look around your house for something you can use as a mandrel. Pill bottles, spice jars, and rolling pins are all items that will work well for this project.
Press your wire around your mandrel to form the circlet, as shown below.
Next, use your chasing hammer and bench block to evenly flatten the wire between the two curved ends. Be careful to avoid hammering the curled ends of your circlet. Also, make sure you’re hammering on the back side of the wire (the side you hammered while shaping the ends).
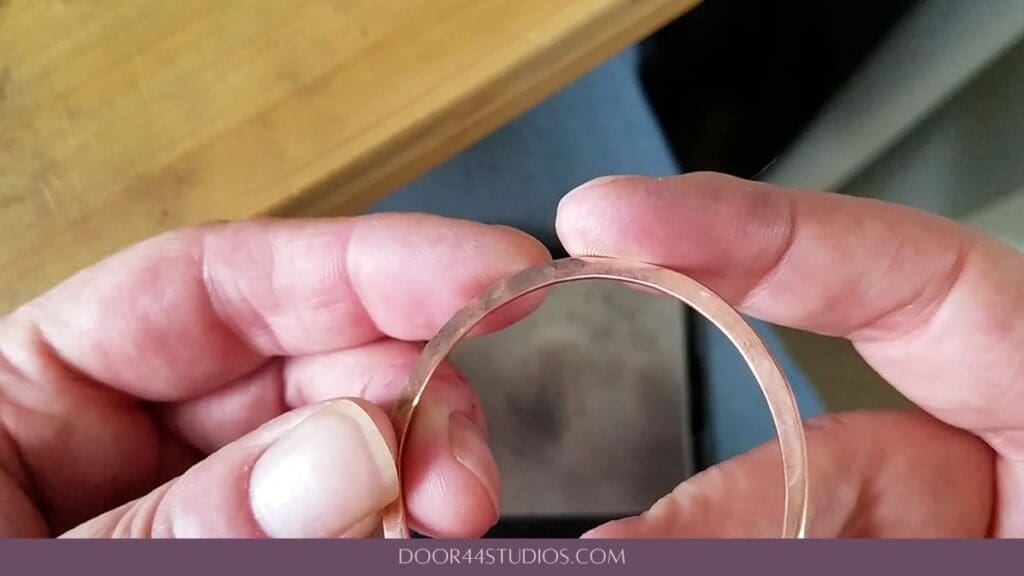
If your circle tightens during this process, just put it back on your mandrel or stretch it gently into shape. Next, place it back on your bench block with the smooth (front) surface facing up. Then carefully texture the flattened part of the circlet.
The trick to getting a pretty texture on wire is to focus on the edges of the wire. Not the center. I go into greater detail about how I texture wire in this post if you’d like more instruction. I also expand on this process in the video version of this tutorial. Refer to those resources if you need help with texturing.
Once finished, your circlet should look something like the one shown below.
Sand & Polish the Circlet
Now that our circlet is fully formed, we just need to add some finishing touches. I like to soften the lines of the flattened parts of my wire with sandpaper. I also use sandpaper to remove any tool marks that I made when forming the curled ends.
Inspect the curled ends of your circlet carefully for tool marks and sharp edges. Then use a combination of 800, 1500, and 2000 grit wet-or-dry sandpaper to refine those curves. Again, I go into much more detail on this process in the video tutorial. So, refer to it now if you need more help.
Once finished, your curled ends should have softly curved edges with no sharp lines. The image below shows what my demo piece looked like after sanding the ends.
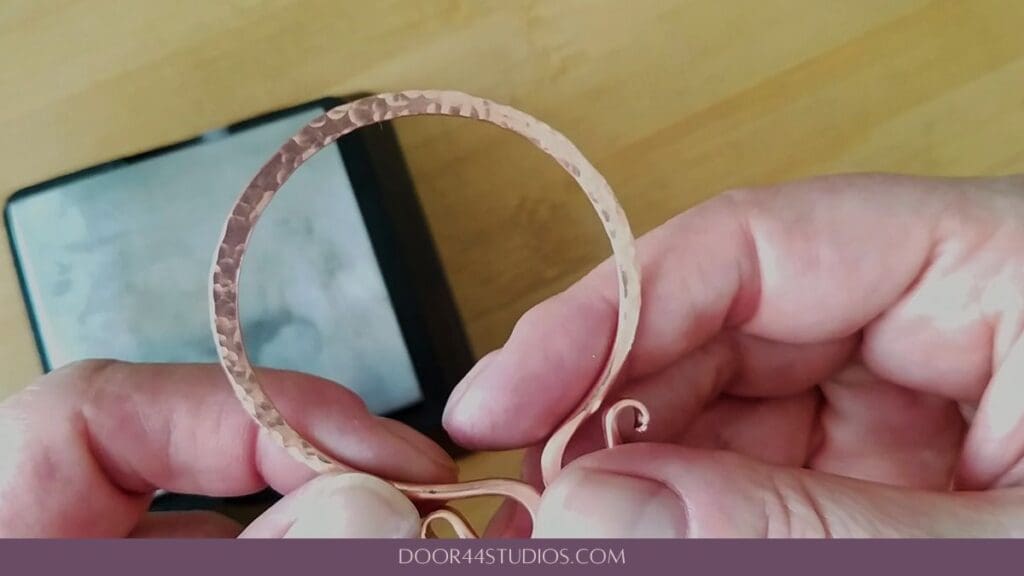
Bind the Curled Ends
The final touch on the circlet is both decorative and functional. We’re going to bind the curled ends where they fold back against the long line of the circlet. This will prevent them from catching on anything while the pin is worn. To do this, cut two pieces of 26ga wire about 5 inches (13 cm) long.
Next, place one wire behind the circlet frame. Then align it at the point where your smaller curl meets the frame. Leave a tail of about two inches and tightly wrap the 26ga wire three times around the intersection, as shown.
To bind off your wire ends, thread one end under the three wraps that you just made. Then wrap that end twice around those three wraps, as shown below.
Flip your frame over and repeat the binding with the other wire tail. Then break off both wire tails. To break small gauge wires, just grip the wire firmly near the point where you want to break it. Tug on it to create some tension and swirl the tail around in a small circle until the wire breaks. This work hardens the wire at exactly the point where we want the wire to break. And it leaves you with a clean finish that won’t scratch skin or snag delicate fabrics.
Repeat the binding on the other side of the circlet. When finished, your binding should look like the one shown here.
Form the Stick Pin
Now that the circular frame portion of our pin is complete, it’s time to form the stick pin. To do that, measure and cut about three inches (7.62 cm) of 12ga wire. Straighten the wire with your nylon jaw pliers. If that doesn’t work, roll it between your bench block and a small scrap of hardwood. I like to use the wedge from my ring clamp, as shown below.
Now use your chasing hammer and bench block to paddle one end of your 3-inch wire. Then smooth and shape the end of the paddle with your needle file. When finished, the paddled end of your stick pin should look like the one pictured below.
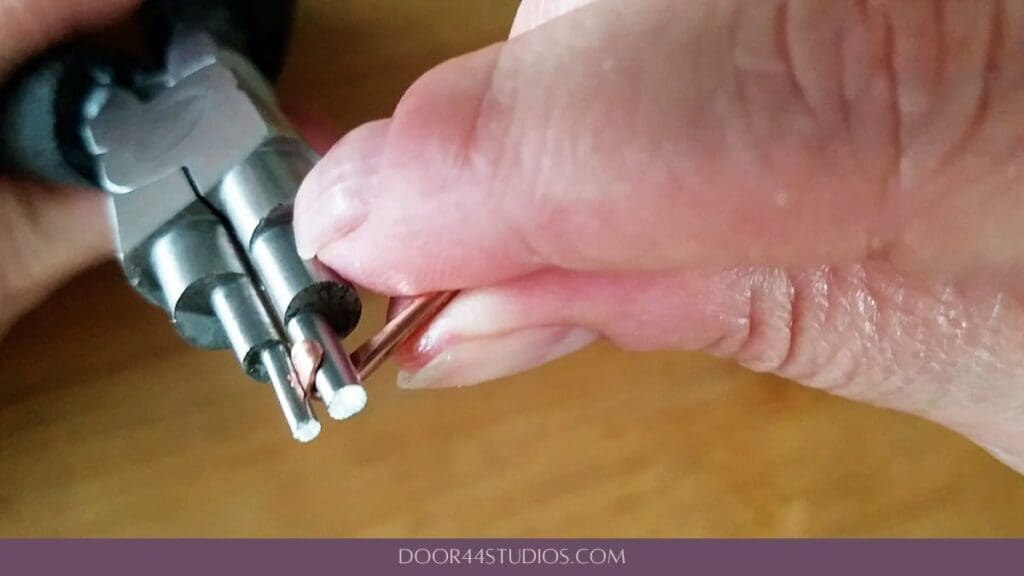
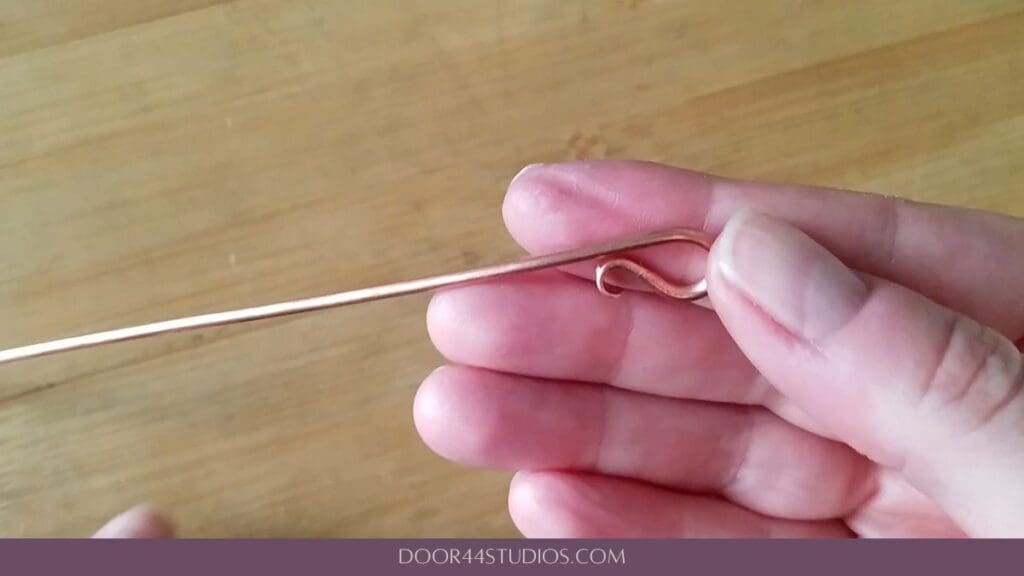
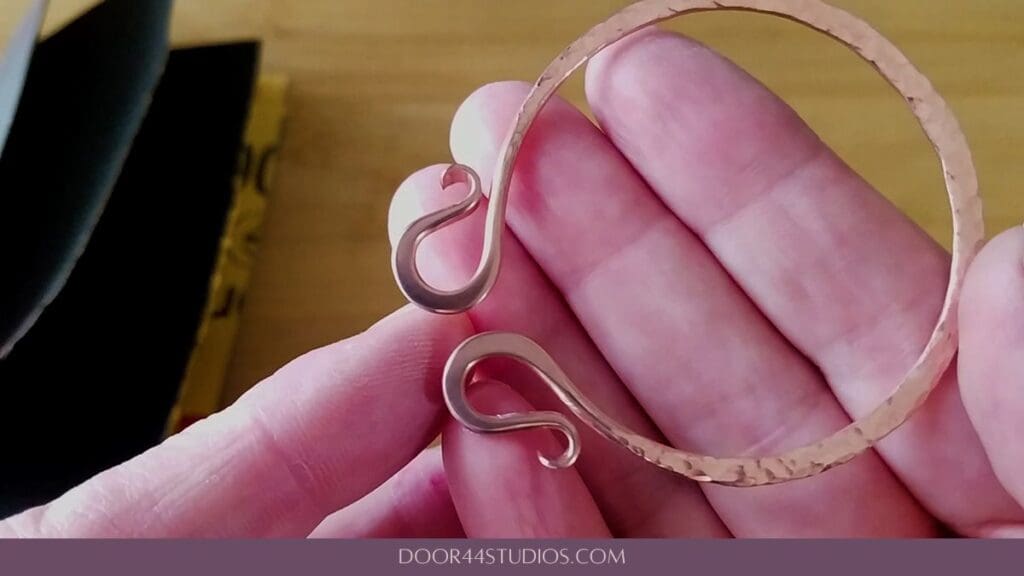
Next, we’re going to form a shepherd’s hook that will connect the pin to the circlet. To do that, grasp the paddle firmly between the two smallest steps of your bail-making pliers. Then roll the paddle into a very soft 2mm curl (the smallest step of your pliers). Don’t wrap too far around the mandrel. We just want to tip the end of the paddle slightly, as shown.
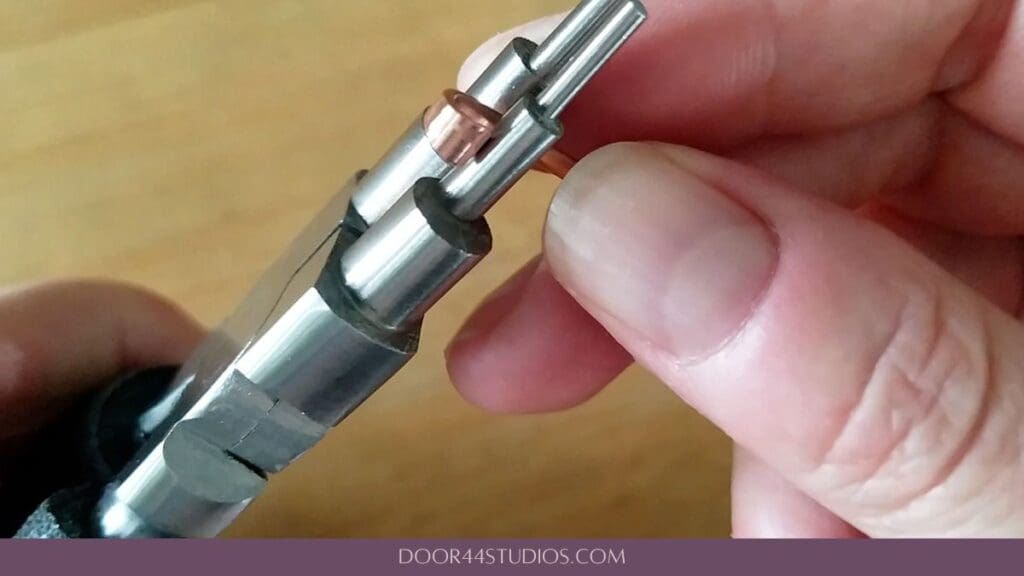
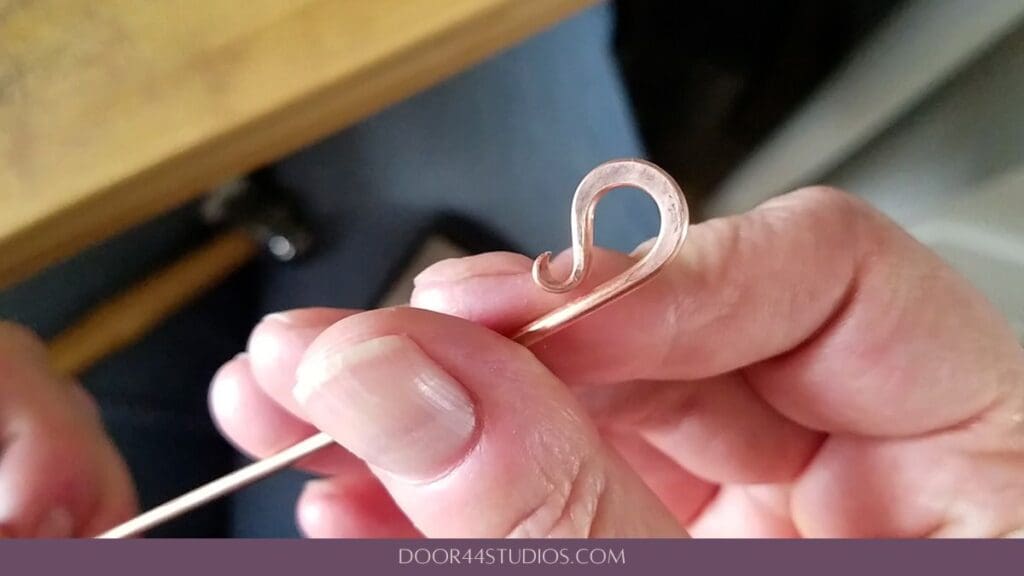
Next, grasp the paddled end of the stick between the two middle steps of your bail-making pliers. Make sure the curled end is resting against the larger of those two steps. Then roll the paddled end into a shepherd hook shape. Use the 4mm step (the third smallest step) of your bail-making pliers to form your hook. When finished, the hook should look something like this.
Assemble and Finish Your Brooch
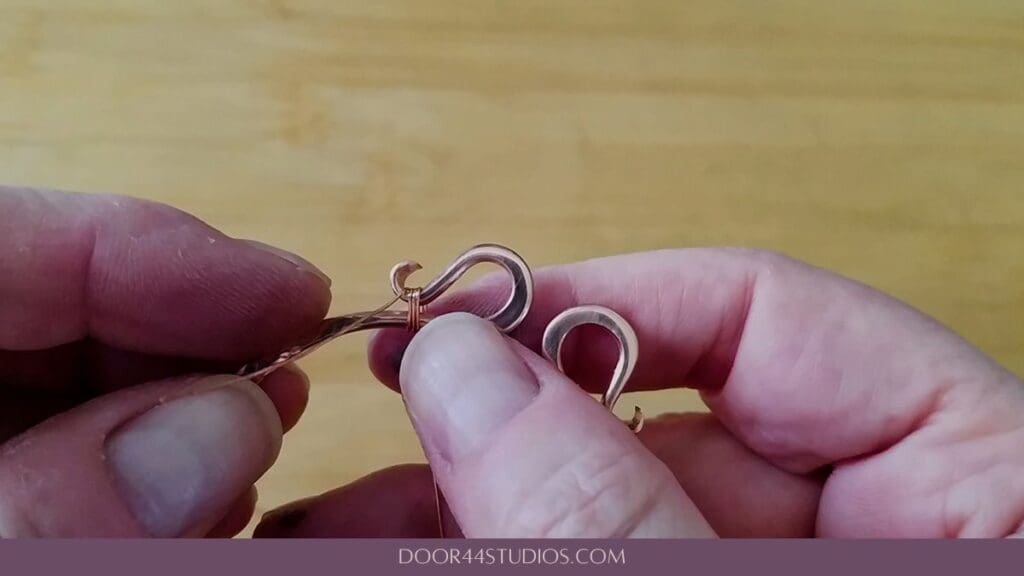
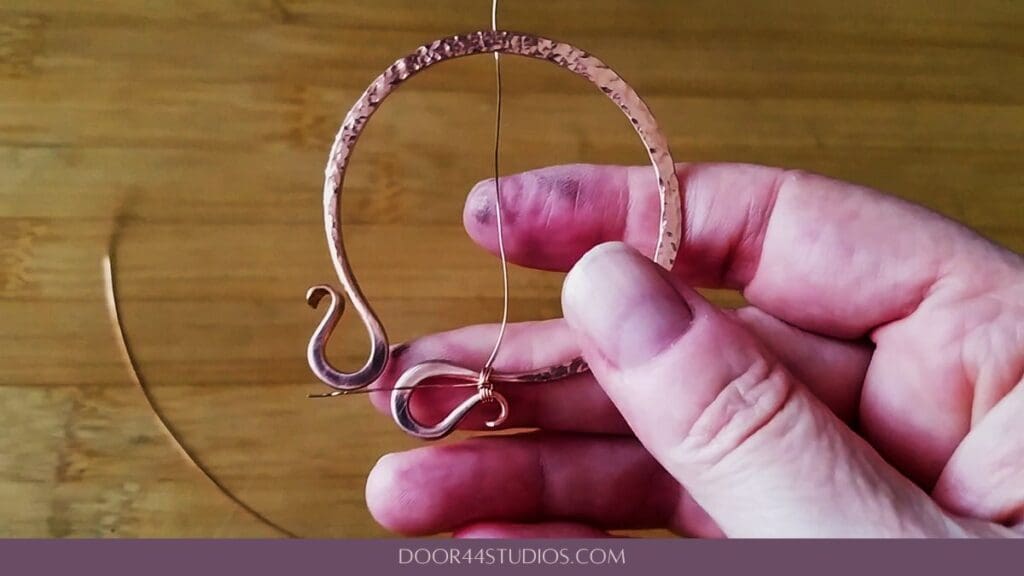
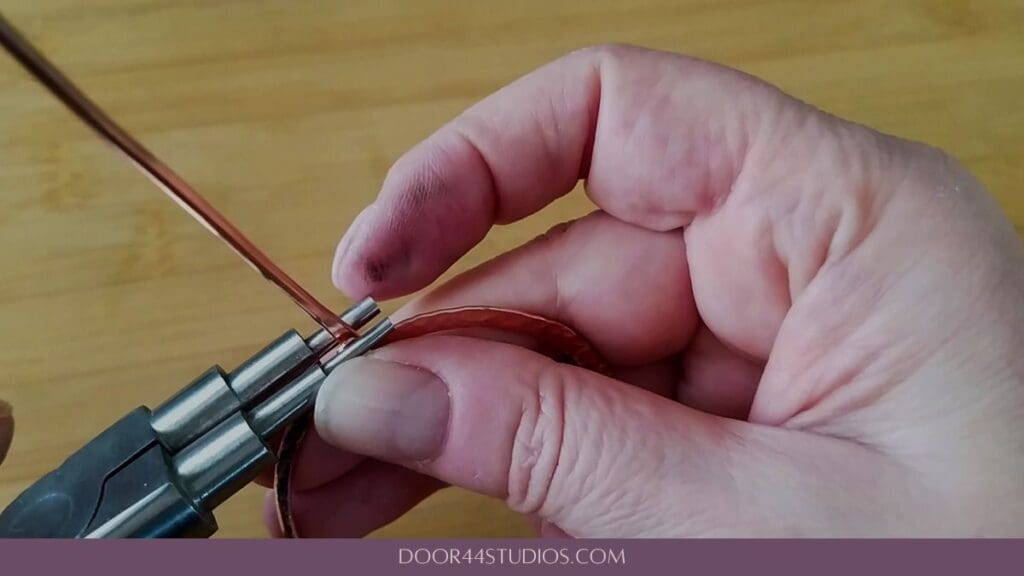
Finally, lay the stick across the front surface of your pin. Then slide the hook into place over the circlet frame. Use your bail-making pliers to secure the hook to the circlet frame, as shown.
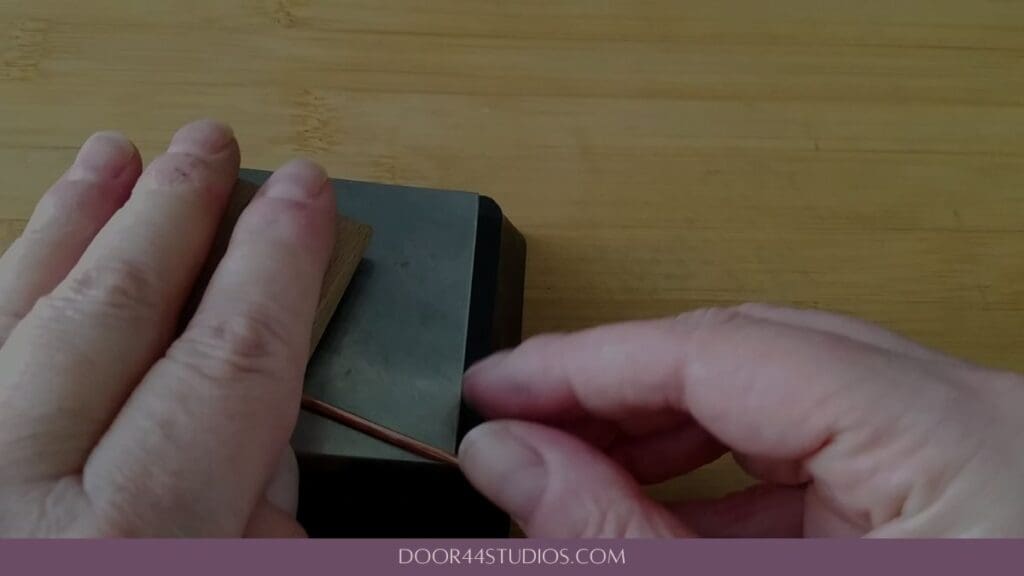
Now we’re going to trim and shape the tip of our pin. Slide the pin around on the frame until it’s centered across the widest part of the circle. Locate a point about 1/4 inch (0.64 cm) beyond the edge of the circle frame. Then use your heavy duty wire cutters to trim the stick at that point, as shown.

Next, use your needle file to shape the end into a blunt point, as shown.

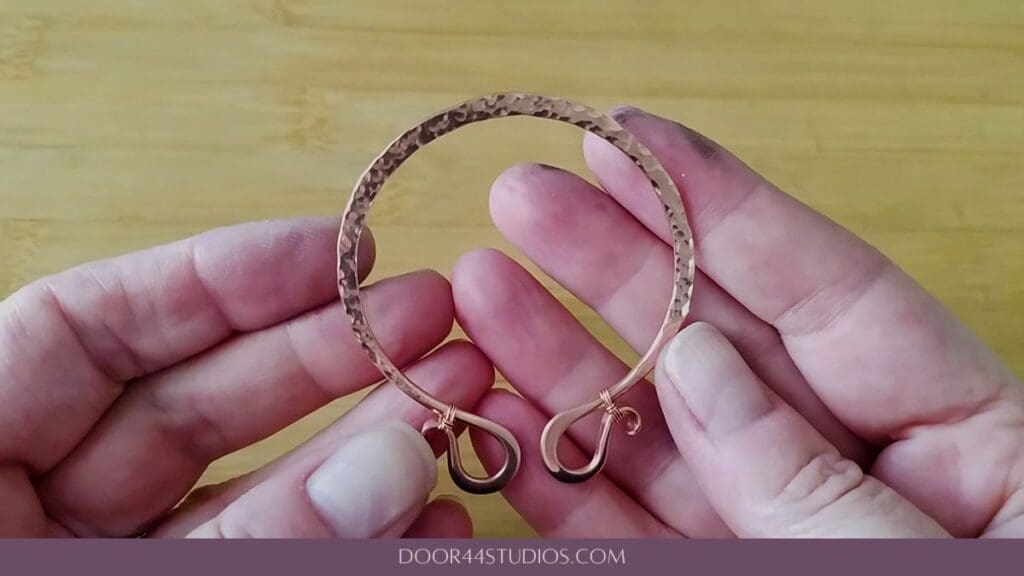
Finally, use sandpaper to remove any tool marks and refine the shape of your stick pin. Remember to start with 800 grit paper and work your way up to 2000 grit. When finished, your completed brooch should look something like the one pictured below.
Finishing Suggestions
I antiqued the brooch that I made while writing this tutorial with Liver of Sulfur (LOS). Then I burnished it with super fine steel wool (Grade #0000) in warm water and original Blue Dawn dish soap. The steel wool brings back the bright copper highlights on the high spots.
Once that’s done, I rinsed the brooch thoroughly to remove any particles of steel wool. And then I put it in a tumbler barrel filled with warm water and a generous squirt of Blue Dawn. I tumbled the pin for about three hours.
If you’re new to wire weaving, be sure to check out my 7-step patina process. And if you’re wondering why I recommend tumble polishing specifically, read this post. Also, be sure to clean your stainless steel shot regularly. Clean shot is necessary to achieve the best finish on your tumble-polished jewelry.
One last bit of tumbler advice before you go. Always make sure that any beads or stones that you use for your jewelry are safe to tumble. I don’t recommend tumbling natural pearls, soft gemstones, ceramic beads, or glass beads with polymer coatings, such as glass pearls and certain frosted-look glass. As always, if you’re unsure if your beads can handle the tumbler, run a test tumble with a bead that you’re willing to sacrifice.
Discover More Behind Door 44
Thanks so much for joining me today. I hope you enjoyed creating this quick and easy hammered shawl pin.
Want more great wirework tips and tutorials?
I like to share practical wire weaving tips and tricks on my social media channels. And we have some great conversations about wire jewelry in my private Facebook Group. Also, be sure to follow me @door44studios on Instagram, and Facebook to keep up with what’s happening behind Door 44. And if you haven’t already done so, subscribe to my YouTube channel where you’ll find new wire jewelry videos weekly.
Until next time, go make something beautiful!

Pin the Quick and Easy Hammered Shawl Pin for Later
Nice simple project to tackle! I have never made a shaw pin before. Thanks for another great tutorial!
Hello Wendi, I am a left-handed wirework and crochet fan. I once had a jewelry-making business that included wirework and taught introductory wirework workshops. Your skills and techniques far surpass anything I ever did. I only discovered wire-weaving very recently. Your wonderfully detailed instructions and videos are exactly what I need to get started. This shawl pin will be perfect to wear with all the scarves I’ve crocheted, so I’ll start here. Thank you!
Hi, Kay. Welcome to Door 44 Studios! I’m so glad you’re enjoying my tutorials. And thanks for reaching out. It’s always nice to hear from another left-handed maker.
Thank you Wendi,
When I taught my workshops in person (pre-YouTube and Zoom), I told left-handed people to sit on my side of the table and right-handed people to sit facing me and pretend they were looking in a mirror. I think it worked fairly well..
A right-handed friend just gave me a complicated and absolutely beautiful unfinished afghan and told me I could finish it and keep it. Hmmm…I need to figure out how to pull that off. It’s time to call on serious creativity.
I’ll need to work on my hammering techniques to make this pin. I’ve never done this kind of work on heavy gauge wire.
Thanks again for introducing me to a new world of wirework.