

How to Texture Wire with a Chasing Hammer
Welcome to Lesson 2 in my two-part series on chasing hammer techniques. In Lesson 1 we learned to effectively use the planishing side of the chasing hammer to form wire. Today we’re going to learn how to texture wire with the ball peen side of our hammers.
This post may contain affiliate links. If you click on a link and then make a purchase, I may earn a small commission (at no cost to you). As an Amazon Associate I earn from qualifying purchases. To learn more, please see my full disclaimer.
The texturing technique that we’re going to learn today is a basic texture that you can create with a standard chasing hammer. You probably already have a chasing hammer in your toolbox. But you might not realize how magical this tool can be. Let’s dive in.
The peened texture is a timeless texture that never goes out of style. In fact, this happens to be my favorite texturing technique because it works well for lots of different jewelry styles. But we’re barely scratching the surface today when it comes to the multitude of different textures you can add to your jewelry designs. The only limits are your imagination and your budget.
Do you prefer video tutorials? You’re in luck because this tutorial is also available on my YouTube channel. Or if you’re a bookworm like me, you can just keep reading. It’s great to have options, right?
The latest on Youtube:
Would you like to download a summary of this post in a handy printable document? If so, be sure to grab my FREE Hammer Texturing Tip Sheet, which is located in my resource library. If you don’t already have a password for my library, you can get one here.
Texturing Tools
You’ll find a wide range of texturing hammers on the market that can create a variety of textures. Many of those hammers are designed specifically for sheet metal, but they work just as well on wire. So if you discover today that texture is the secret sauce that’s been missing in your wirework, be sure to shop around for some specialized texture hammers. You may also want to consider adding a rolling mill to your toolbox if textured metal is your jam.
You’ll find everything from entry level texturing hammers with interchangeable faces like this one to professional grade texture hammers that cost many times more than the entry level tools.
As for me, I’m presently working within some tight space and budget constraints. So I strive to keep things super simple when it comes to my tools. I love the classic hammered texture that I can achieve with my chasing hammer. And that’s the only texture I feel the need to use in my jewelry. For now, anyway.
A Quick Review of Correct Hand Position
In Part 1 of this Chasing Hammer series, I talked a lot about the anatomy of a chasing hammer and how to hold it properly to maximize both comfort and efficiency. If you’re brand new to using a hammer, you may want to review that lesson now.
Otherwise, let’s quickly review how to hold your hammer properly. And then I’ll demonstrate how your hammer’s head and handle work together to conduct energy.
The Chasing Hammer Handle
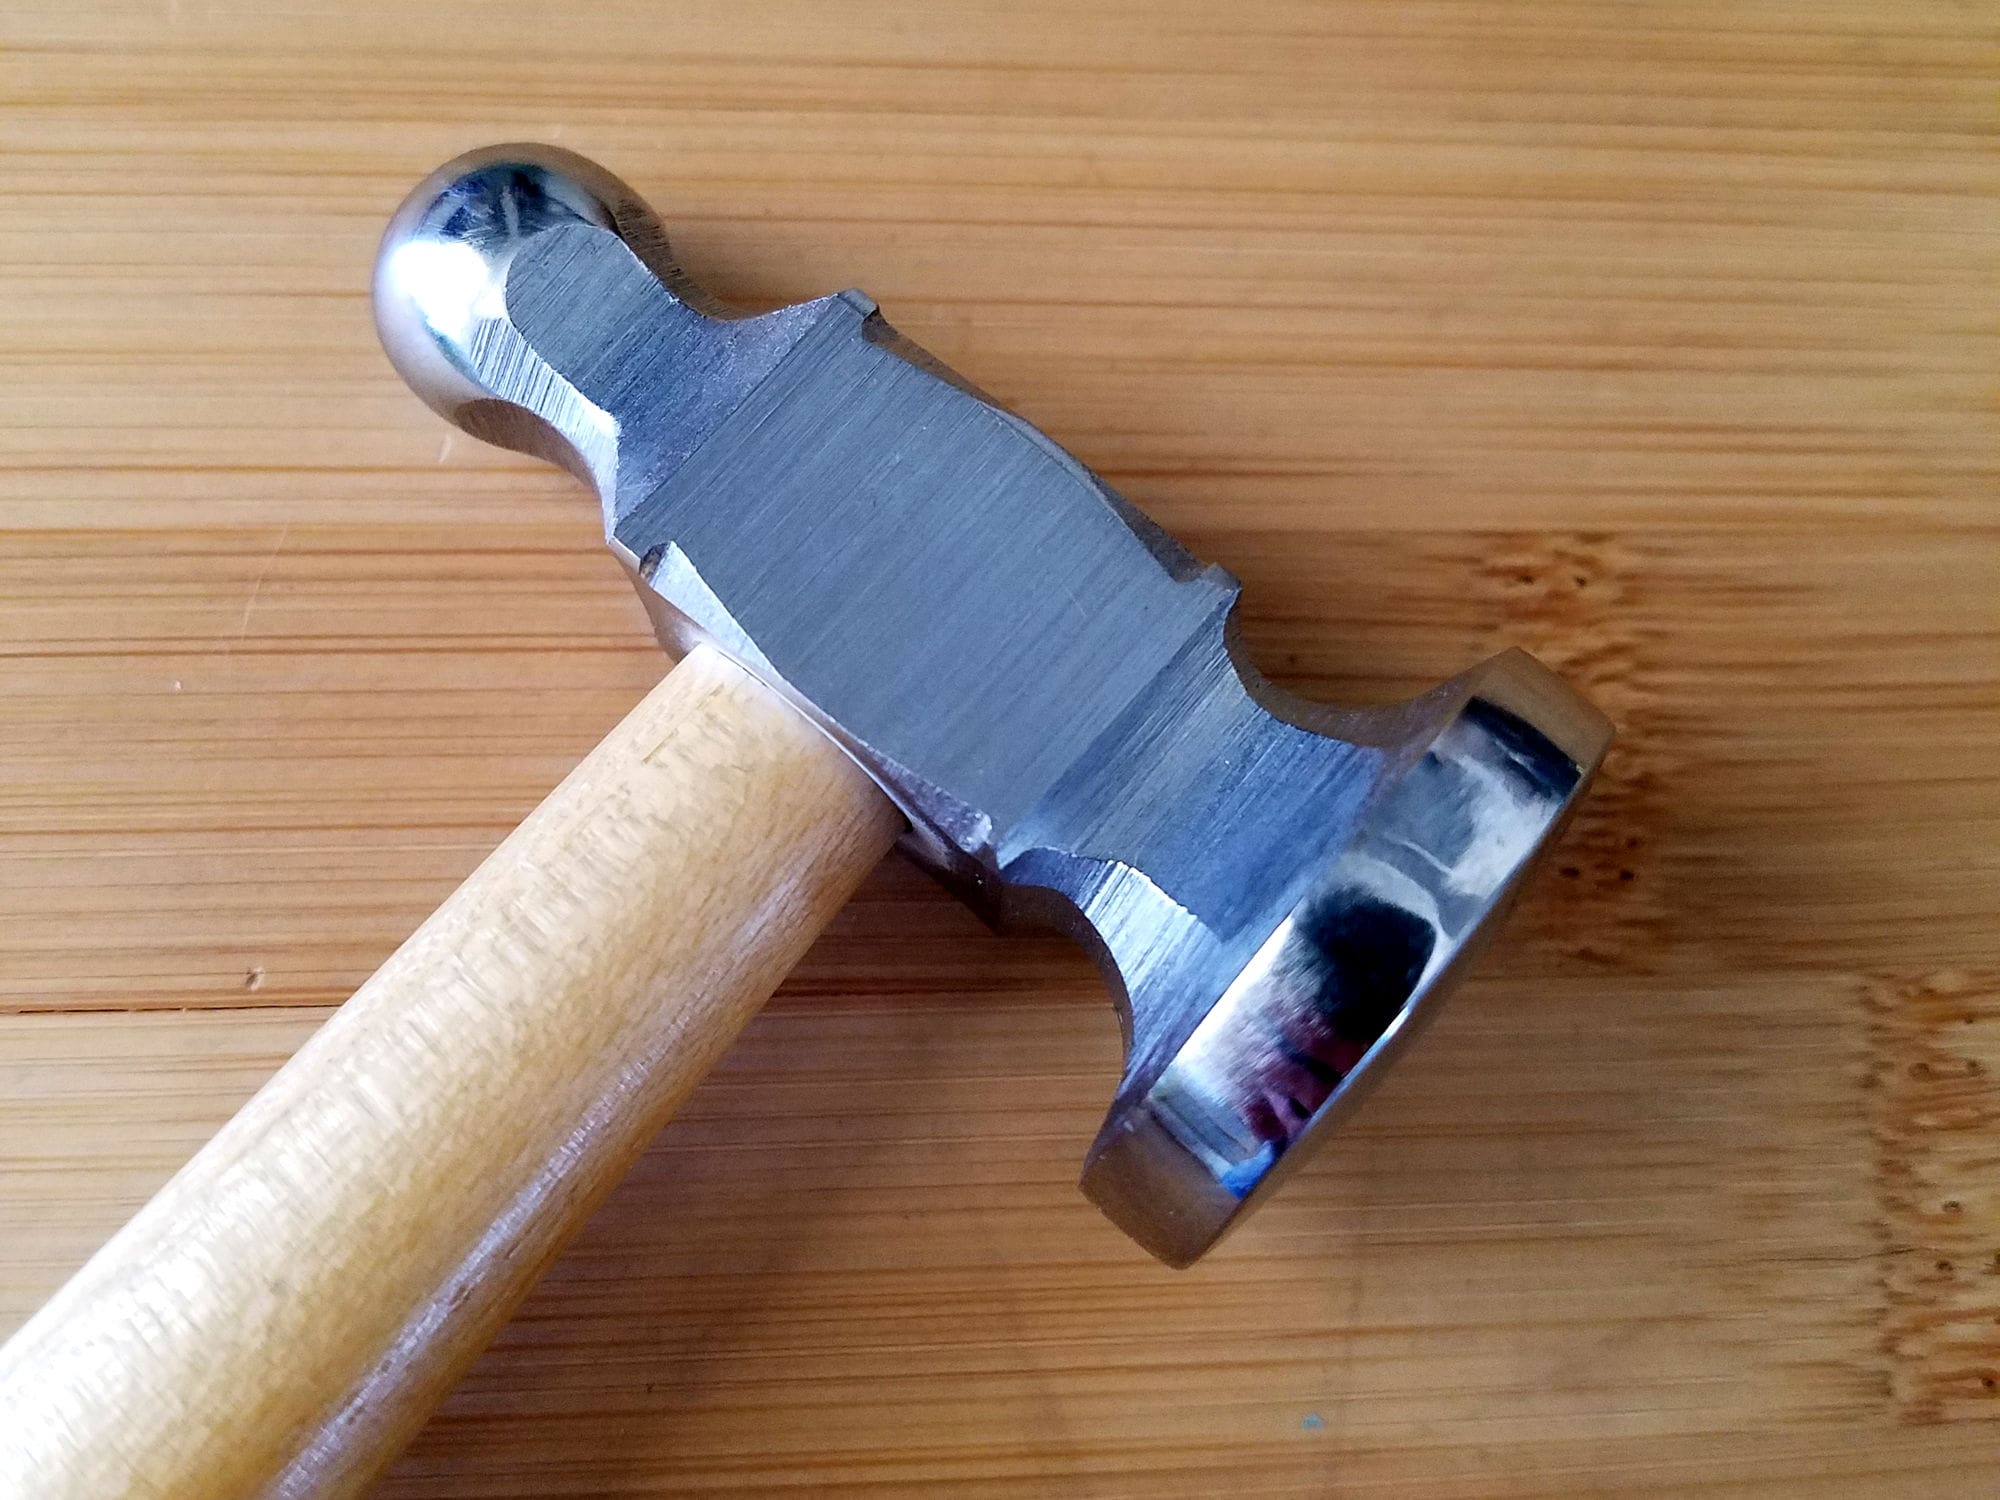
Most chasing hammers have a solid hardwood handle with a peculiar shape. The handle is tapered sharply near the head of the hammer. This adds a bit of spring to the hammer so that the head will bounce off the work rather than land solidly with a dead blow. But it’s the end of the handle that I want to talk about first.
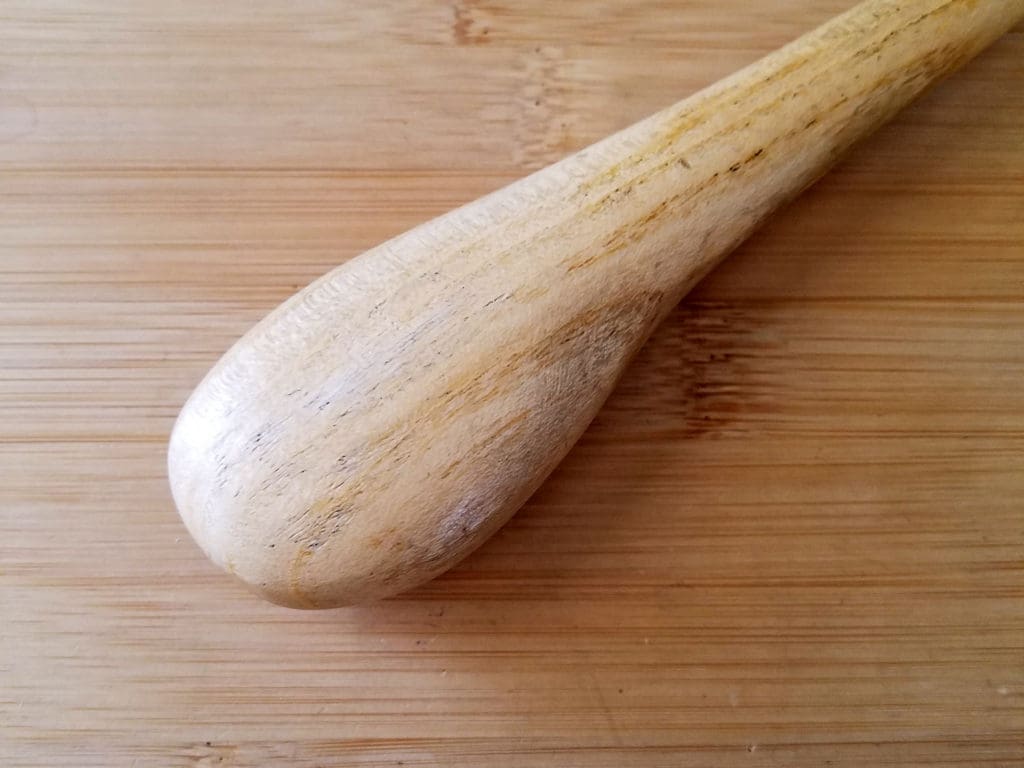
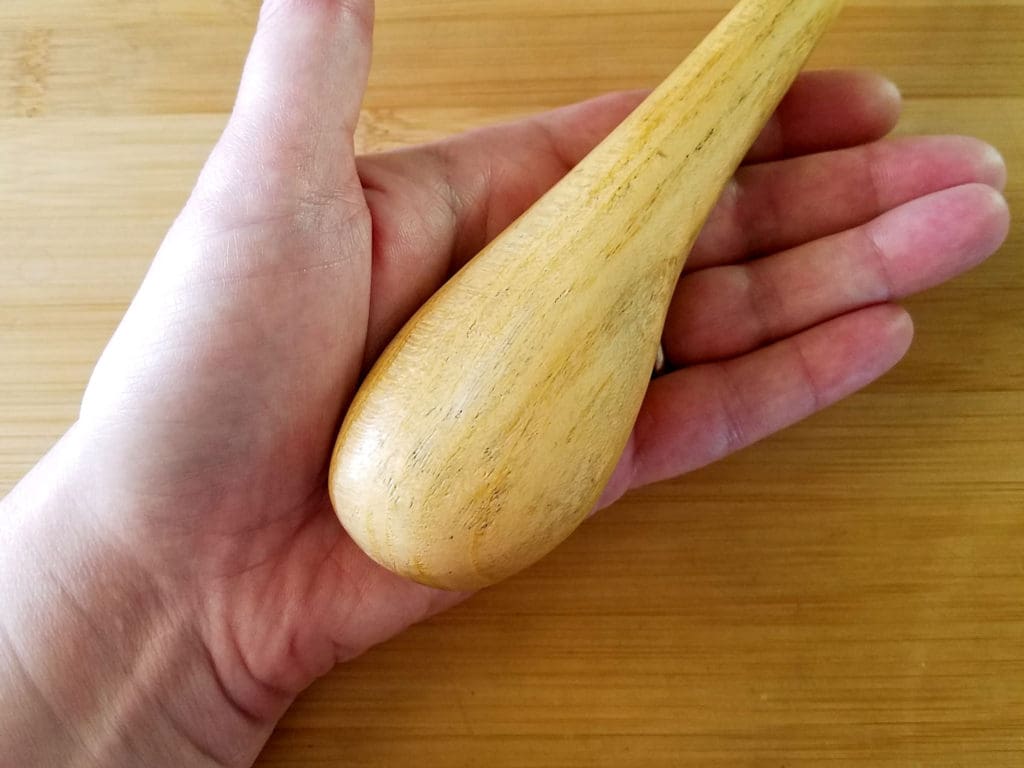
The end of a chasing hammer handle has a large bulbous shape to it that will look something like the handle of my chasing hammer below. That bulb on the end is designed to fit comfortably in the palm of your hand. And its form is a visual cue that shows you exactly where you should grip the handle.
One of the biggest mistakes that I see beginners make when learning to use a hammer is that they want to instinctively grip the hammer closer to the head, as shown below. This is the wrong way to hold your chasing hammer. And holding it this way will make it very difficult for you to achieve good results.

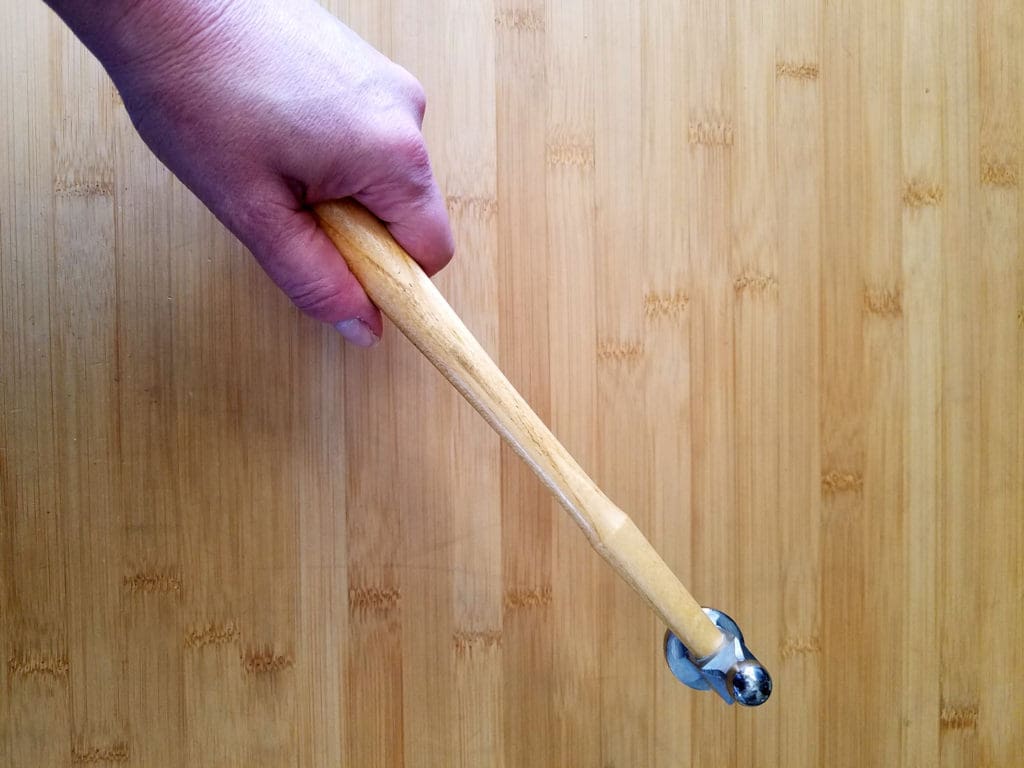
For maximum control and the best planishing and peening results, make sure you grip your hammer on the end. Here’s an image of the correct hand position.
This hand position applies to the planishing face of the hammer, which we learned to use in Part 1 of this series. And it applies just the same to the peening face, which we’re going to use now to add texture to our wire. But there’s one slight difference between the two techniques that I want to point out.
Download my Hammer Texturing Tip sheet for free from my resource library. It’s file #108. Need a password? Get one instantly by completing the form below. You’ll also find this form at the bottom of this post if you’d prefer to finish reading before grabbing the tip sheet.

Grab my FREE
Hammer Texture Tip Sheet
Subscribe (free!) to my newsletter for weekly updates and wire jewelry tips. PLUS get instant access to my resource library where you’ll find this file along with lots of other helpful wire jewelry resources!
How the Handle Controls the Head
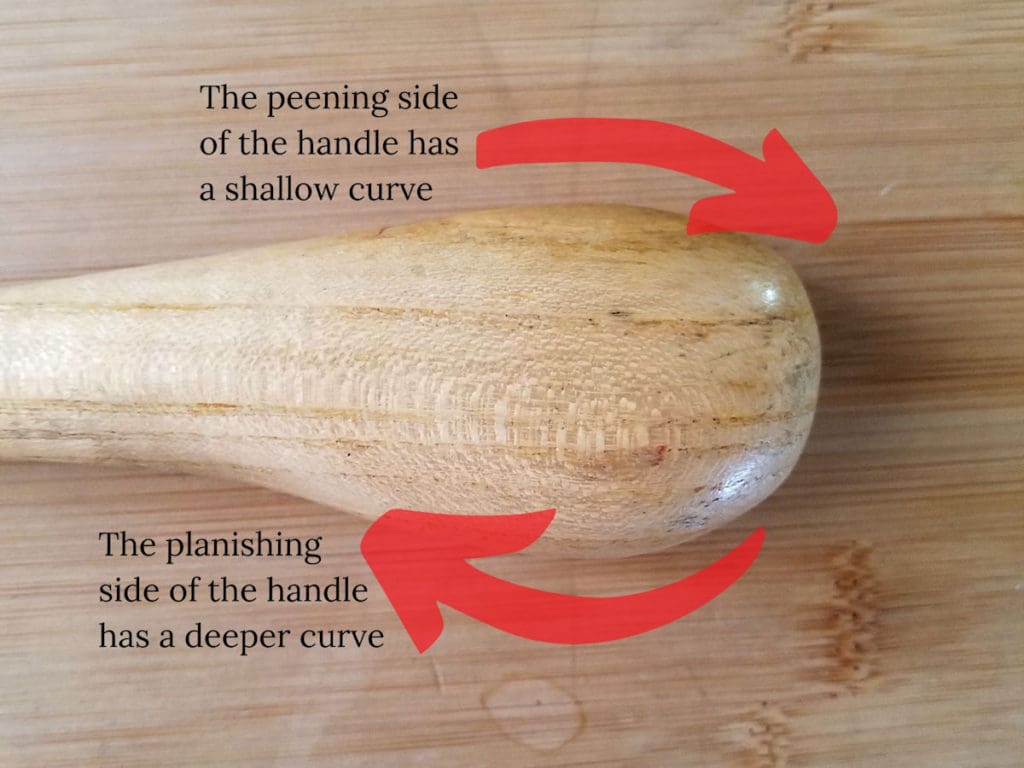
If you look carefully at the bulb on the end of your hammer’s handle, you’ll notice that the bulb dips much further down on the planishing side of the head. Meanwhile, the handle has just the slightest curve on the ball peen side, as shown in the image below.
Do you remember when I mentioned earlier that the taper of the handle adds a bit of springiness to the hammer? Well, the unique shape of the bulb on the end of the handle is carefully designed to help you control the springback of the hammer.
Who knew that the humble chasing hammer was such a high-tech tool, right? That’s why it’s so important that you hold your hammer properly. Let’s look closer at how your hammer actually works.
Planishing vs. Peening
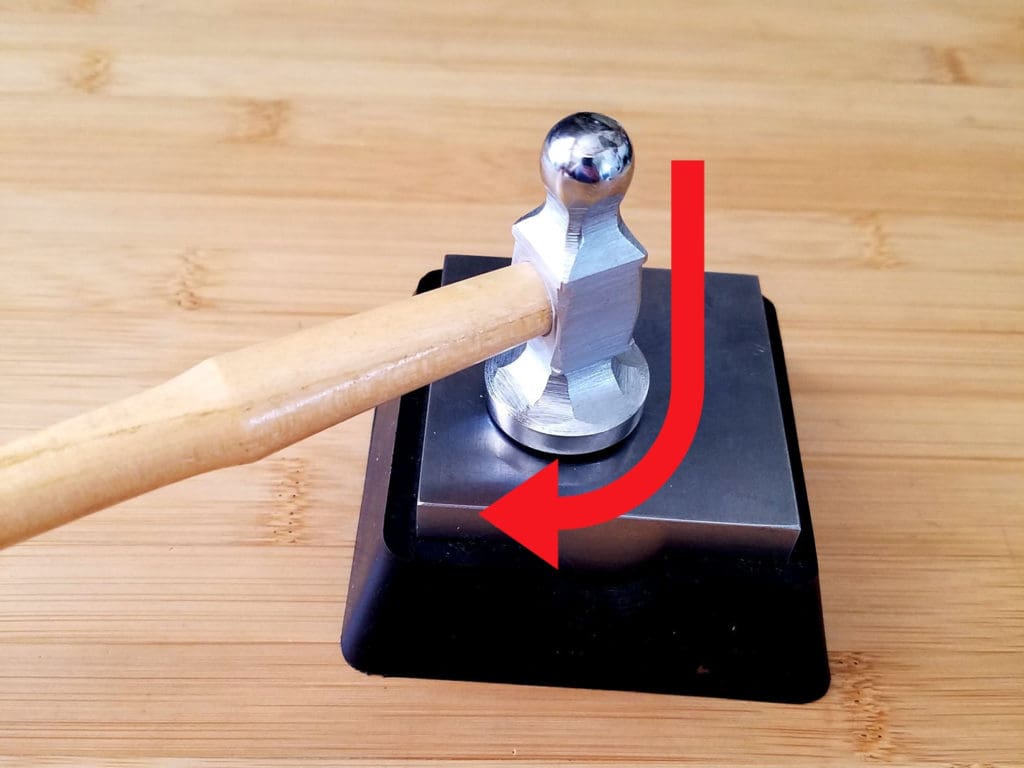
As you may recall from our first hammering lesson, we used a stroke to draw our wire into the shape that we’re after. That stroke ends up looking something like the letter J, as shown below.
How Planishing Works
Planishing requires a lot less springback than peening. On the contrary, we want to achieve more of what’s called a deadblow on our planishing strokes.
A true deadblow hammer has virtually no bounce or springback. That’s the sort of hammer that’s used for metal stamping, for instance. The clean solid blow that you can achieve with a deadblow hammer gives you a clearer mark from the stamp. But a deadblow hammer doesn’t allow you to draw or chase metal into a particular form. That’s not what it’s intended to do, and that’s where the planishing face comes in.
By combining the curved planishing face of the chasing hammer with the drawing motion of our stroke, we can effectively coax metal into a desired form. But in order to do that, we need to minimize springback. And that’s where the shape of the handle comes into play.
The thick bulb on the planishing side of your handle gives you a deeper grip on the handle. The deeper grip minimizes the spring action on your strokes, which allows you to draw or chase your wire into shape without the head wanting to spring off of the wire surface before the stroke is complete.
On the flip side, the shallow bulb on the peening side of the handle maximizes springback. And this is desirable because we don’t stroke while peening. Instead, we come down straight onto the wire surface and then bounce off again without stroking the wire. And we use the springback to create that bounce. This light bouncing motion, combined with the rounded face of the peen, is what creates the pretty faceted texture on our wire.
Let’s do a quick exercise to help you learn to feel the difference between planishing and peening.
Exercise 1: Getting to Know Your Chasing Hammer
Do you recall the air strokes that we made in our first lesson while learning where to grip the handle? We’re going to repeat that exercise. Only this time the goal is to learn to feel the difference between planishing and peening.
First, let’s talk about planishing since you already know how that’s done. Position the larger part of the bulb of your handle in your palm so that it’s facing your fingers, as shown. This is your planishing postion.
Now, gently tap the palm of your free hand with the planishing face of your hammer. Remember, a chasing hammer isn’t designed to use heavy force. We’re just lightly swinging the hammer and allowing the weight of the head do all of the work.
This shouldn’t hurt your hand at all. If it does, you’re using too much force. Lighten your strokes until the planishing face is just lightly tapping the palm of your free hand. As you do this, pay attention to how solidly the face of the hammer makes contact with your hand.
Does it feel bouncy? Or does it feel like it wants to just stop and rest in your palm?
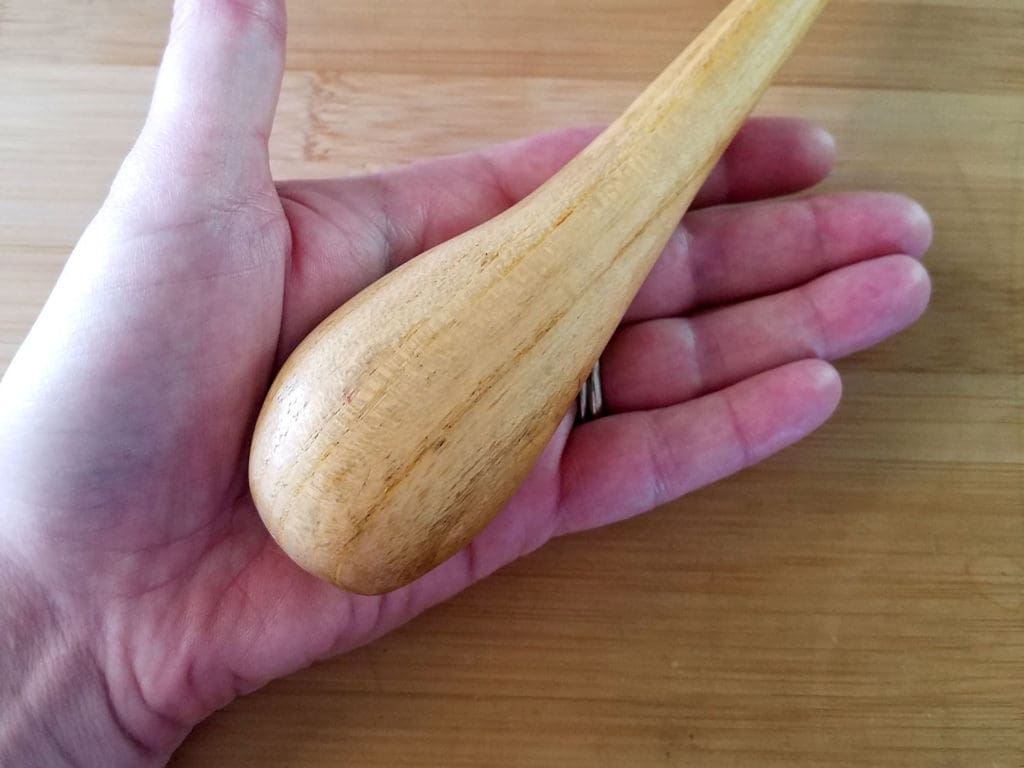
Make a mental note of how the hammer feels when in planishing position. Then switch the hammer into peening position with the deeper part of the bulb facing your thumb, as shown below.
Now tap the palm of your free hand with the peen of your chasing hammer. Can you feel a difference?
You should feel more bounce in your hammer, as if the ball wants to keep moving rather than resting in your palm. That spring action is what we use to texture wire.
How to Peen Texture Wire with a Chasing Hammer
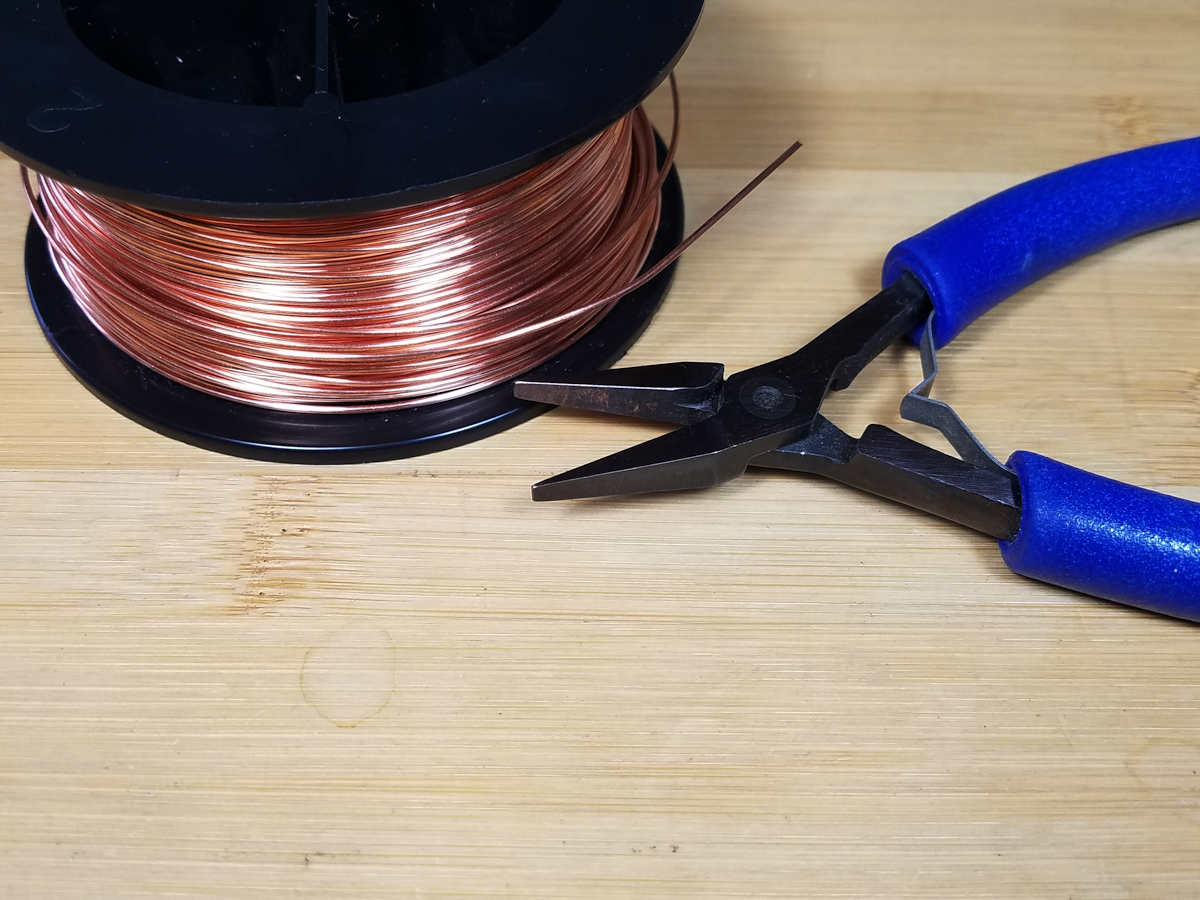
Okay. Now that you’ve learned the secret of how your chasing hammer works, let’s texture some wire. Grab a couple of scrap pieces of dead soft wire. 18ga or 16ga will work well for this lesson.
Before texturing the wire, we’re going to flatten it. So this gives you another opportunity to practice your planishing technique.
I’m using a piece of dead soft 16ga wire that I’ve cut to four inches long for this demonstration. Then I flattened the full length of that wire. Go ahead and prep your wire the same way.
Peen texturing is really fun and easy to do. But it’s quite different from planishing. Remember, you don’t stroke with the peen. Instead, let the peen fall straight down onto the wire. Then gently guide the peen as it naturally bounces off the wire. The motion of the peening blow is indicated by the arrow on the image below. Notice how this motion is different from the planishing stroke pictured above.
The other big difference between peening and planishing is in what moves and what stays still. It’s helpful to keep your hammer in the same relative position while moving the wire as you’re planishing.
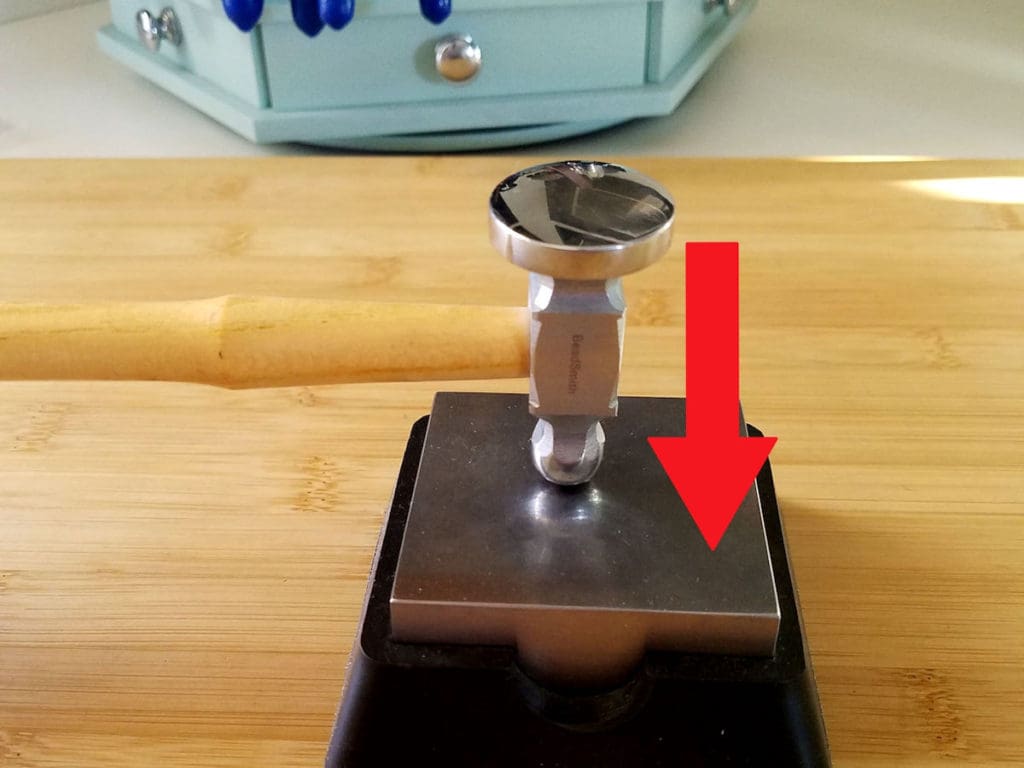
Peening, on the other hand, is exactly the opposite. To begin texturing your wire, hold the wire steady on your bench block, as shown.
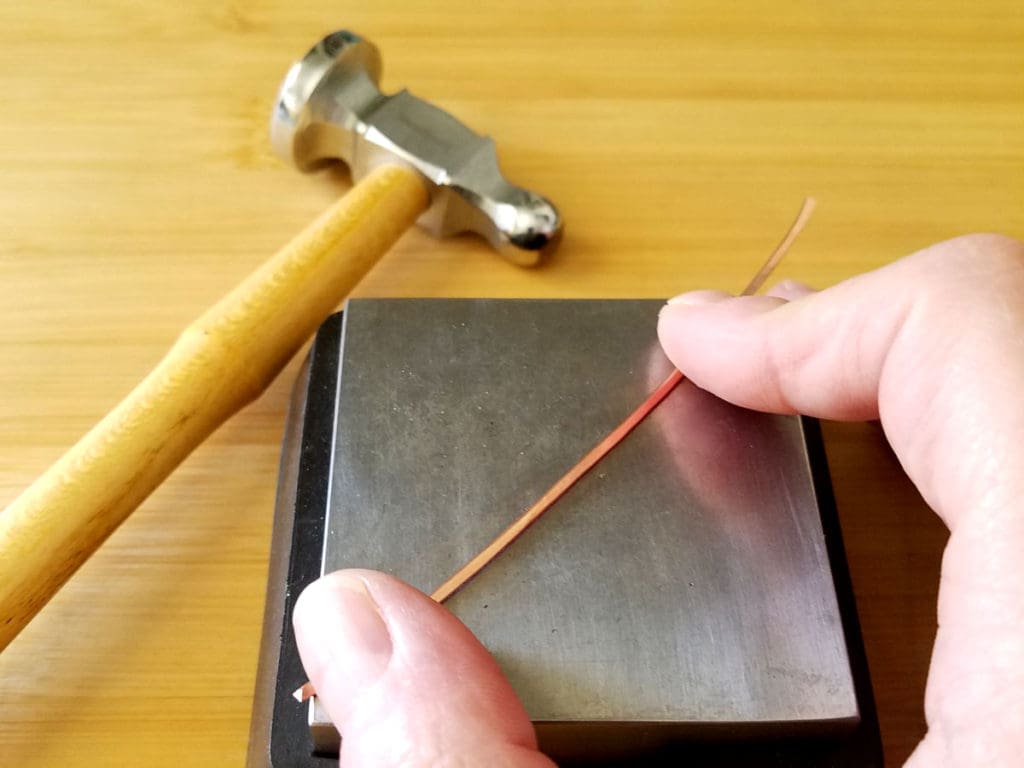
Now begin gently bouncing the peen along the length of the wire focusing mainly on one edge. Try to keep your blows evenly spaced so you create a sort of scalloped effect on the edge of the wire. This helps to really capture the light on your finished piece.
Make sure your hand is in a comfortable position while you move along the length of the wire. And feel free to adjust the position of the wire as needed, but we’re going to focus mainly on moving the hammer along the wire’s edge.
Because the peen is round and we’re deliberately creating tool marks, keeping the handle of the hammer level is less important with peening than it is with planishing. But you still need to stay relaxed and in a comfortable position. A relaxed arm will improve the look of your texture. And it will also minimize muscle fatigue.
Have you ever done a sponge painting technique where you pounced the paint onto the surface with the sponge randomly, but with even coverage? We’re doing the same sort of thing with the peen face of the hammer. The goal is to create an evenly dimpled surface of individual facets. But by concentrating mainly on the edges of the wire, we’re sure to end up with a textured surface that really plays with light.
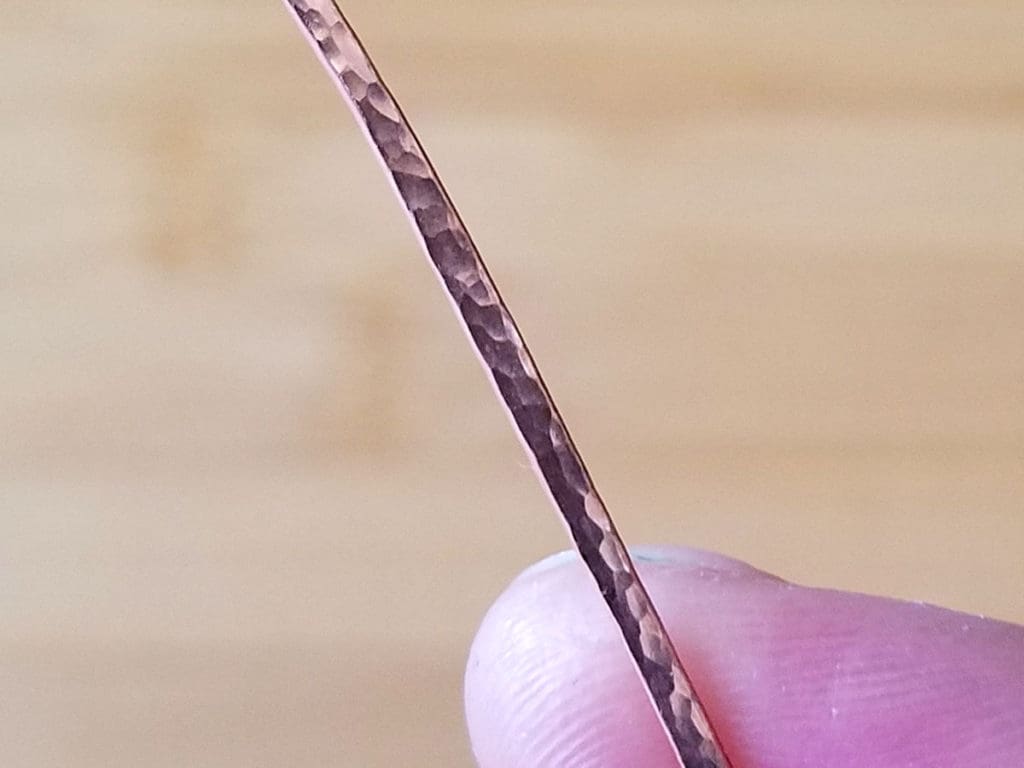
Maintain an even degree of force (not too much!). And keep your arm and hand relaxed so the peen can just gently bounce along one edge of the wire. Then focus on the opposite edge of the wire on your return pass.
Texture about an inch of wire at a time and check your texture periodically to see how it looks. It takes a while to develop a feel for texturing wire. And I’ve already explained all of the mechanics of this technique. At this point, you really just need to develop the feel for it. So practice the technique for a few minutes.
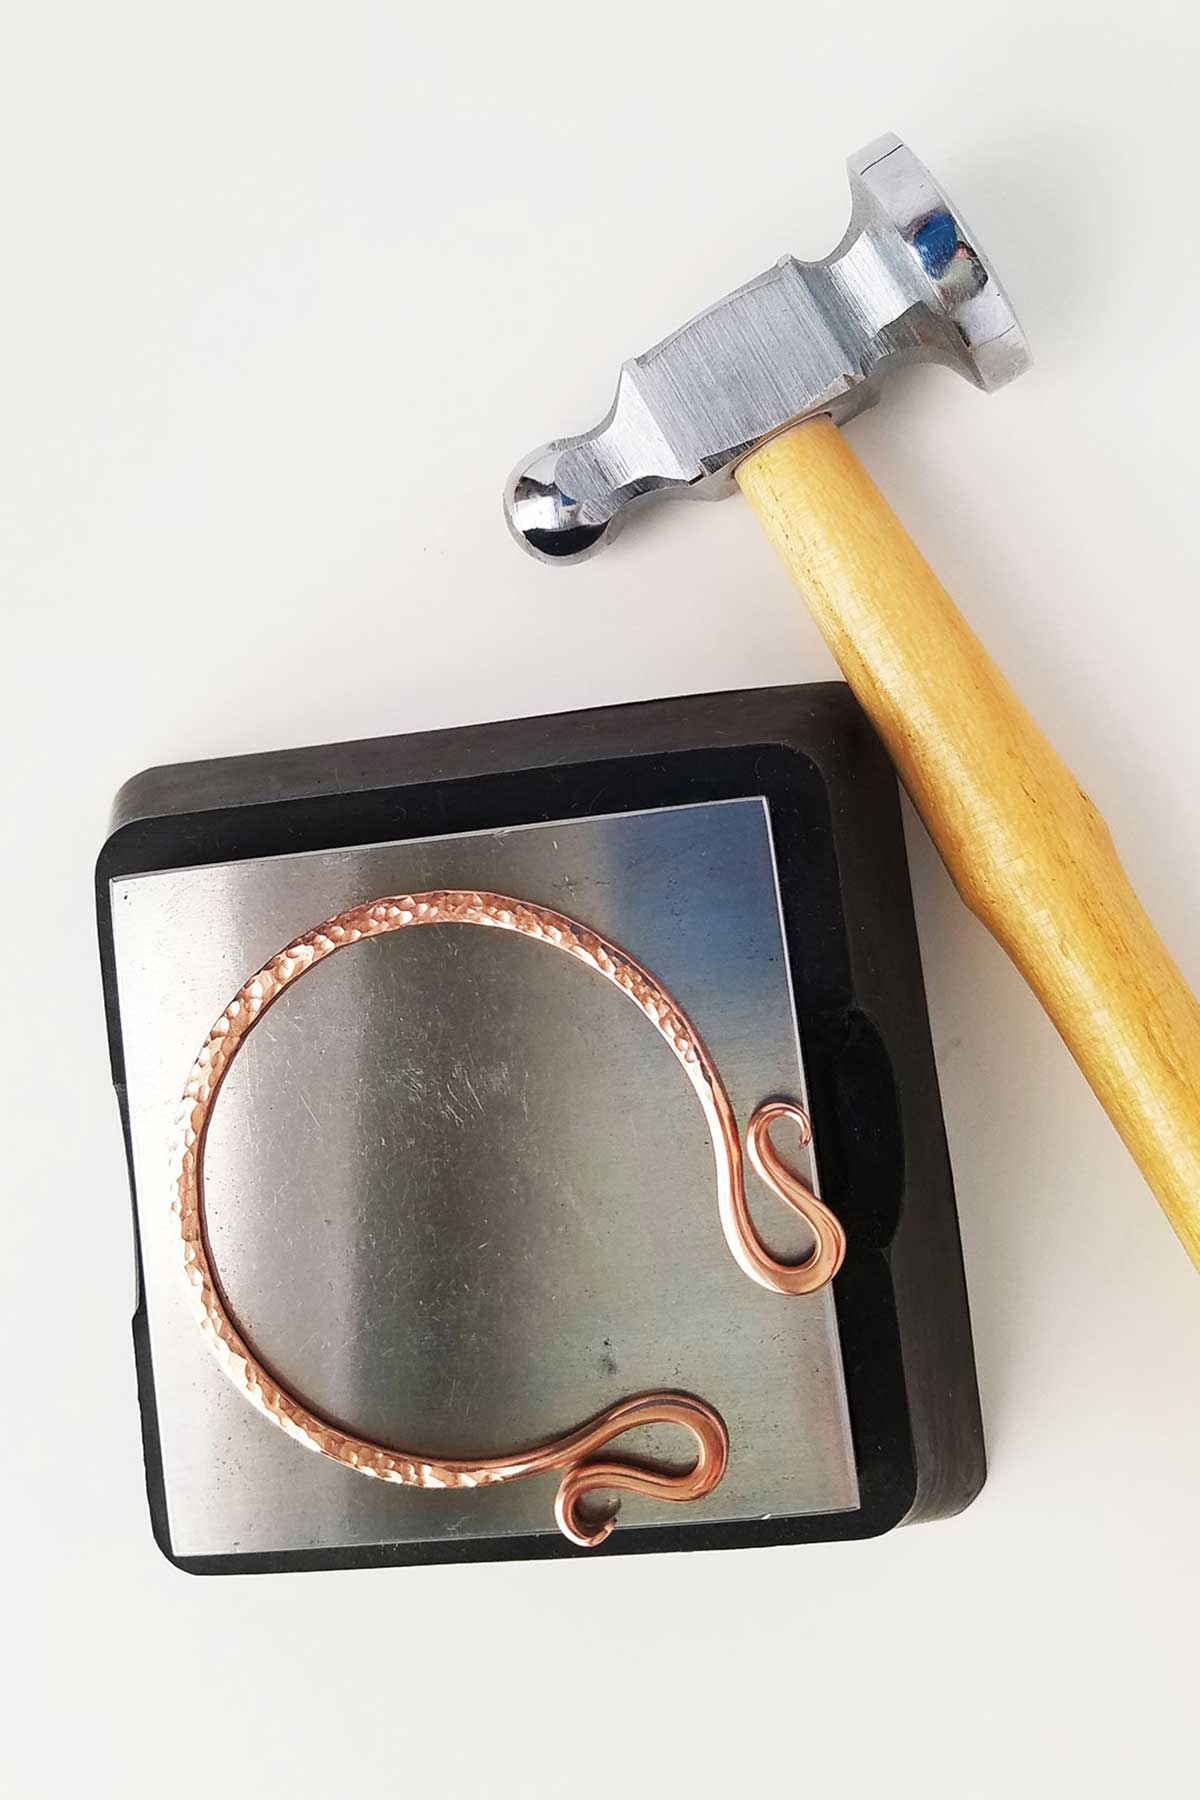
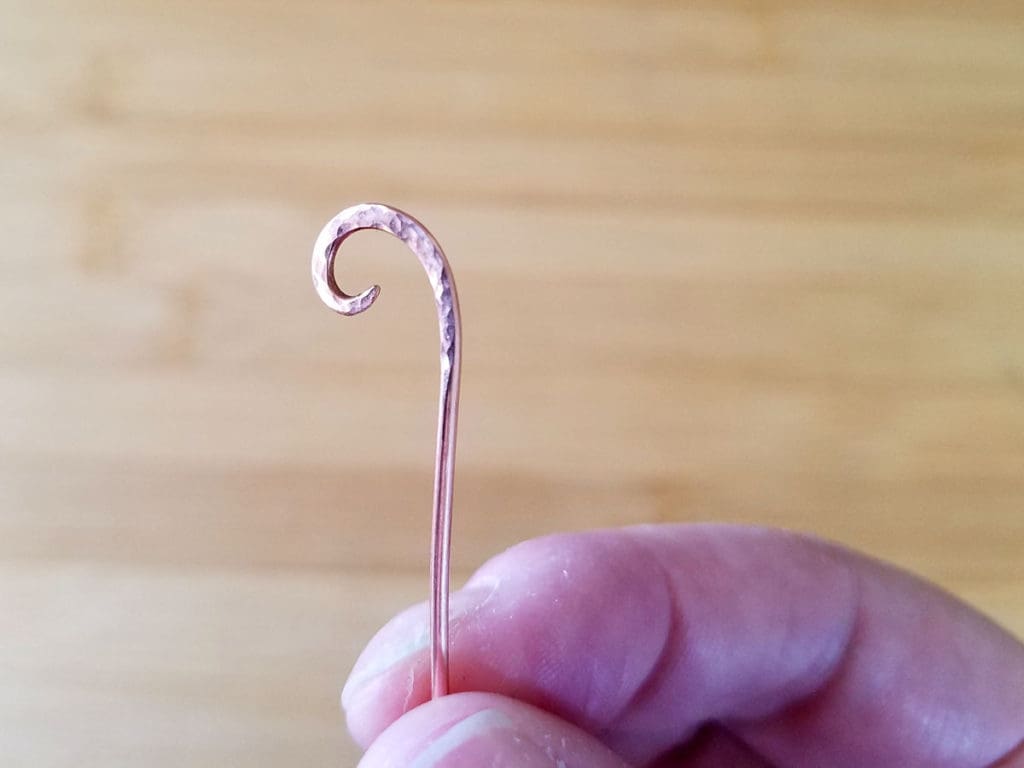
Once you’re happy with your texture, try texturing a different gauge of wire. And when you’ve finished that, try texturing a shaped wire, such as the curl we made in Part 1 of this series.
Here’s what my curl looks like after refining its form and then texturing it with my chasing hammer.
Key Points to Keep in Mind
- Relax any tension in your body.
- Maintain a firm but gentle grip on the hammer.
- Don’t stoke the wire. Just let the peen bounce like a ball along one edge of the wire and then the other edge.
- Hold the wire steady on the surface of your bench block.
- Move the peen slowly and evenly along the length of the wire.
- Focus your contact on the edges of the wire.
- Finally, practice, practice, practice.
Spend a few minutes practicing this technique every day for a week. Then send me pictures of your work. I’d love to see your progress.
We’re going to use these chasing hammer techniques on upcoming jewelry projects. So get ready to make some gorgeous wire jewelry with loads of light refracting texture!
Thank You!
Thanks for joining me today. I hope you enjoyed my 2-part series on how to effectively use your chasing hammer.
As always, I’d love to see what you’ve made with the help of Door 44 Studios tutorials. And I’m dying to hear your ideas and suggestions for new tutorials and blog posts. So, be sure to connect with me @door44studios on Pinterest, Instagram, and Facebook.
Until next time, go make something with a beautiful hammered texture!

P.S. Don’t forget to download my FREE Hammer Texturing Tip sheet from my resource library. It’s file #108. Need a password? Get one instantly by completing the form below!
Grab my FREE
Hammer Texture Tip Sheet
Subscribe (free!) to my newsletter for weekly updates and wire jewelry tips. PLUS get instant access to my resource library where you’ll find this file along with lots of other helpful wire jewelry resources!
Pin This Post for Later

Loved the chasing hammer instructions super explicit and understandable .I am a one year jewelry maker starting out and need to learn so much more especially bezeling gems .Thanks for your great instructions and will follow you to learn more .Thank You !
Welcome to Door 44 Eileen! I’m so glad the chasing hammer lessons are helpful. Bezeling gems is an important skill to learn, but I’m afraid it’s not one that I can teach presently. I don’t have a dedicated studio space, so I don’t have a proper soldering station with good ventilation. I do very limited torch work right now, but that’s something I look forward to doing in the future!