

How to Use a Chasing Hammer to Form Wire
One of the basic metalsmithing techniques that nearly all beginners struggle with is learning how to use a chasing hammer. Dive deeply into almost any jewelry making discipline, whether it’s wire weaving or silversmithing, and you’ll find that the chasing hammer is used pretty much universally across all disciplines. So it pays to learn to use this tool effectively. And wire is the perfect material to help you master your chasing hammer technique.
Would you like to download a summary of this post in a handy printable document? If so, be sure to grab my free Chasing Hammer Tip Sheet (file #104), which is located in my resource library.
If you don’t already have a password for my library, you can get one here.
This post may contain affiliate links. If you click on a link and then make a purchase, I may earn a small commission (at no cost to you). As an Amazon Associate I earn from qualifying purchases. To learn more, please see my full disclaimer.
Watch the Video Version of this Tutorial
Do you prefer video tutorials? You’re in luck because this tutorial is also available on my YouTube channel. Or, if you prefer written tutorials like me, just keep reading! Either way, I’ve got you covered.
The latest on Youtube:
Use the Right Tool for the Job
First and foremost, let’s make sure that we’re all talking about the same tool. If your hammer looks like the one pictured below, then we’ve got a problem!
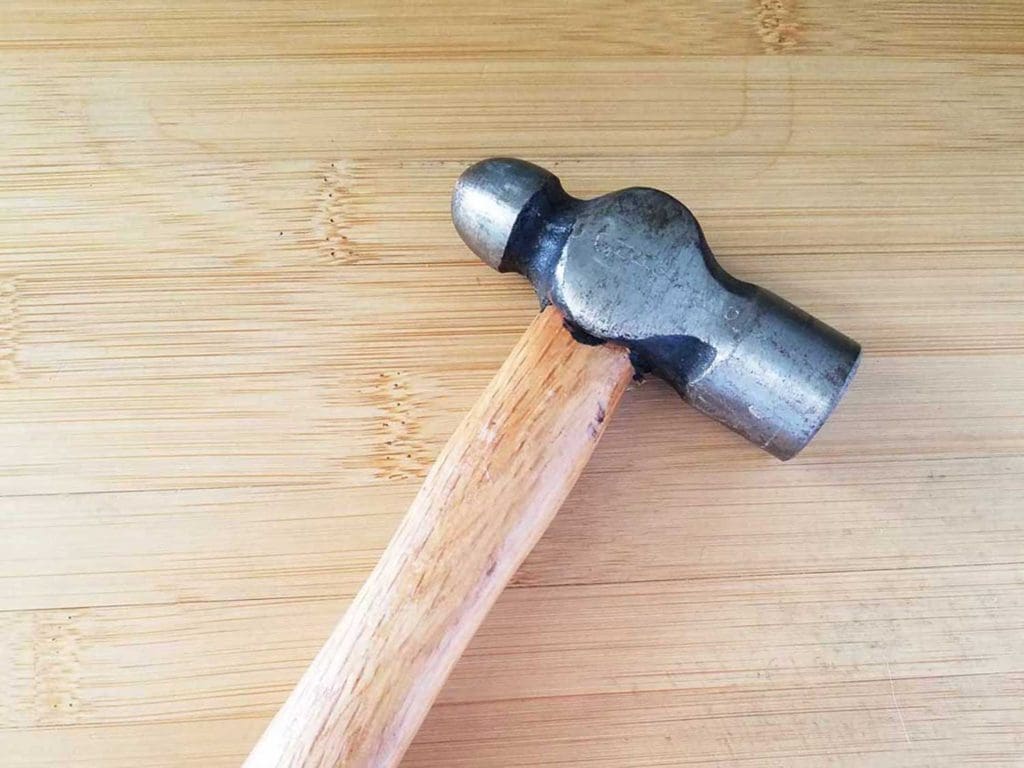
I see a lot of jewelry makers using a ball peen hammer, just like the one pictured above. In fact, just the other day I happened to watch a tutorial on YouTube, and the presenter was using a ball peen hammer to form a silver wire bracelet. I cringed as I watched that video because I could see how beginners get the idea that this is a suitable tool to use for jewelry making. But it’s not. Not really.
This is a mechanic’s ball peen hammer, and it’s intended for use in industrial/mechanical applications. If you look carefully at the engraving on the head, you’ll see that it’s been marked with my maiden name. This hammer has traveled with me for decades. I used it extensively in my earliest career days while I was employed as an automated equipment mechanic and later while I worked in the gas and oil fields of Alaska as an instrument technician.
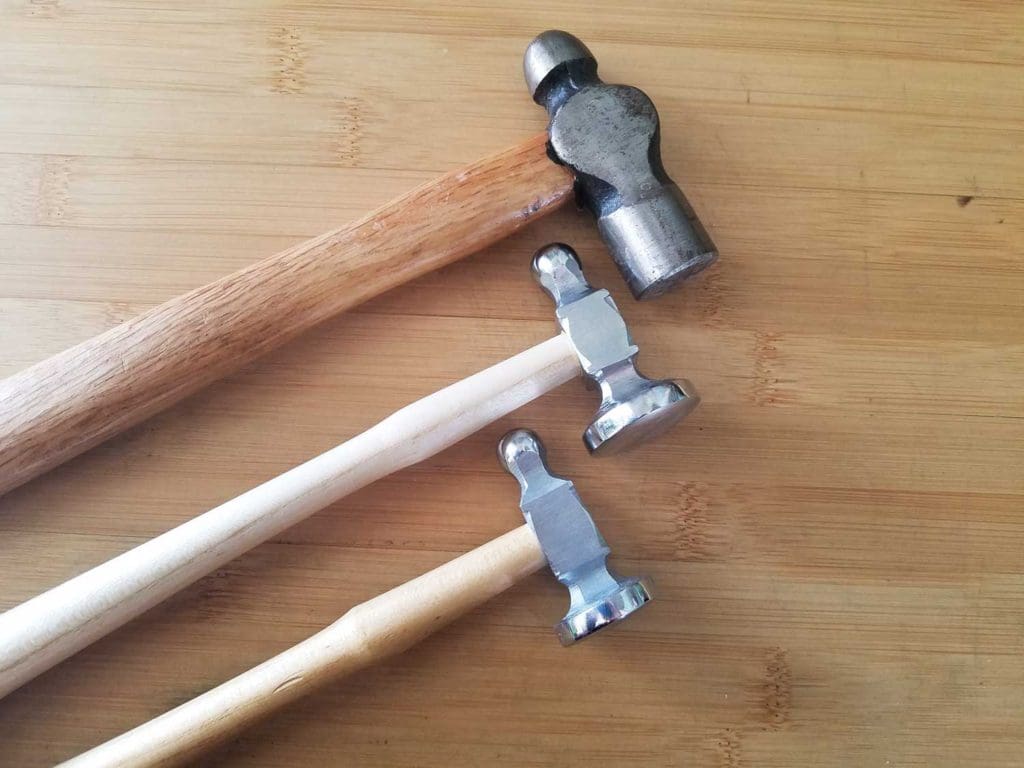
This ancient relic from my past, although similar in size to the larger of my two jeweler’s chasing hammers (see the image below) is nearly twice the weight of my 5 oz. chasing hammer and three times the weight of my 3 oz. hammer.
Do I use my ball peen hammer for making jewelry? Yes, but only on very heavy wire gauges — 10g and 8g wires, specifically. But that hammer is much too heavy to use on the wire gauges that are typically specified in my jewelry tutorials. And the fact that it has a flat face rather than the convex face of a jeweler’s chasing hammer means that it inevitably creates a lot of tool marks. It will also leave tools marks on your bench block because the steel head on a mechanic’s ball peen hammer is typically going to be much harder than the steel used to make a standard jeweler’s bench block.
Again, I do use this hammer in rare instances on very heavy wire gauges. And when I use it, I’m also careful to use my old beat-up bench block, which is pocked with tool marks from my beat up old ball peen hammer.
If your hammer looks like the one pictured above (top) — if you found it in your husband’s tool box (or your own toolbox, as in my case) or you bought it at your local hardware store, please do yourself a favor and invest in a proper chasing hammer. Trust me — it’s an inexpensive tool, and it’s going to make a world of difference in the quality of your work. I’m all for saving money and minimizing tool clutter. But there’s no downside to getting the right tool for the job in this particular instance. Also, here’s a link to my favorite bench block, in case you’d like to find something that’s a bit quieter to use.
Download my Chasing Hammer Tip sheet for free from my resource library. It’s file #104. Need a password? Get one instantly by completing the form below. You’ll also find this form at the bottom of this post if you’d prefer to finish reading before grabbing the tip sheet.
get my free planishing guide
When you join my newsletter
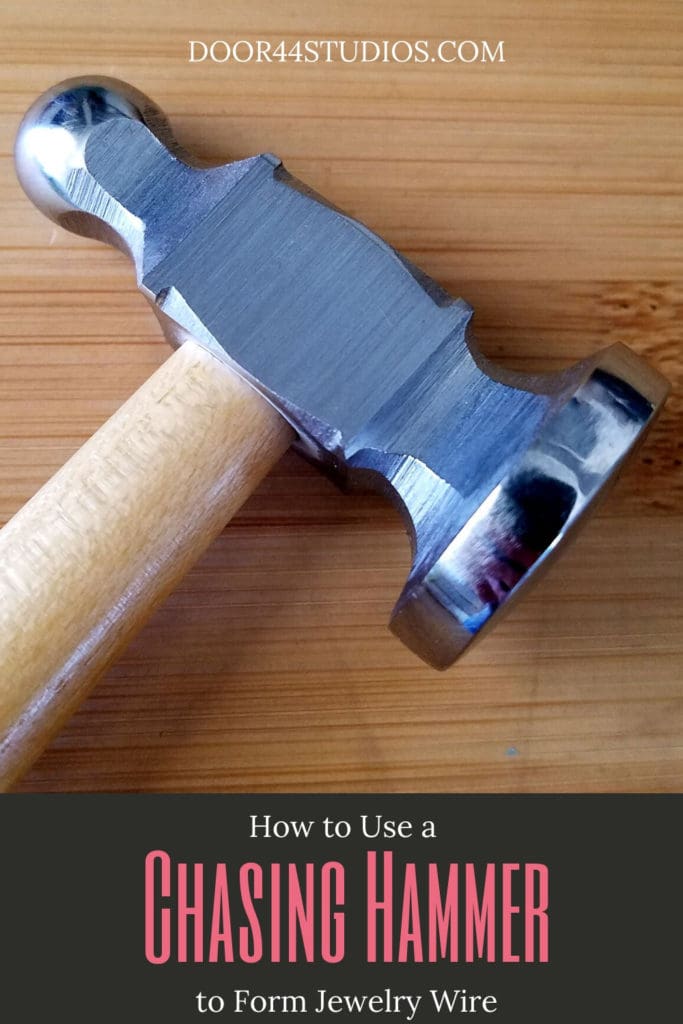
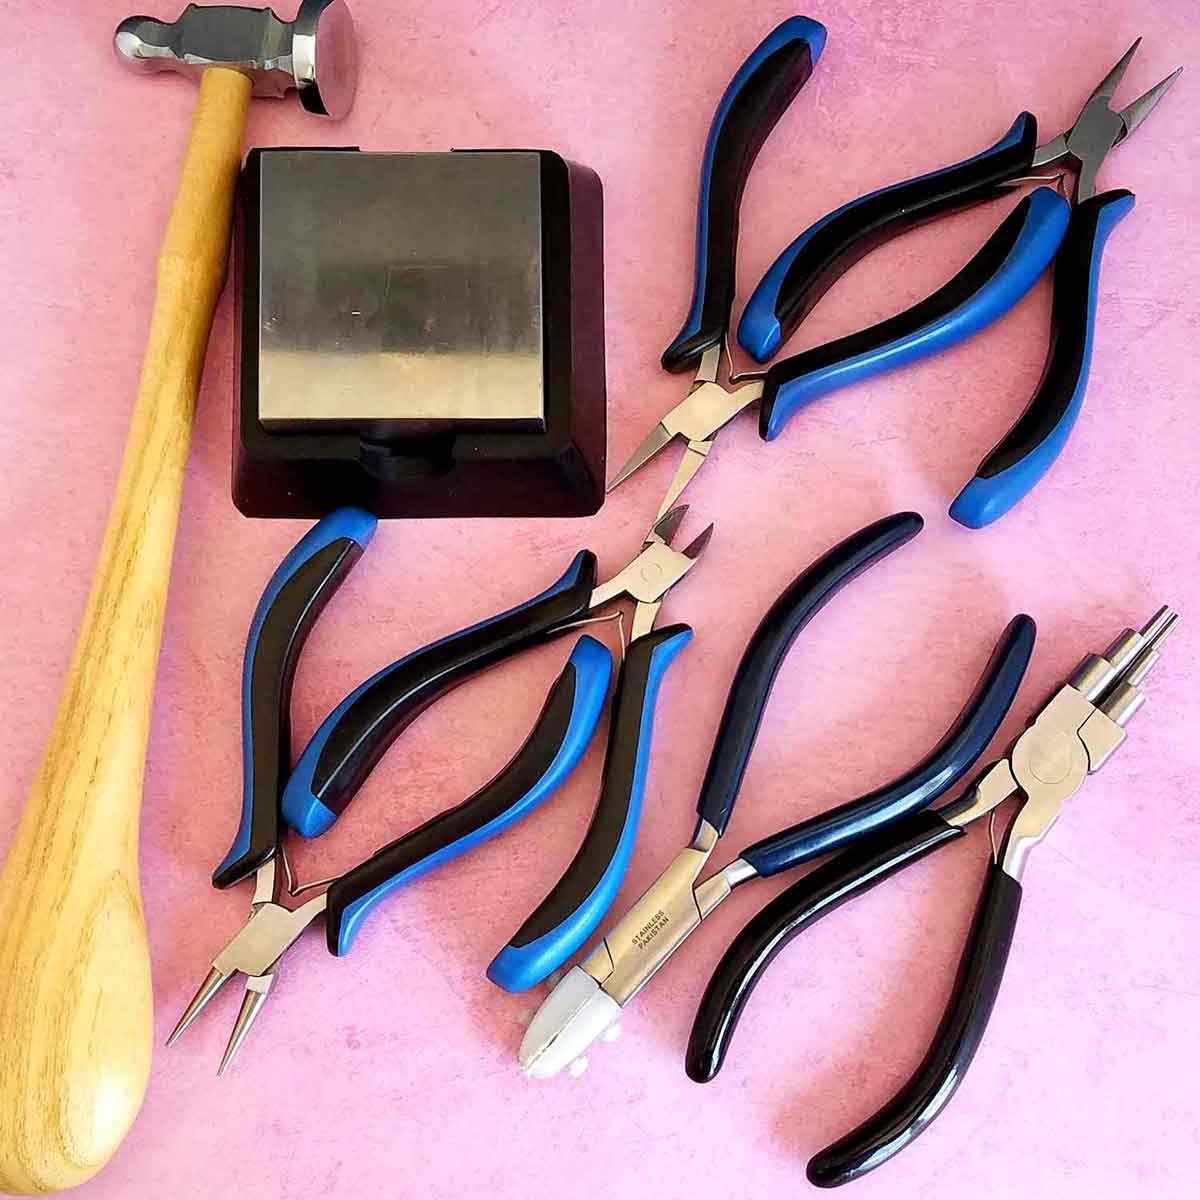
The Anatomy of a Chasing Hammer
There are lots of different chasing hammers on the market, but if you shop around you’ll discover that, no matter what brand or price point, they all share certain common traits. Let’s take a closer look.
The Chasing Hammer Handle
Most standard jeweler’s chasing hammers have a solid hardwood handle with a bulbous end, similar to that shown on my well worn 3 oz. Beadsmith chasing hammer below.
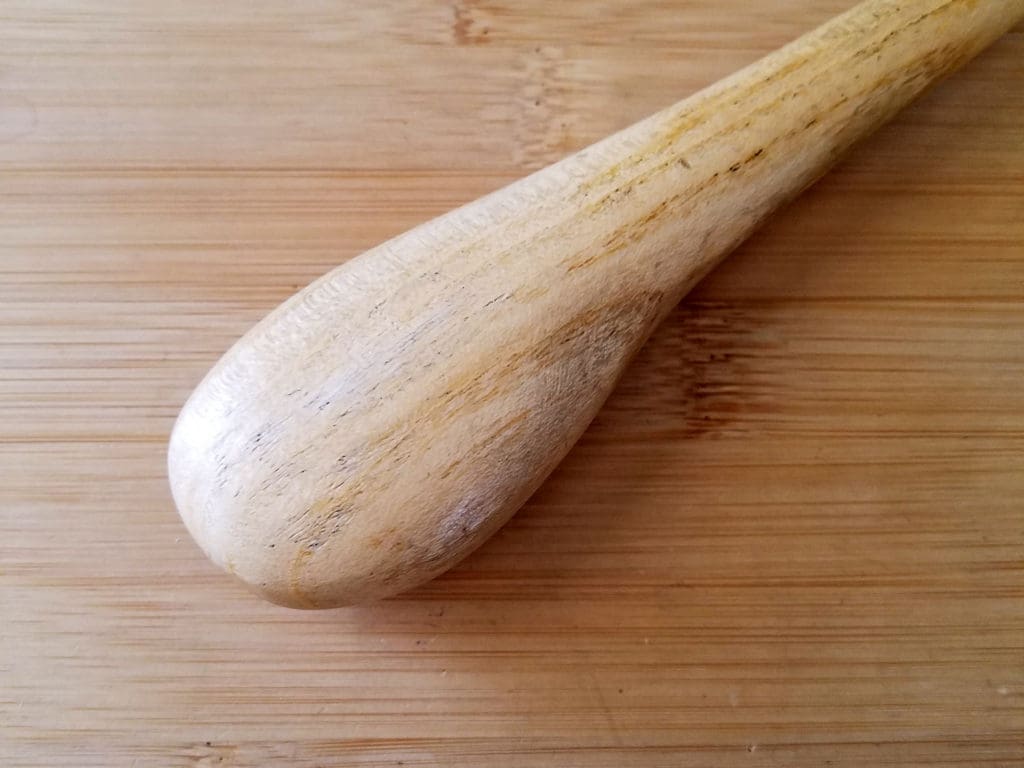
I’ve had this hammer for as many years as I’ve been making wire jewelry. It was one of the first jewelry tools that I ever purchased, and I can’t imagine making jewelry without it. In fact, if you look closely at the image above, you can actually see where the finish has completely worn off in the area where I grip the handle.
How to Properly Hold a Chasing Hammer
Chasing hammer handles are designed with that bulbous end for both comfort and control. One of the biggest mistakes I see beginners make is that they grip their chasing hammer up close to the head, like this.

This is a natural and instinctive tendency when working with hand tools. We all seem to think that the best way to control a hammer is to grasp it as close to the head as possible. But the truth is that the best way to control a chasing hammer is to place your hand as far from the head as possible. That seems counter intuitive, doesn’t it? I get it. And so do tool designers.
A chasing hammer’s handle is designed specifically to encourage proper hand placement because tool designers want you to get the most from your tools.
Hand Position Exercise
Let’s try a little experiment with hand placement so you can learn to feel the difference. First, grip your chasing hammer the wrong way, from the middle of the handle, as shown in the image above.
Now move your hand as if you’re hammering on an invisible bench block. As you do so, think about how the hammer feels. Pay attention to how short and choppy your hammer strokes are. Does the end of the handle bump your wrist or forearm as you move? Make a note of any awkwardness that you feel in your arm and shoulder as you hold your hammer this way.
Now grasp your hammer the correct way, from the bulbous end of the handle, as shown below. The thickest part of the handle should fit comfortably in the palm of your hand. Now repeat the air strokes that we did in the first hand position.
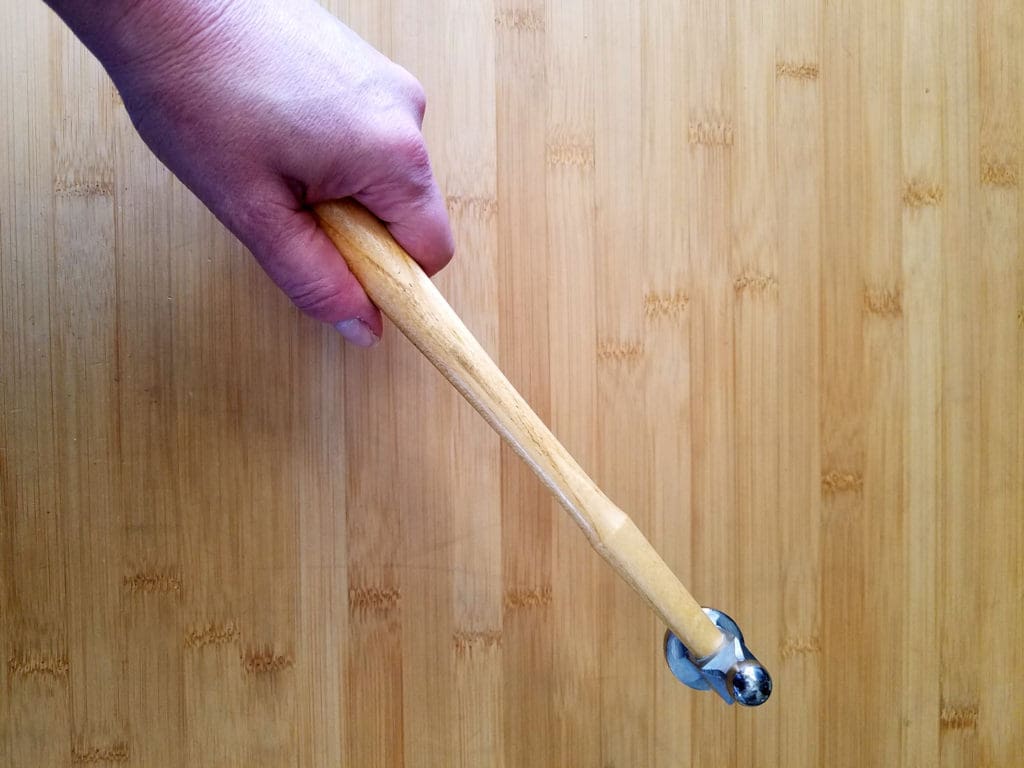
Do you feel the difference? Are your hammer strokes longer? Smoother? Do you feel like you have more control? Does the hammer feel well balanced as you swing? The answers to all of these questions should be a resounding Yes!
This is the difference that proper hand position makes. And it really doesn’t matter how expensive your chasing hammer is or isn’t. You can buy an inexpensive basic chasing hammer like mine, or you can buy a top-of-the-line Fretz Chasing Hammer. Regardless of how much a hammer costs, you’ll notice very little difference in the balance of chasing hammers all across the price spectrum when they’re held properly.
The expensive hammer will certainly feel more substantial and solid, as you would expect from a high-end tool. But in terms of overall balance, it’s not the tool itself that makes the difference. It’s proper hand placement that matters most.
Now that you know how to correctly hold your chasing hammer, let’s take a closer look at the business end of this handy little tool.
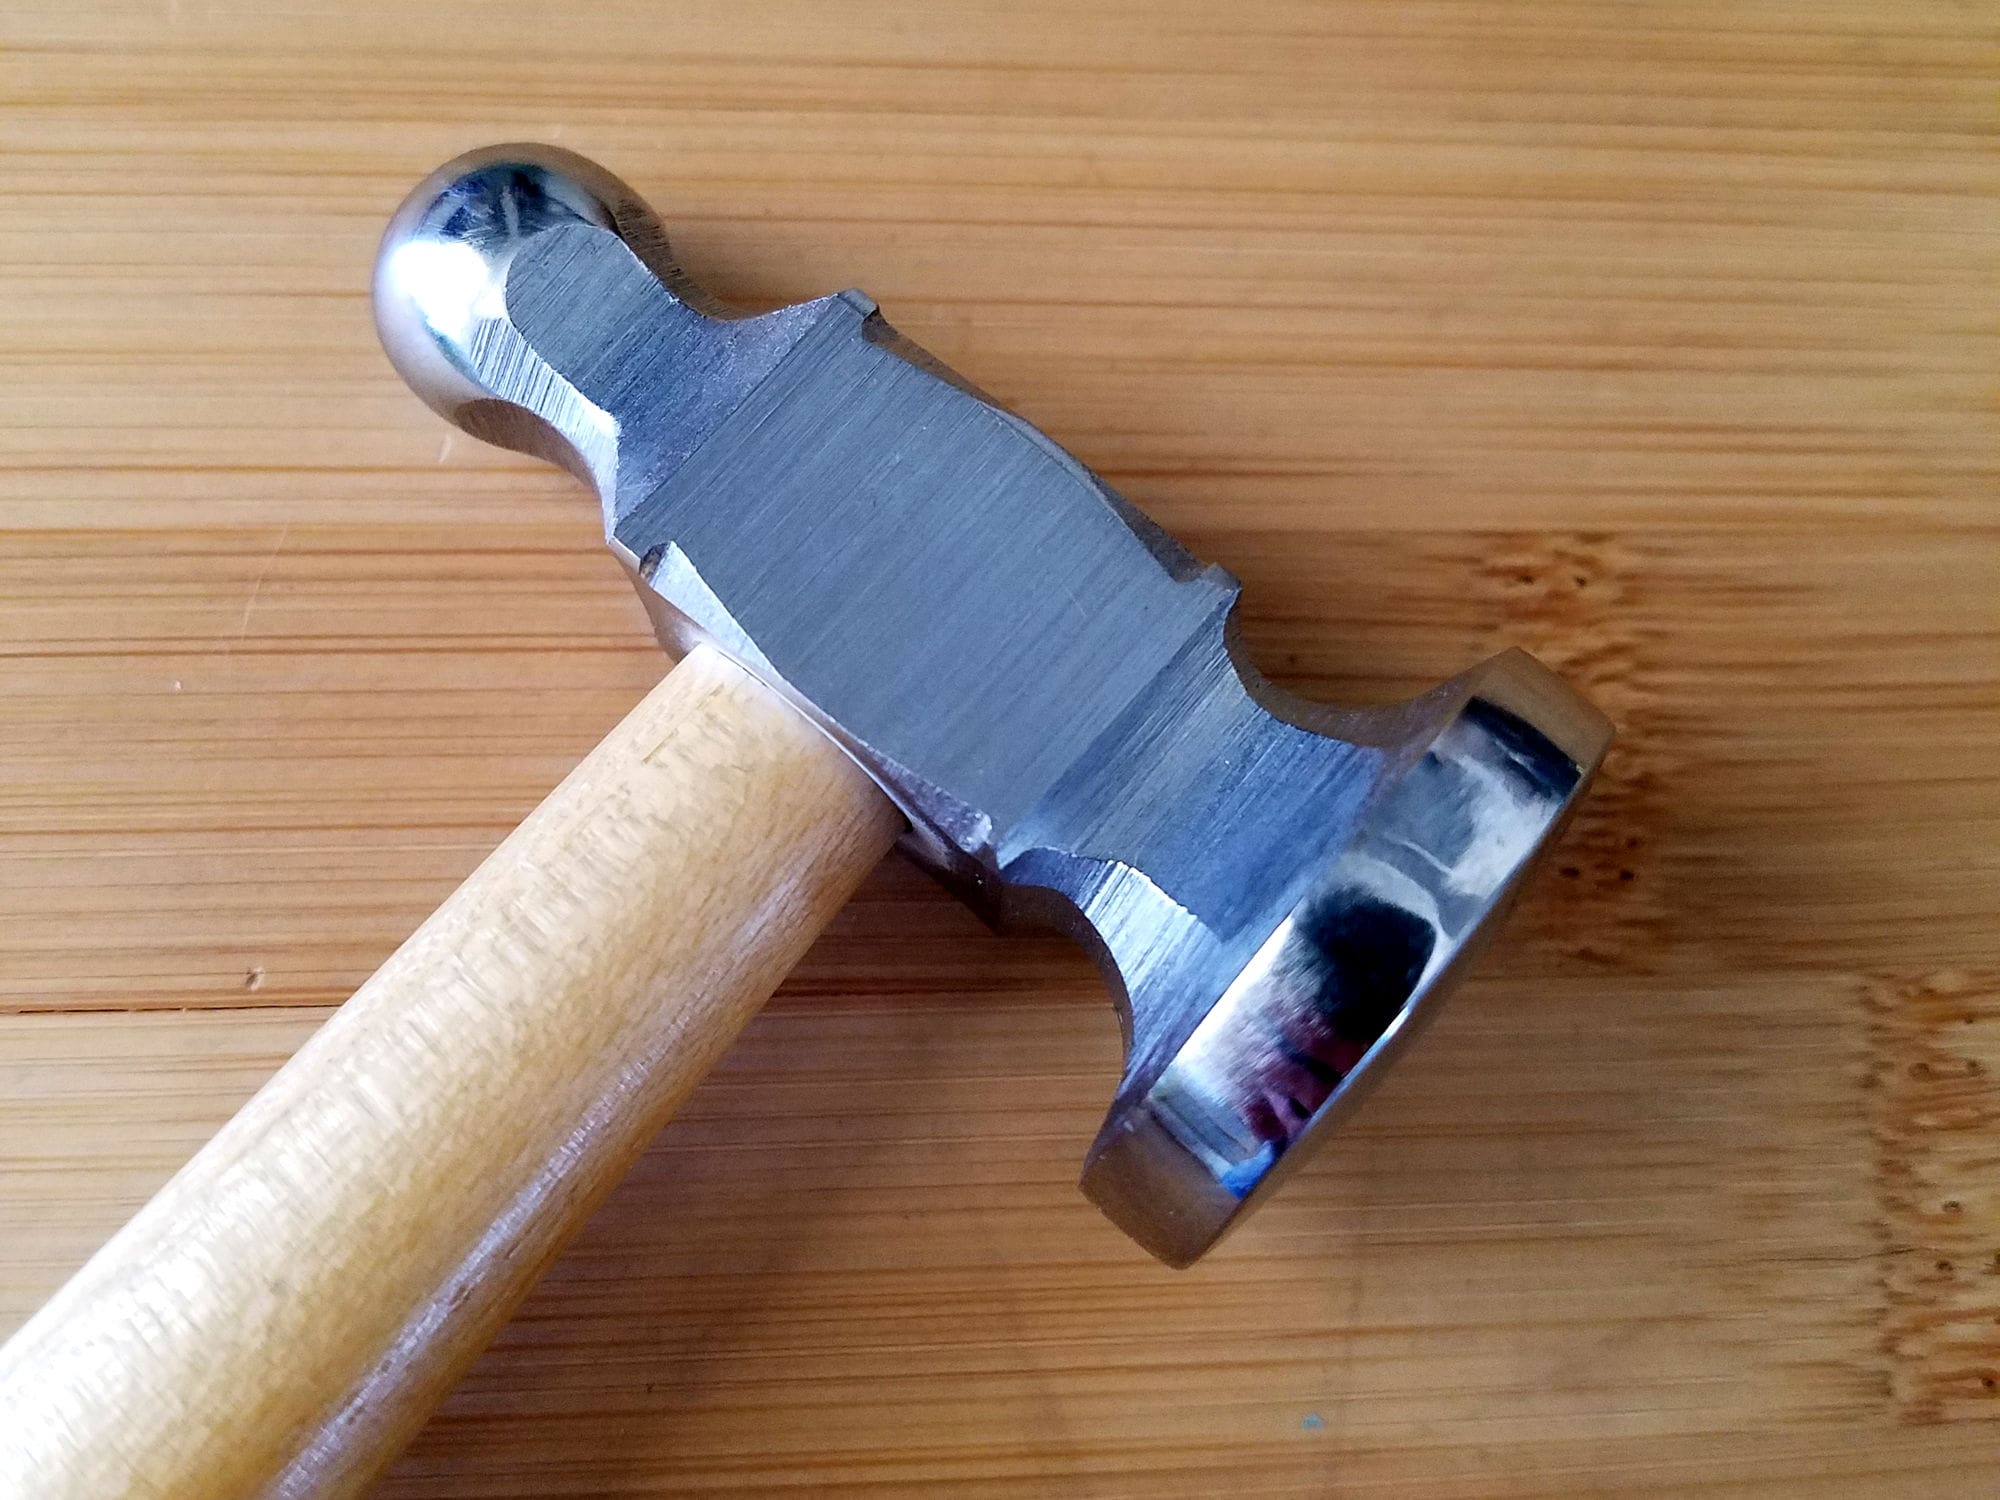
The Chasing Hammer Head
Just like the handle, the head of a typical chasing hammer will strongly resemble the head of my trusty little chasing hammer shown below.
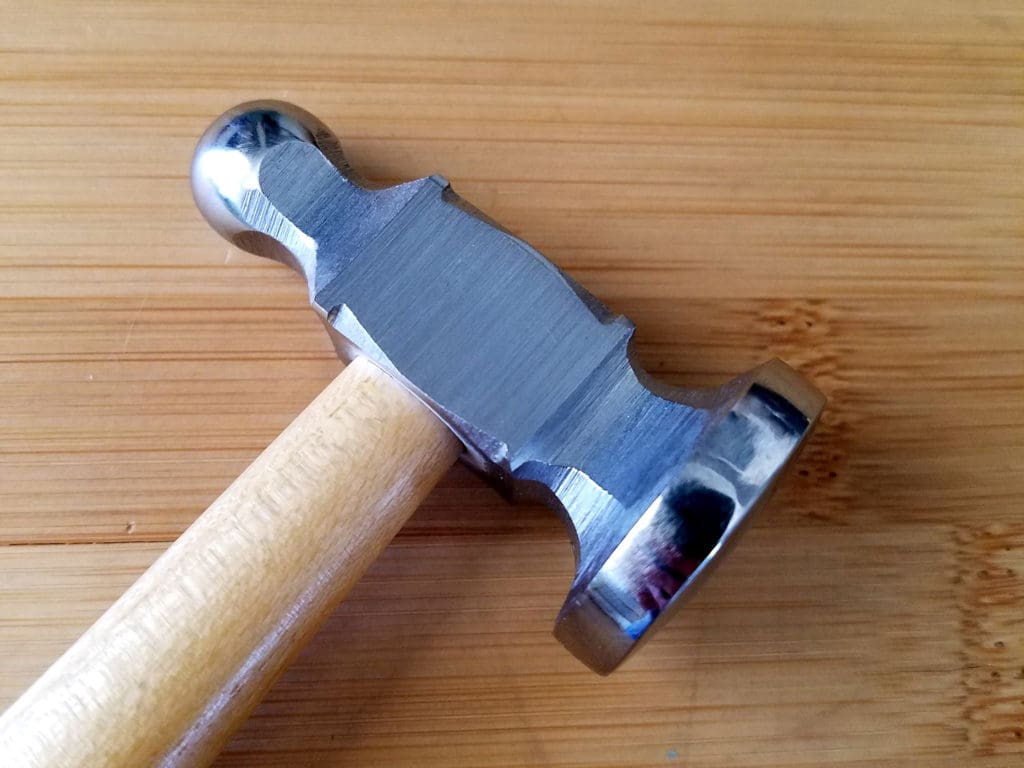
Note that the two sides of the hammer have distinctly different shapes. One end is shaped like a ball. That shape is common for hammers that are designed for metalwork, so it may look familiar. It’s called a ball peen.
The Ball Peen Face
Ball peen hammers are used for all sorts of metal work across lots of different industries. And the ball is used specifically to ‘peen’ or dimple metal.
Peening can be used for many reasons, but for our purpose as jewelry makers, peening is most frequently used to add texture and interest to a metal surface.
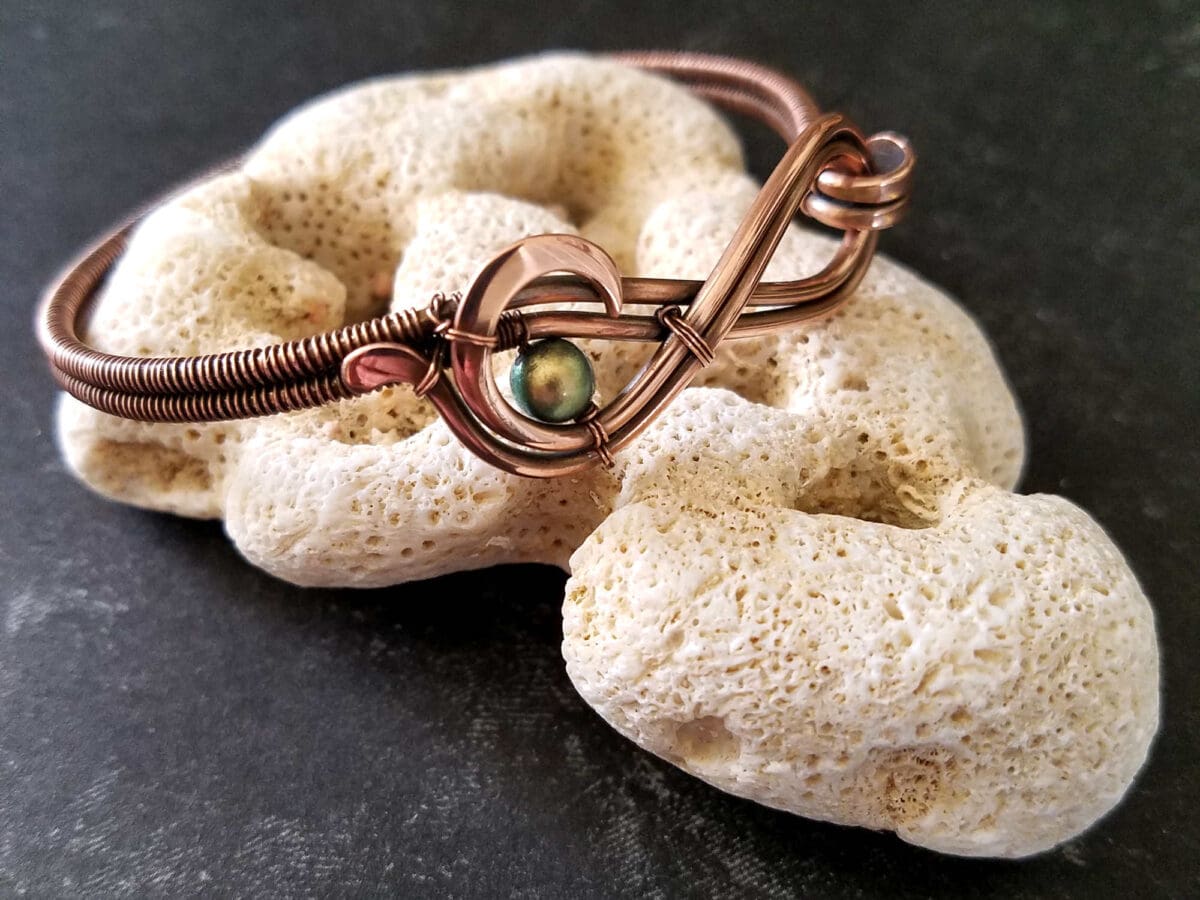
An example of how I’ve used peening as a decorative element in my work can be seen on the knotted cuff pictured below. Notice how the dimpled texture on the single strand of hammered wire catches and reflects light.
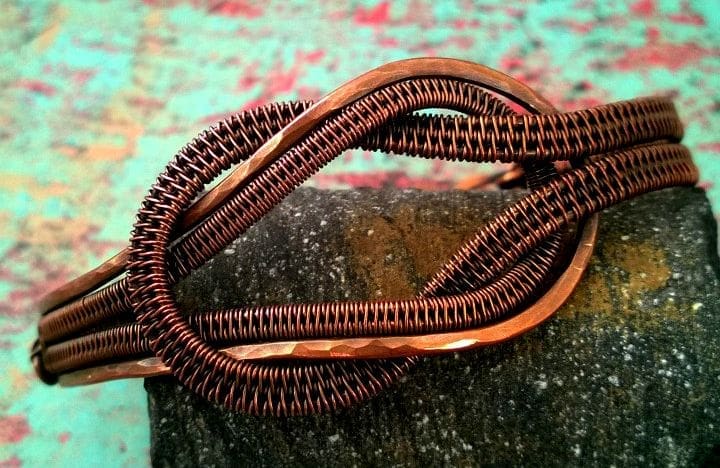
This texture is easy to achieve, and I’ll show you exactly how to do it in Lesson 2 of this series. But for today’s lesson, we’re going to focus on learning to use the larger planishing side of the chasing hammer first.
The Planishing Face
This is difficult to capture in an image, but the first thing I want you to notice about the planishing face of your hammer is that it isn’t perfectly flat. It’s actually domed ever so slightly into a convex curve so that the center of the face is just a bit higher than the edges.
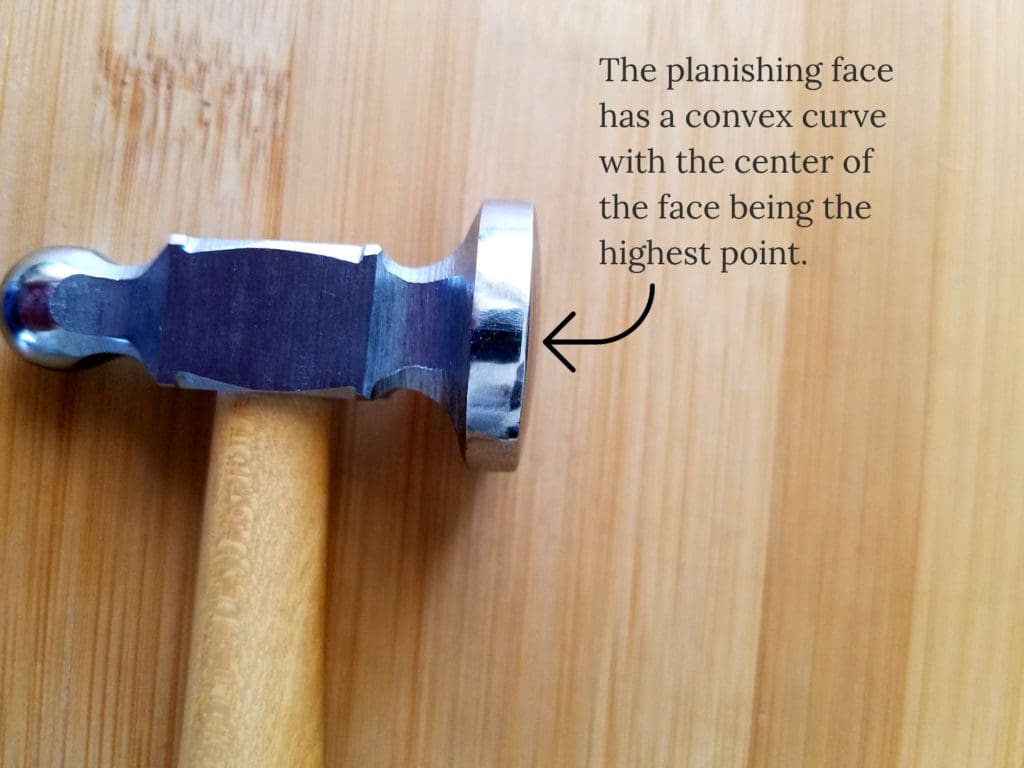
That curve is actually the secret to ‘chasing’ or forming your wire. When used properly, the planishing face allows you to smooth and shape your wire with minimal tool marks.
Mastering Planishing Technique
Planishing is the act of flattening, smoothing, shaping, or forming metal. And we accomplish these acts by coaxing the metal to move in a particular direction.
I love to bake. So the way that I like to think of planishing is like this: I imagine that my wire is a ball of dough and the planishing surface of my chasing hammer is my rolling pin.
Do you remember when I said earlier that the convex curve on the planishing face of your hammer holds the secret to forming your wire? Well that curve works much like the rounded surface of a rolling pin.
When that curve makes contact with you wire, it causes the wire to spread and stretch away from the point of contact, much like a rolling pin causes dough to spread and stretch away from the curve of the pin.
Practice on Different Wire Gauges
Let’s try it out. Gather a few scraps of wire in different gauges from say 16ga to 22ga. Whatever you have on hand is fine. Just try to choose three or more different gauges that you would typically use for core wires.
We’re going to practice chasing those wire scraps so you can learn to shape wire with maximum efficiency and minimal tool marks.
I chose to use 16ga wire for my demo photos. That’s about the heaviest gauge of wire that my 3-ounce chasing hammer can comfortably form, and it’s a gauge that photographs well for the purpose of this demonstration. So that’s what you’ll see in all of the images that follow.
Finding the Most Effective Hand Position
Do you remember our discussion about where to place your hand on the handle of your hammer? Well, now we’re going to talk about where to place your hand in relation to your bench block.
For best results, you want to position your hand so that the handle of your hammer is roughly parallel with the surface of your bench block when the face of your hammer is resting lightly on the block, as shown below.
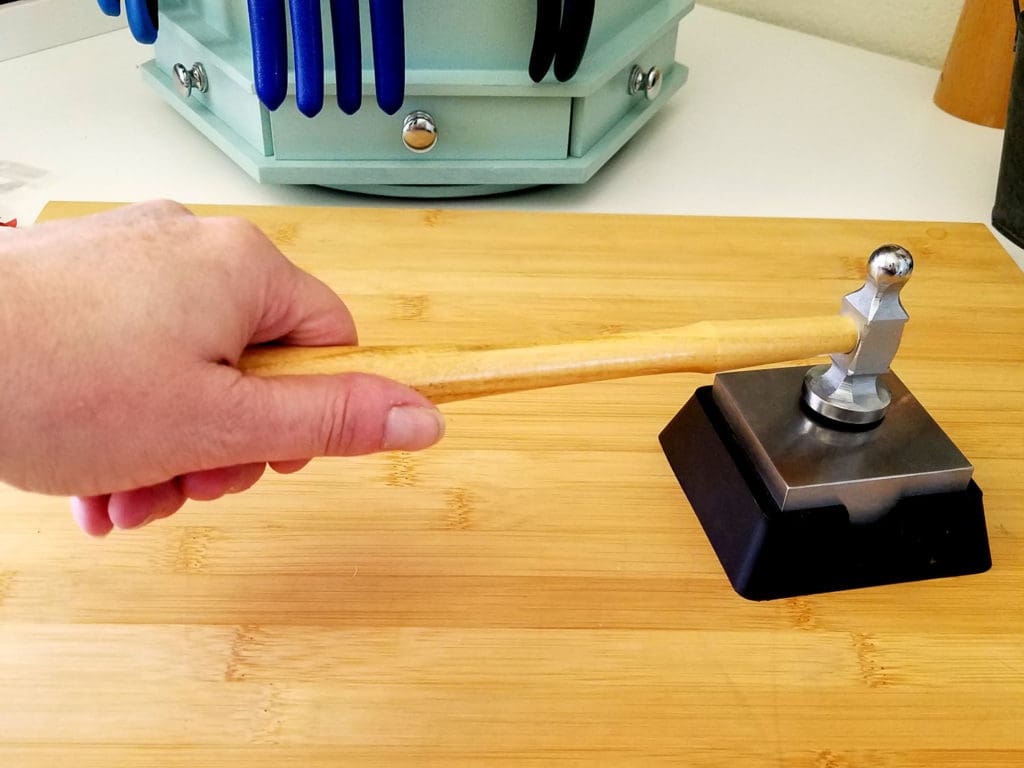
This position does two things. First, it maximizes the efficiency of the planishing face of your hammer by making sure that the crown or apex of the convex curve on the face is the first part of the hammer to make contact with your wire.
Secondly, this position minimizes muscle tension and fatigue in your arm and hand. You want your muscles to be relaxed and your grip on the handle to be fairly loose when planishing because this technique requires far less force than you might imagine.
Gauging Your Force
Before you started making jewelry, what was your experience with using a hammer? Most of us are familiar with using a hammer in a household context. Maybe you’ve only used a hammer before to hang pictures on your walls. Or perhaps you have some experience with woodworking. If that’s the case, than you already have some misconceptions about how to use a hammer that we need to correct.
Hammering a nail into a piece of wood requires a certain degree of brute force. And that force is achieved by actively swinging the hammer at a high velocity.
Planishing metal, on the other hand, requires more finesse than brute force. We achieve that finesse by moving the hammer in slower and more calculated strokes. The goal is to let the weight of the hammer head do most of the work. So we’re going to gently lift the head an inch or so above the wire and then let it fall onto the the wire.
Done properly, the full force of your stroke should be more of a light tap than a hard blow. My husband likes to refer to this as elf hammering. He swears that I employ a bunch of elves to make my jewelry and that I don’t actually make it myself. Haha.
My first hammer stroke is always light enough that it wouldn’t hurt a bit if I accidentally hit my finger instead of the wire. I then use the results of that stroke to gauge my force for the following strokes.
Let’s give it a try. Take a piece of scrap wire and give it one light stroke with your chasing hammer. Make sure your hand is in the correct position, then lift the head of your hammer about an inch above the wire by flexing your wrist. Finally, relax your wrist and let the weight of the hammer head fall onto the tip of your wire.
Now, let’s examine the results of that first stroke because it’s loaded with useful information when you understand what you’re looking for.
Ideally, your wire should look something like the wire pictured here.
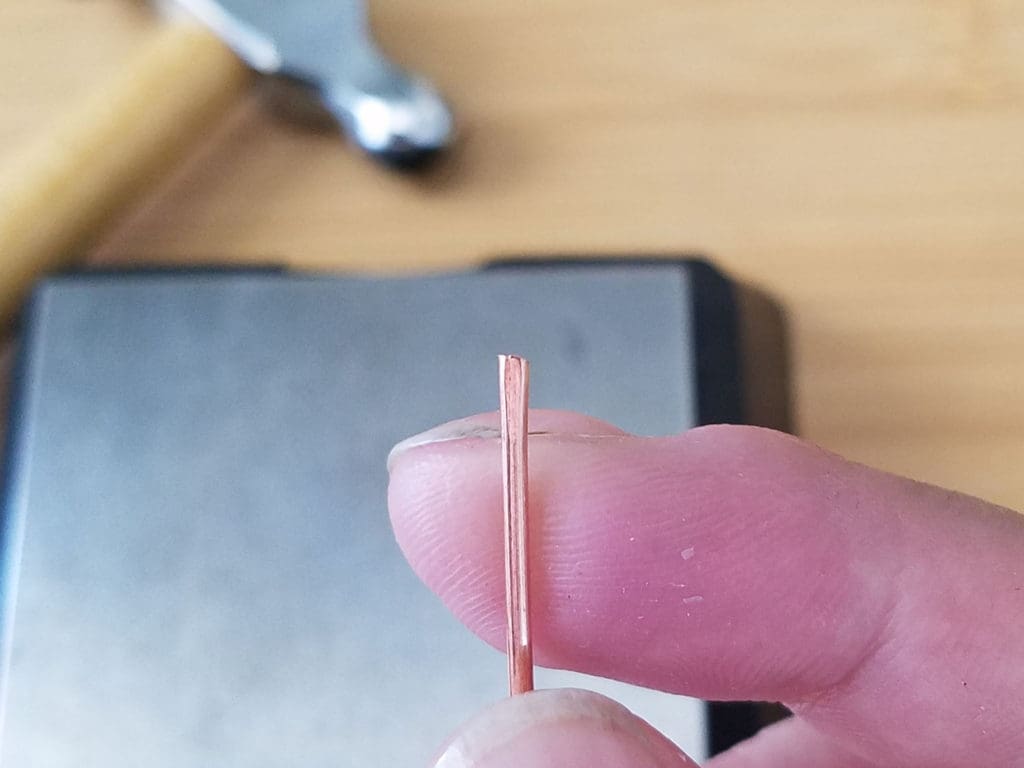
As you can see, the tip of the wire is just slightly but evenly flattened and there are no tool marks on the wire. This tells me that my hammer is positioned correctly to minimize tool marks and that the weight of the hammer head alone is enough to form my wire without a force multiplier like added velocity. In other words, I don’t have to swing my hammer harder in order to flatten my wire. I can simply work it with multiple strokes similar to my test stroke.
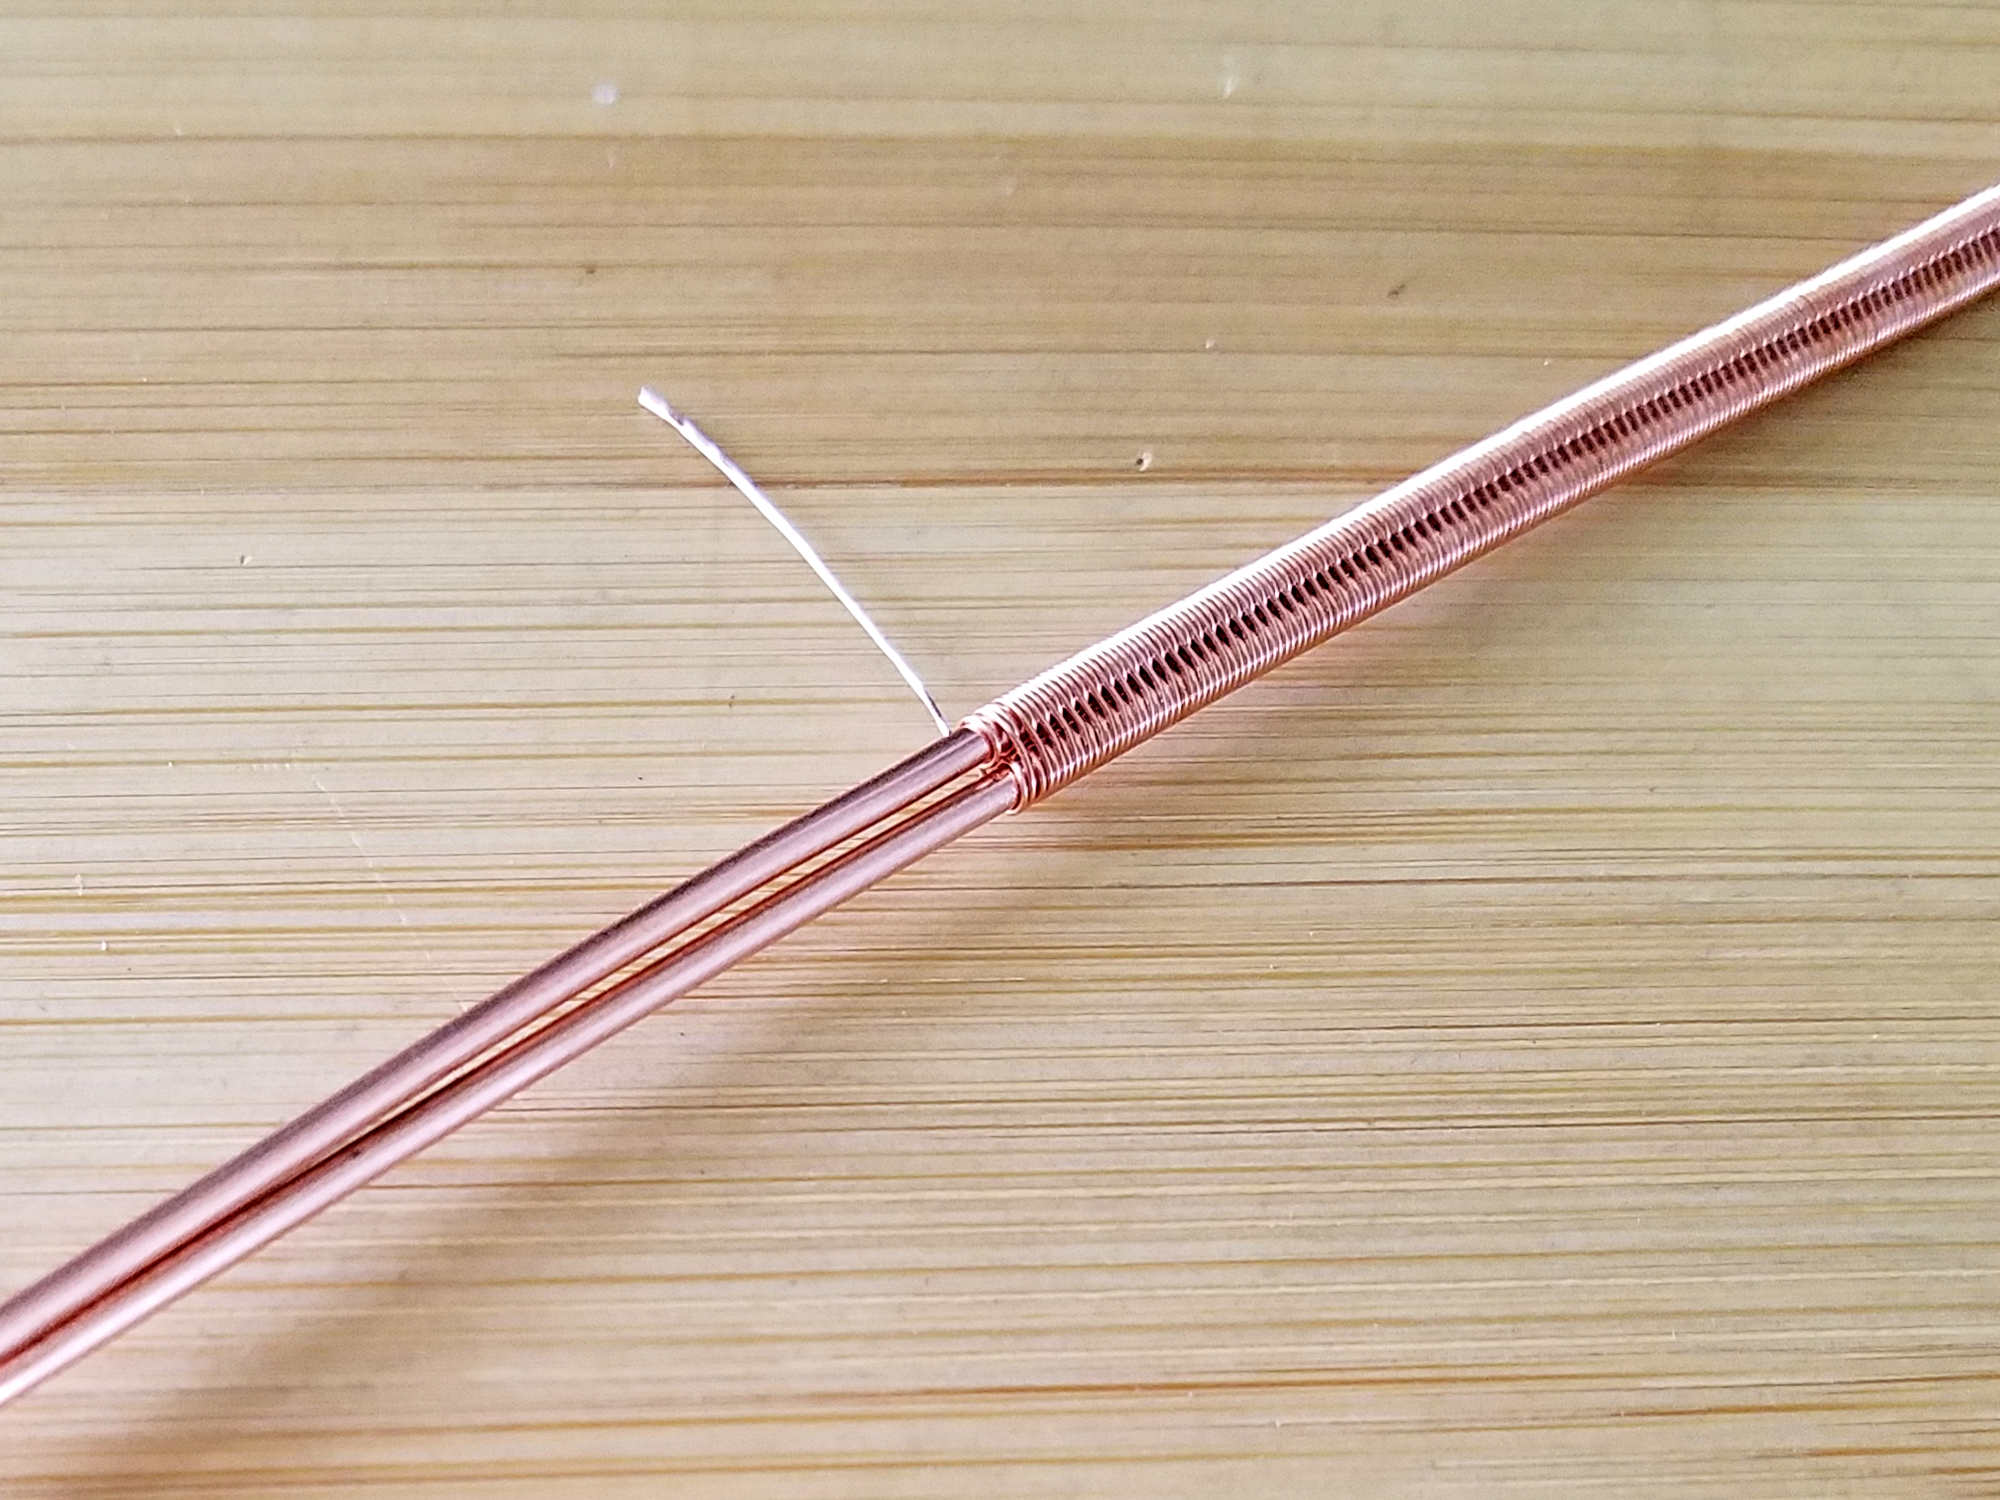
Notice also that the tip of the wire is angled slightly. That’s an indication that my test stroke was a bit off center. There’s no real harm in that, and this tip can be easily evened out with subsequent hammer strokes. But this shows you clearly how the curve on the face of your hammer moves and shapes your wire. And the softer your wire is, the easier it is to shape with a hammer. The sample that I used for this tutorial is 16ga dead soft copper.
If your wire looks something like mine and you don’t have any obvious tool marks, you can skip the next section. Otherwise, use the Troubleshooting section to figure out where your tool marks are coming from.
Troubleshooting Tool Marks
If your wire looks very different than the image above, here’s how to figure out what went wrong.
If you see a crease or a tool mark at any point on your wire, that indicates that the edge of your planishing surface made contact with your wire. This can happen for a couple of reasons. First, your hand may be at the wrong angle relative to the surface of your bench block. Secondly, it can indicate that your grip is too tight.
If the tool marks cut across the surface of your wire, as shown below, that usually indicates a problem with your hand position.
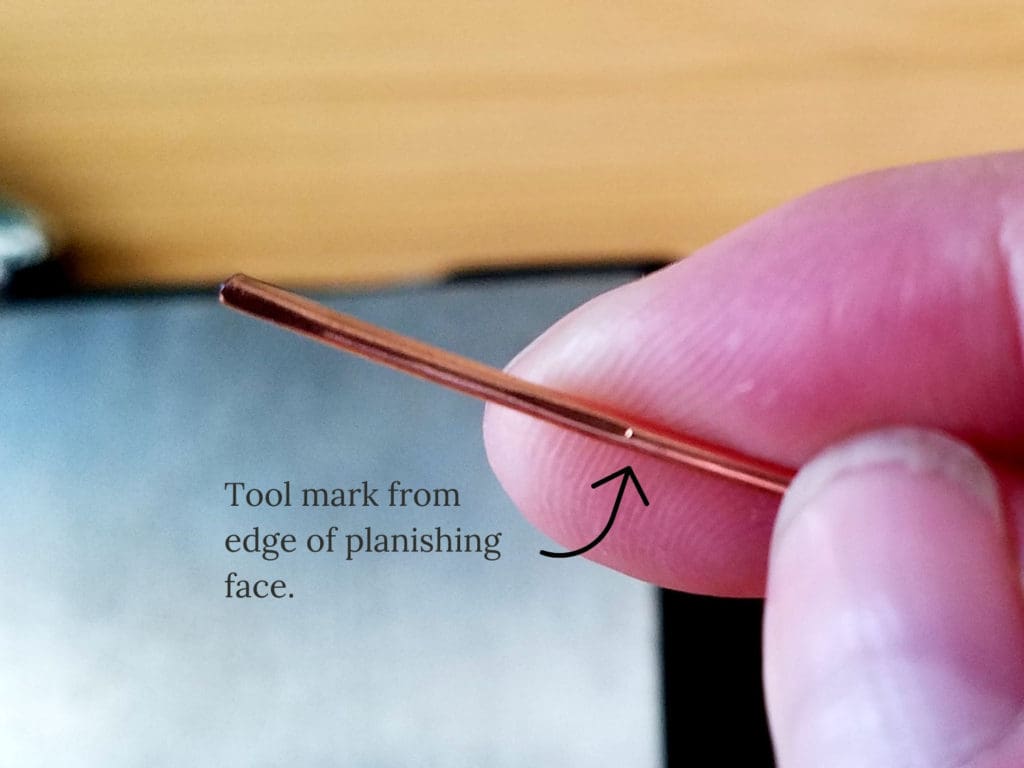
Your hand is either too high, in which case the tool mark will have come from the leading edge of your planishing face. Or your hand is too low, which can cause the trailing edge of your hammer face to leave a mark closer to the tip of the wire.
If you have tool marks on both sides of the planishing face, then you’re either using too much force or your hammer is too heavy for the wire gauge and temper that you’re working with.
Again, let the weight of the hammer head do all of the work. You don’t want to swing the hammer. Instead, you want to let the hammer sort of free fall onto your wire.
Adjust your hand position and the force of your stroke accordingly and try again until you no longer see tool marks cutting across your wire.
If the tool marks run along the length of the wire, this is an indication that you’re allowing the head of the hammer to rotate as it falls. And you’re catching the wire with the edges of your planishing face.
This tends to happen when you grip the hammer too tightly or when you have a lot of tension in your forearm. Remember, planishing metal requires more finesse than brute force. And you achieve that finesse by relaxing your grip.
You want to grip the handle of your hammer firmly, but lightly, as if you’re holding a small bird in your hand. Don’t hold on so tight that you squeeze the poor little creature to death. But you do want to hold on firmly enough that the bird can’t easily escape your grip.
Practice relaxing your grip and try again until you no longer make tool marks on your wire.
Forming Wire With Your Chasing Hammer
At this point we’ve optimized our hand position. We’ve dialed in our grip. And we’ve calibrated the force of our hammer strokes. Now it’s time to begin working our wire. This is the fun part!
Let’s go back to our baking analogy for a moment. Imagine again that you’re rolling out a pie crust. And think about how the rolling pin moves the dough. It stretches the dough in the direction that you roll the pin, right?
Well, your planishing hammer does exactly the same thing. It stretches the wire in the direction that you draw your hammer. This technique takes a bit of practice. But once you get the hang of it, it’ll become second nature. Much like rolling out a pie crust is second nature for an experienced baker.
In order to achieve this drawing technique, we need to add a second movement to our hammer stroke. Let the hammer head fall straight down, just as we did when gauging the force of our first blow above. But just as the face of your hammer makes contact with the wire, I want you to draw the hammer face back slightly along the length of your wire. Follow the path of the arrow on the image below.
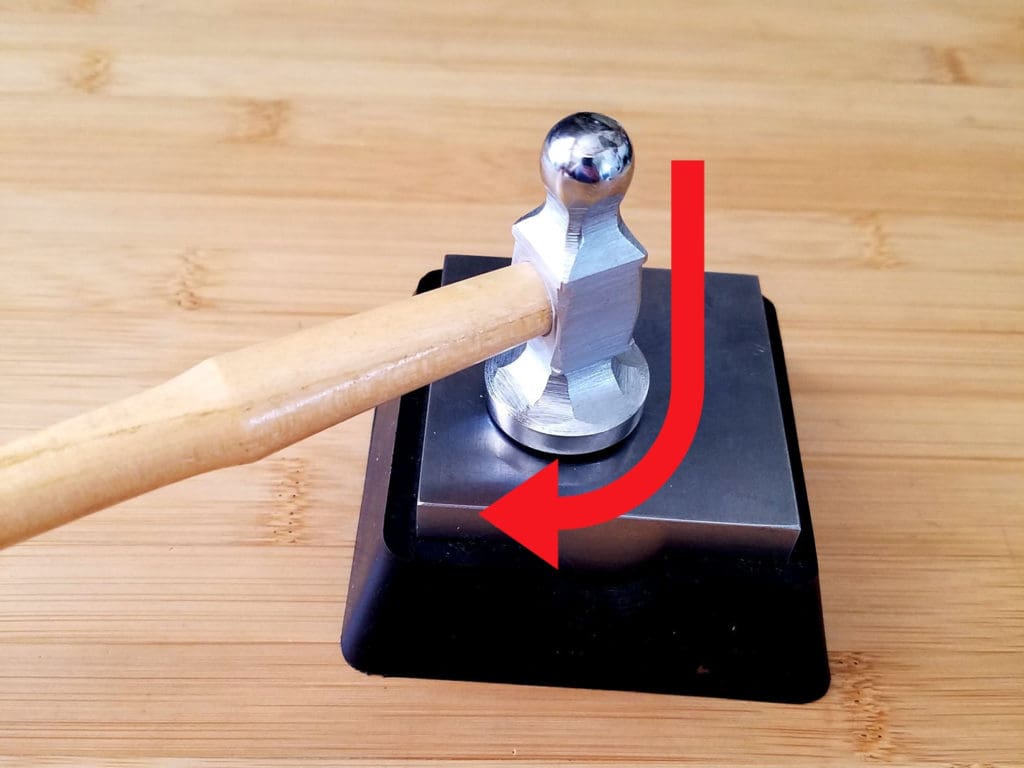
Imagine that you’re writing the letter “J” with each stroke. And that drawing motion at the bottom of your stroke will stretch and pull the wire into the desired shape.
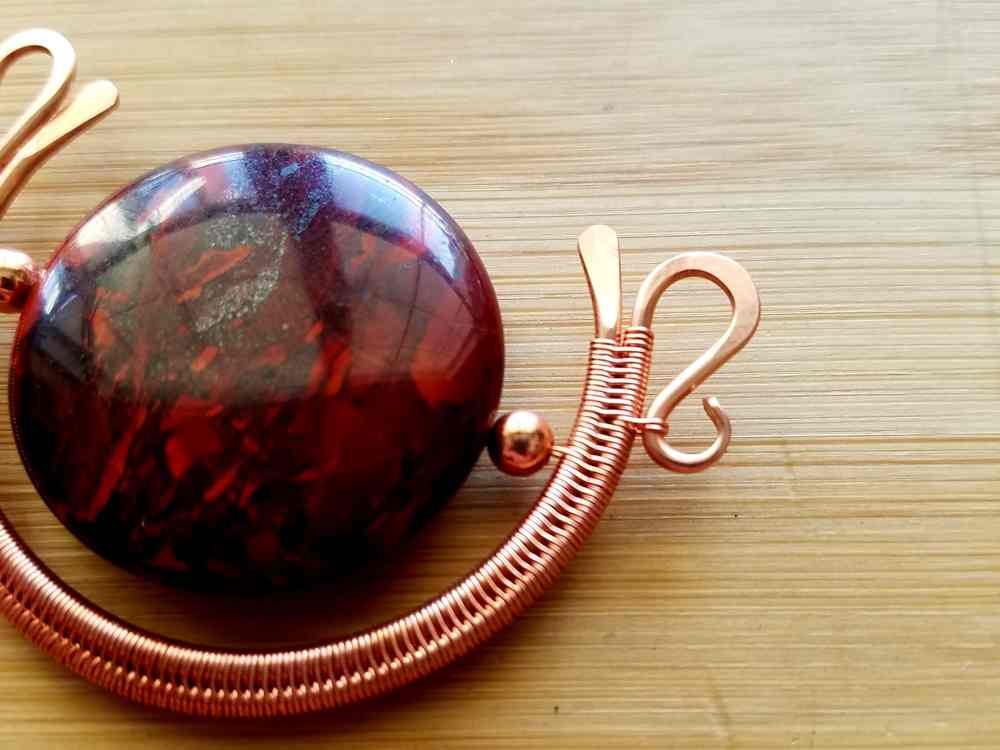
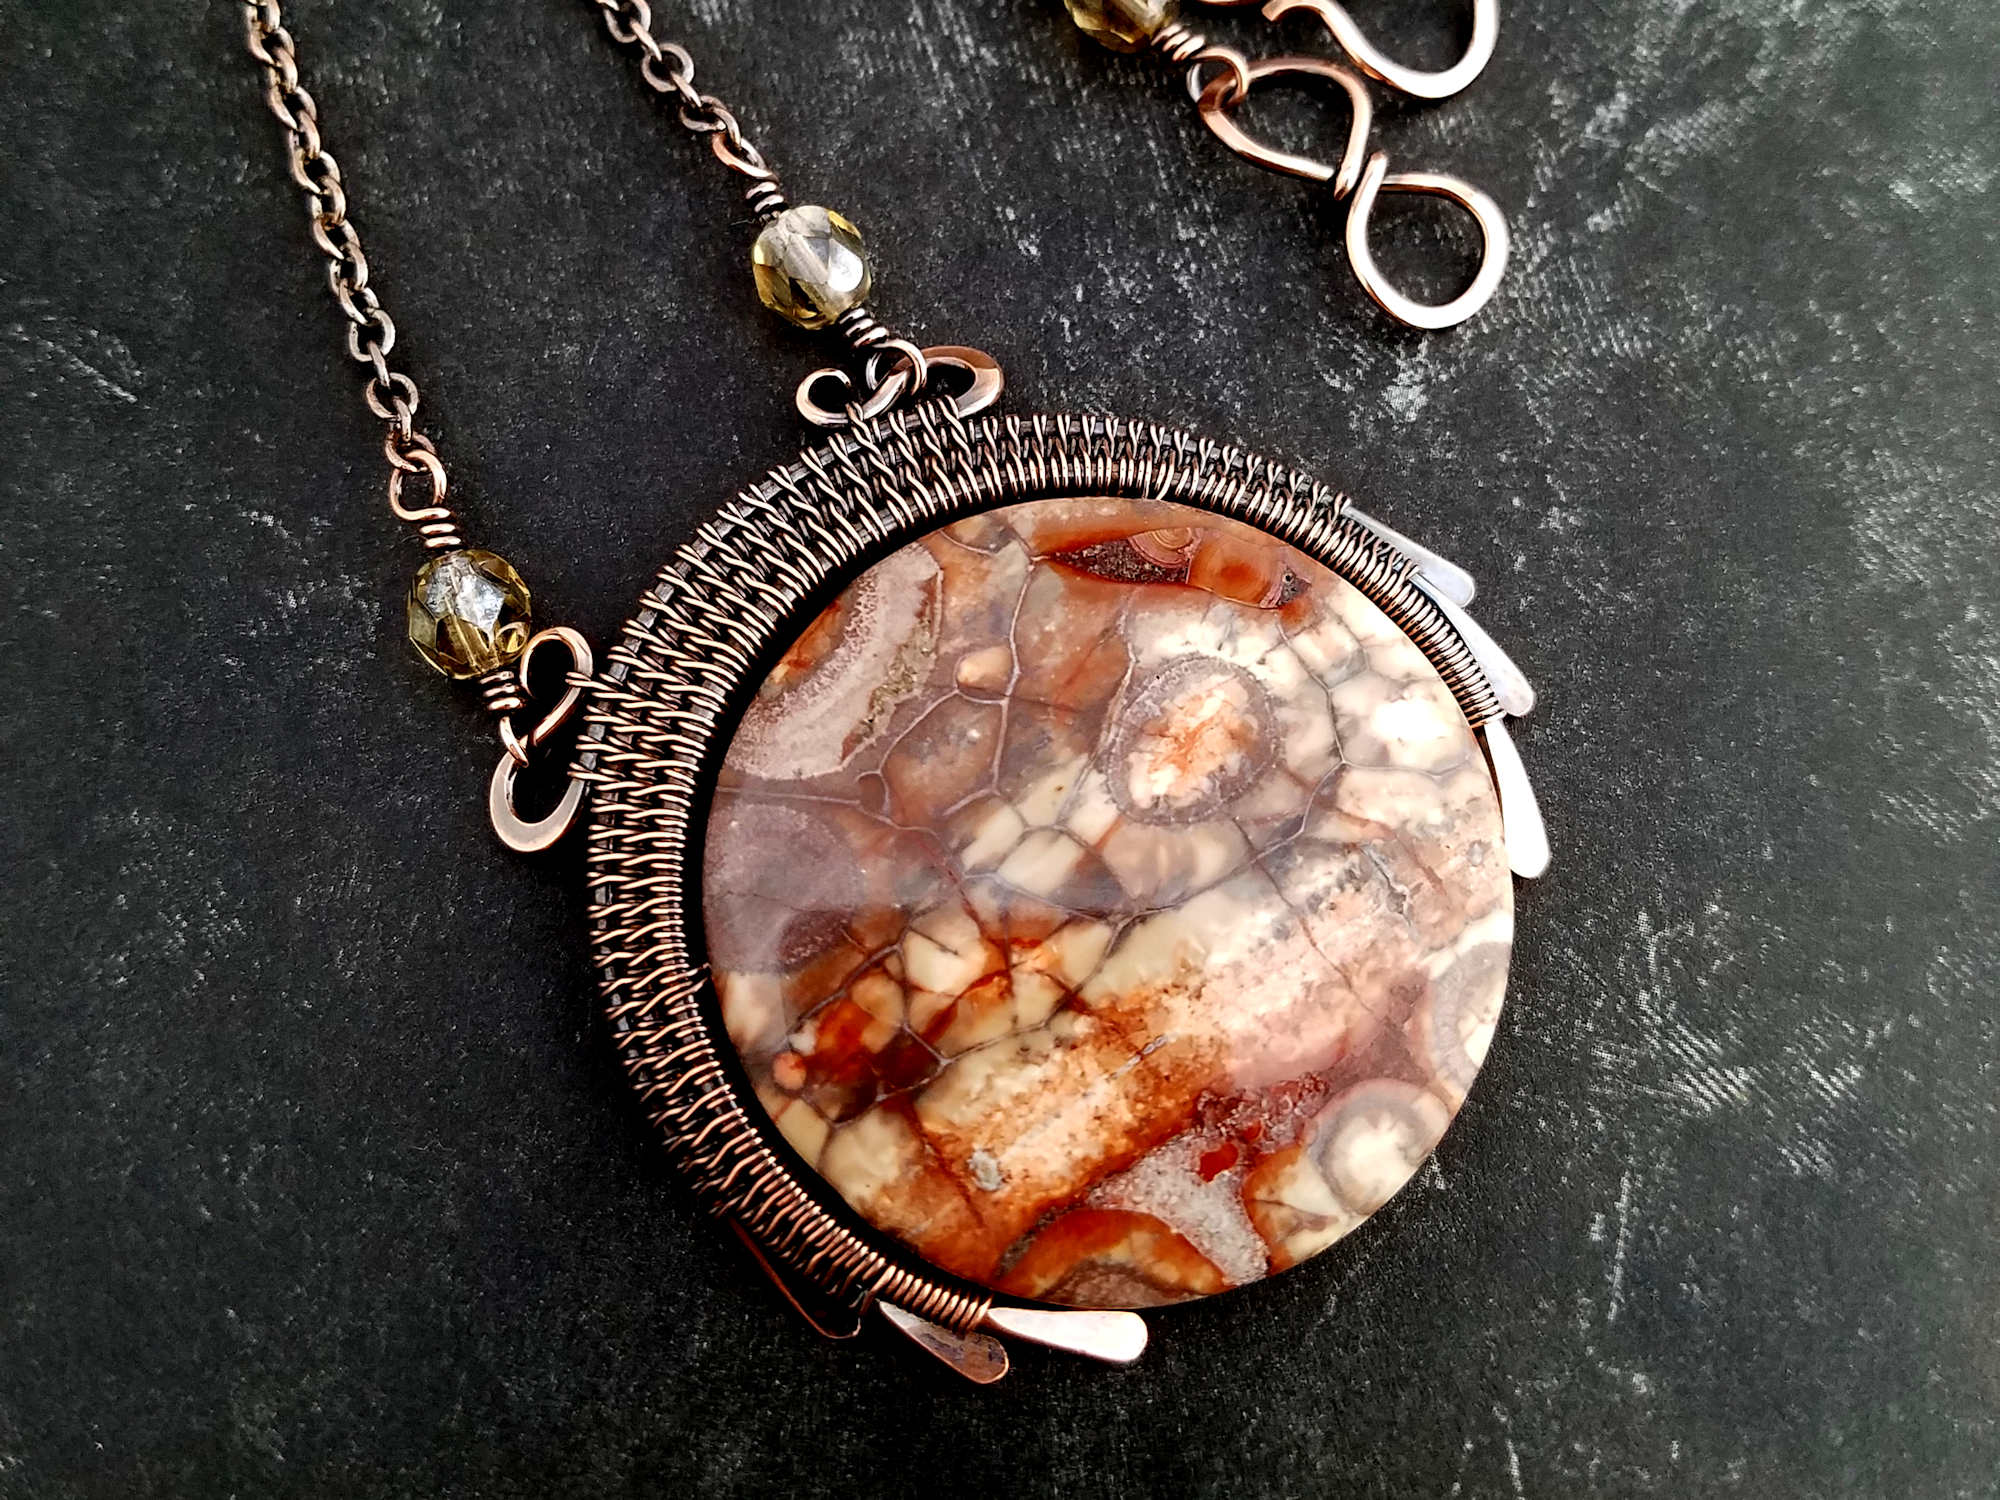
This is how I paddle the ends on my core wires for many of my jewelry designs. The Egyptian Sun Pendant pictured below is just one example.
Practice drawing out some pretty paddles on the ends of your scrap wire. Then, once you get the hang of that, let’s try making some dimensional wire swirls.
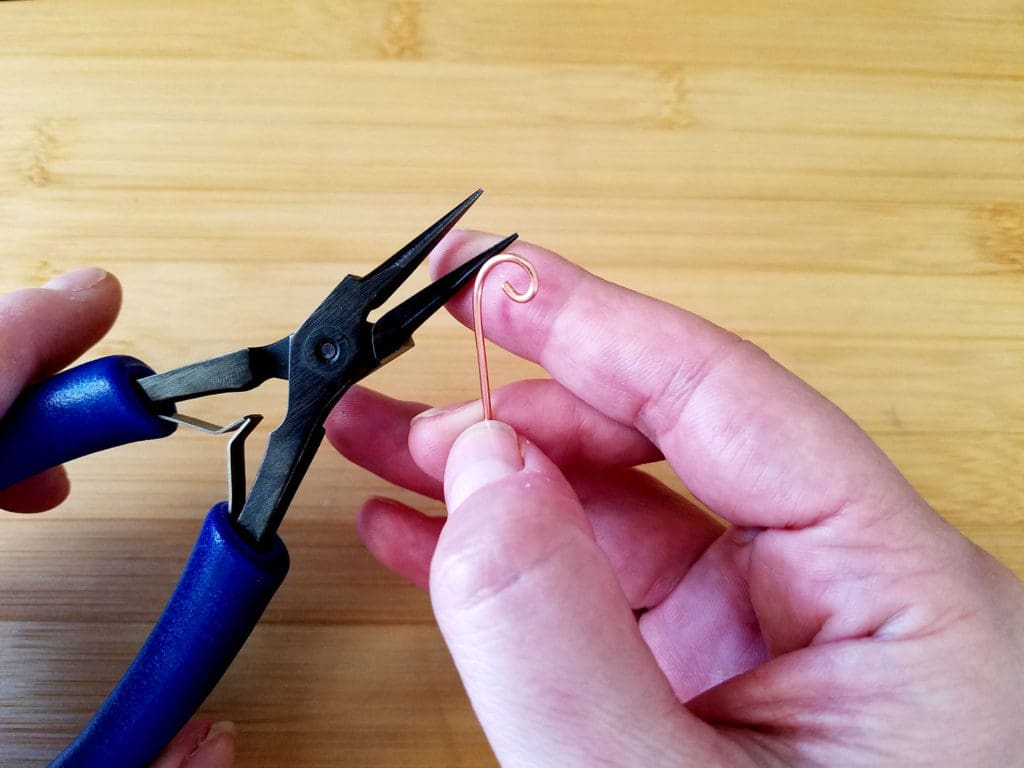
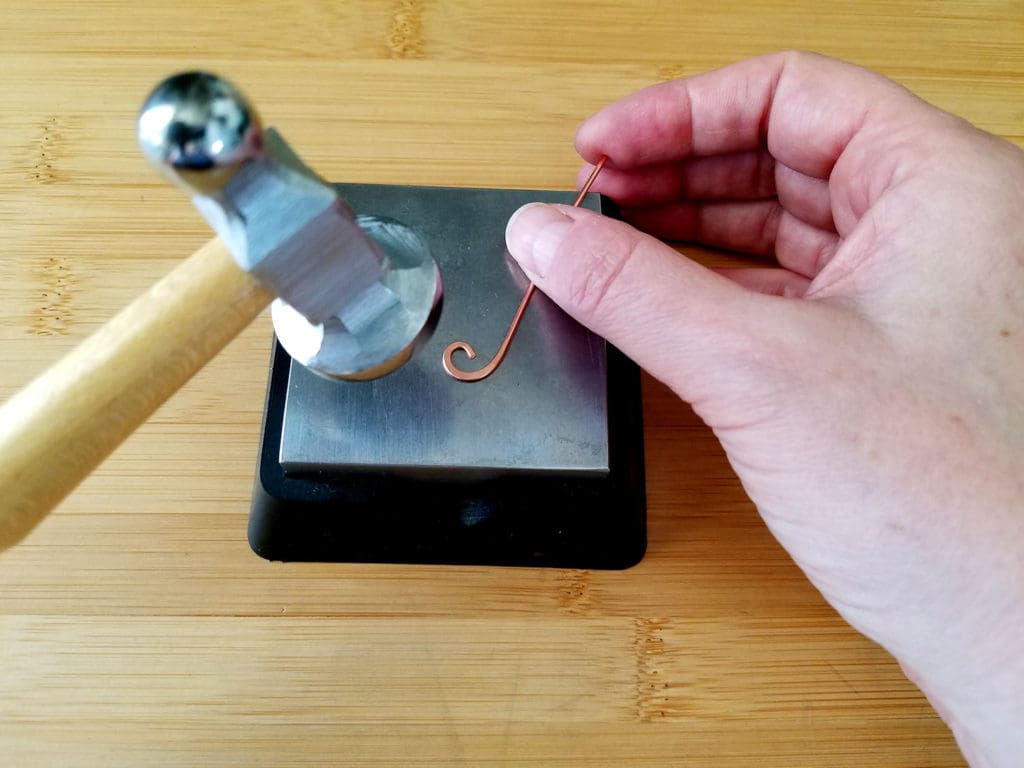
To do this, create a loose curl on the end of a piece of scrap wire, as shown below. It doesn’t have to be perfect. We’re just practicing on this curl.
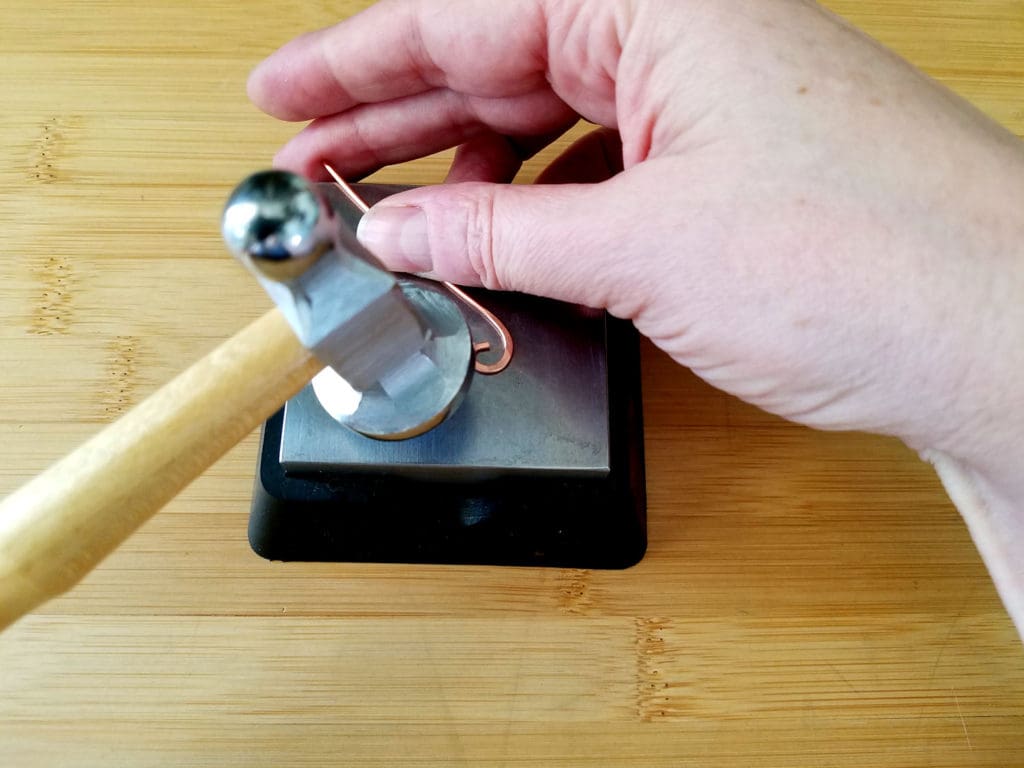
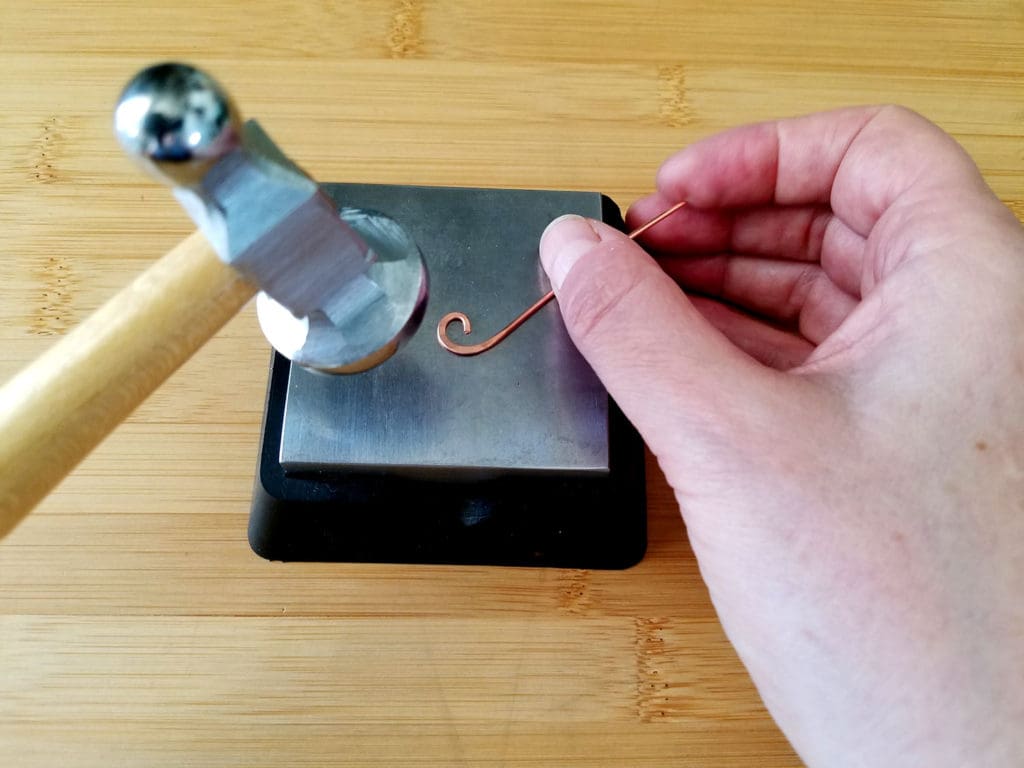
Next, let’s chase that swirl into an even prettier shape. To do this, keep your hammer and your bench block in the same position. Then move the wire around with your free hand. This allows you to focus on the points of the curve that you want to draw out.
Follow my example in this sequence of photos and see if you can match my results. It takes a bit of practice, but I promise you’ll get the hang of it quickly.
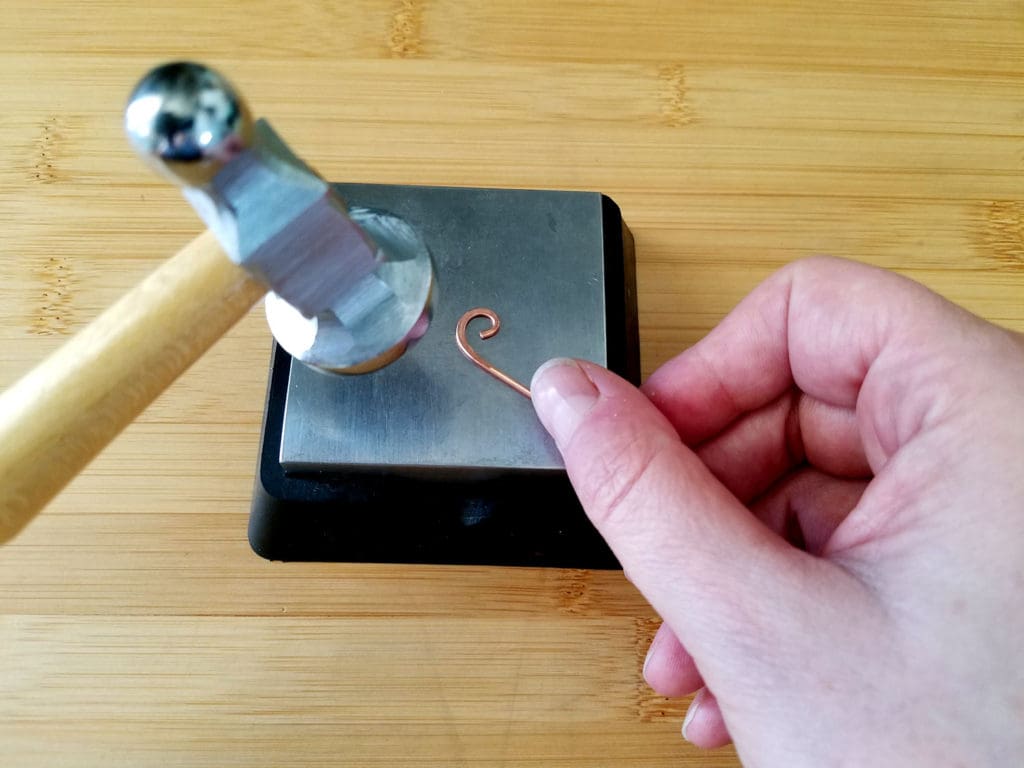
Here’s what my curl looked like after I finished planishing the curled end of the wire. Note that the curl now has more dimension. The line gets thicker through the bend and then tapers again toward the point of the curl.
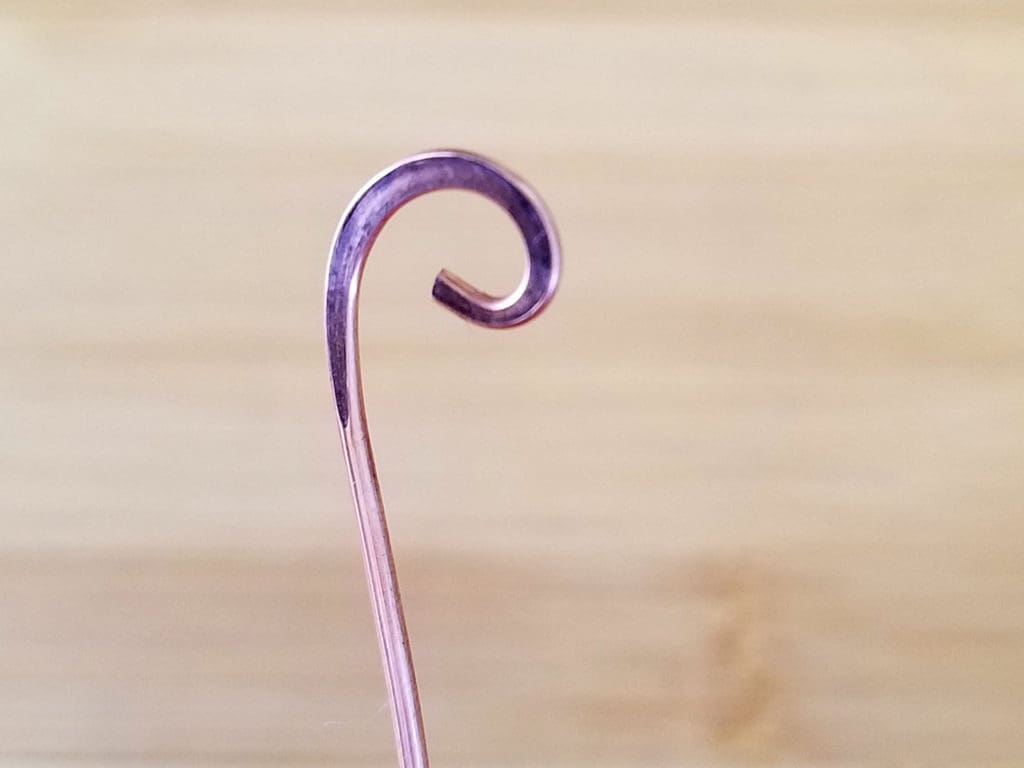
There are some very faint tools marks on the curl. They’re so light I couldn’t capture them in this image, which means they’ll be easy to polish out. And it also means that those tool marks resulted from the softly rounded face of the hammer and not the more sharply rounded edges.
It’s completely normal to have some faint tool marks on your planished wires. Just be careful to keep the edges of the planishing face away from your work. The tool edges will leave deeper and more pronounced tool marks that will require a lot of sanding to remove later.
If I were going to use this curl in a piece of jewelry, I’d refine it further with a trim and some filing. But that’s a lesson for another day. Today’s lesson is all about using a chasing hammer.
Practice your planishing technique. This is a skill that doesn’t come naturally for a lot of us. So set aside three to five minutes a day to practice planishing various wire gauges. Work on paddled ends and curls. And always approach your practice with a curious mind. Experiment and play with your hammer to see what sort of effects you can achieve with it. And before you know it, you’ll be using a chasing hammer like a pro.
That’s it for our first chasing hammer lesson! I hope you learned some interesting facts about this amazing little tool today. And I hope that you’re well on your way to mastering the art of planishing.
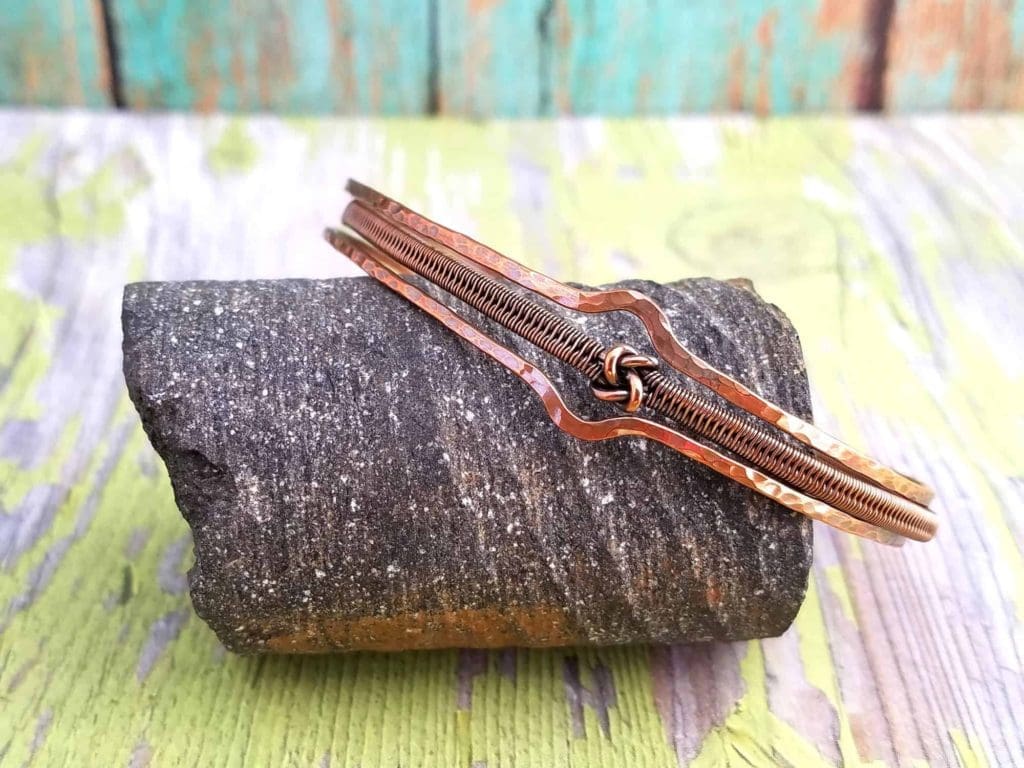
Be sure to check out the next lesson on peening. I’ll show you exactly how to achieve the pretty textured finish that you see on my Lover’s Knot Stacked Bangle, pictured below.
Discover More Behind Door 44
Thanks so much for joining me today for this first lesson in using your chasing hammer! I hope this post and the accompanying video tutorial help you master the planishing technique.
Want to learn more jewelry tool techniques like this one?
I like to share useful wire weaving tips and tricks on my social media channels, and we have some great conversations about wire jewelry in my private Facebook Group. Also, be sure to connect with me @door44studios on Instagram, and Facebook to keep up with everything that’s happening behind Door 44. And if you haven’t already done so, be sure to subscribe to my YouTube channel where you’ll find new wire jewelry videos weekly.
Until next time, my friend, go make something beautiful!

P.S. Don’t forget to download my FREE Chasing Hammer Planishing Guide from my resource library. It’s file #104. Need a password? Get one instantly by completing the form below!
get my free planishing guide
When you join my newsletter
Pin the This Post for Later

Thank you for the excellent article on the chasing hammer! It is full of good information!
You’re welcome, Catherine. Thank you for being part of the Door 44 community!
Wonderful tut! Clear, detailed and easy to follow – many thanks!
Thank you, Denise. Glad you enjoyed it!
Thank you for the post on chasing hammers. I have lots of tools I have either forgotten how to use or never really knew,
so articles like this are great!
You’re welcome! I plan to do more posts like these. So I’m very pleased to know that this one is helpful!
Just what I needed, now I just need to find the time to practice.
So glad this tutorial is helpful! Just a few minutes each week is all you need to hone your chasing skills. You’ll be surprised by how quickly you can master hammer techniques!