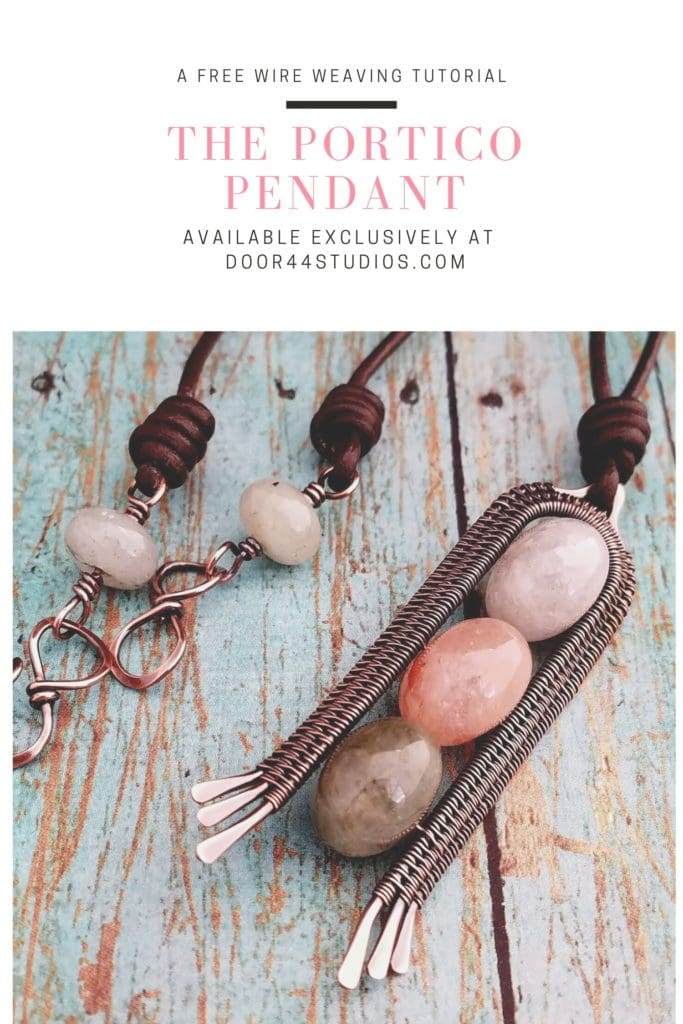
The Portico Pendant Wire Weaving Tutorial

Where do you find inspiration for your jewelry designs? This is a question I’m asked now and then. Usually, I say my inspiration comes from nature. And that’s true. But I’ve also had a life-long fascination with architecture. The inspiration for the Portico Pendant came from the covered entry of one of my favorite homes in the historic Old North End of Colorado Springs.
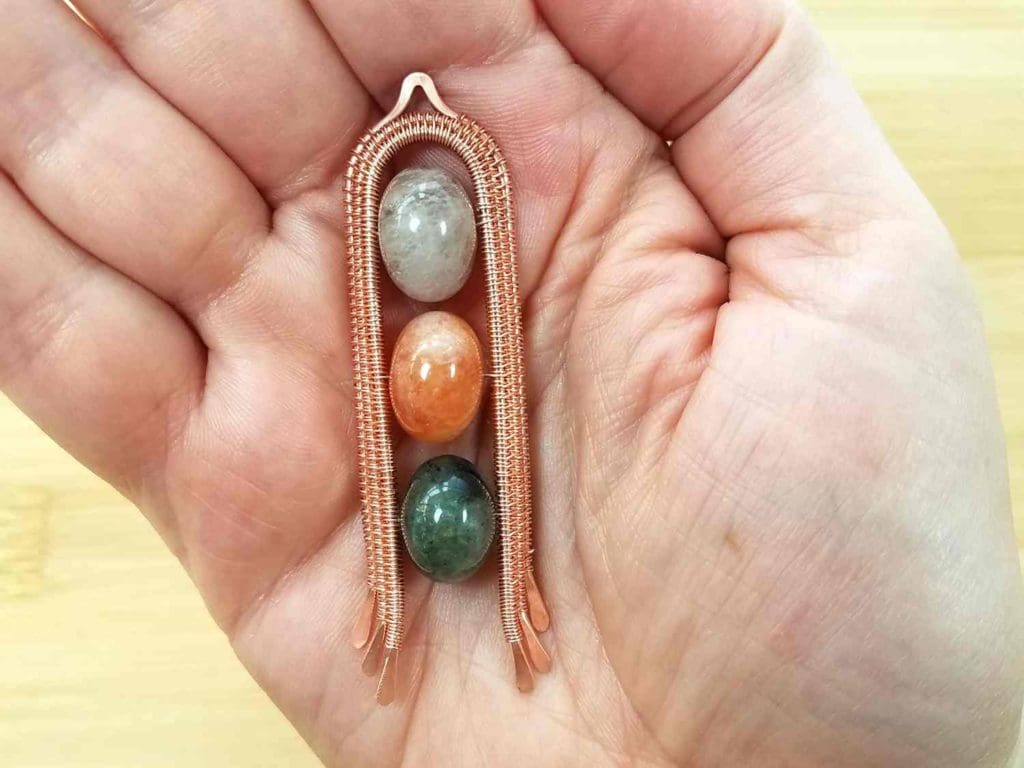
I chose some pretty 10mm x 14mm Rutilated Quartz rondelles for this tutorial. I purchased these pretty multicolor gemstone beads quite some time ago from an Etsy shop that is currently not stocked. However, you can use nearly any 10mm bead for this design. Round beads work just as well as rondelles. And you can even use large hole rondelles for this design (with or without round spacer beads to fill in the holes).
Feel free to experiment with different beads. Because this design can easily be modified to work with a multitude of bead shapes and sizes.
Copyright & Disclosure
As always, you’re welcome to make and sell products from this tutorial on the condition that you credit Wendi of Door 44 Studios for the design and link back to this page.
When it comes to my written tutorials, however, I reserve exclusive rights to all images and written content. You may not reproduce or redistribute any portion of the Portico Pendant tutorial in any way, shape, or form. Furthermore, you may not teach the designs contained within this tutorial without my written permission.
This copyright applies to the printable PDF version of the fun and versatile Portico Pendant tutorial as well, and it’s included therein. Don’t forget, you may share the free version of this tutorial only by linking directly to this page.
This post may contain affiliate links. If you click on a link and then make a purchase, I may earn a small commission (at no cost to you). As an Amazon Associate I earn from qualifying purchases. To learn more, please see my full disclaimer.
Getting Started
You can use half-hard or dead soft solid jewelry wire for the core wires for this design. Because we’re using heavier gauges, and there’s no heat involved, this design will work just as well with brass or bronze wire as it does with copper or sterling silver. As usual, you’ll need dead soft wire in the same (or a compatible) alloy for weaving.
Skill Level: Intermediate
This is a more challenging project that involves wire weaving. It can be achieved by someone who has some basic wirework skills.
If you choose sterling silver for your core wires, I recommend using dead soft fine silver for weaving. You’ll also need to modify the way that you suspend your focal bead if you choose silver wire. There’s a free tutorial on my blog that walks you through the modified bead suspension method. You’ll find a link to that tutorial, along with some other tutorials that are related to this post, below.
related post
Skills Helpful for Completing This Project
If you choose to use a filled wire, be aware that the bead frames are finished and hardened by hammering the wire. Even light hammering can expose the base metal core in filled wires, which can negatively affect your final finish. As always, I don’t recommend plated or anodized craft wire for this necklace. The reason why is because those finishes will be ruined with this construction process.
How to Choose the Right Jewelry Wire
Jewelry wire is a constant source of confusion for beginners. I remember those days well! If you’d like to learn how to choose the right jewelry wire for wire weaving, be sure to read this post. In it, I share everything you need to know about jewelry wire as you set out on your wire weaving journey.

Tools & Materials
- 16ga wire – 15 inches
- 28ga dead soft wire – 10 feet
- 10mm round or rondel beads (I chose the 10mm x 14mm Rutilated Quartz rondels)
- Wire Cutters
- Chain Nose Pliers
- Flat Nose Pliers
- Needle File
- Chasing Hammer
- Bench Block
- 10mm mandrel (I use these knitting needles)
- Ring mandrel
- Ruler
- Fine Point Permanent Marker
- Sharp Beading Awl (optional)
- Nylon Jaw Pliers (optional)
- Sunshine® polishing cloths (optional). These are the polishing cloths that I use for dry polishing jewelry.
Finished Size
- WIDTH: about 3/4 inch (1.91 cm)
- LENGTH: about 2-3/4 inches (6.99 cm)
I added a
How to Make the Pretty Portico Pendant
These instructions assume that you’re using 10mm x 14mm rondelle beads, as specified in the materials list. However, this design can be easily adapted to any round or rondelle beads.
I make recommendations for resizing the bead frame to fit smaller or larger beads in the Variations section of this tutorial. Refer to that section now if you’ve chosen to use focal beads that are substantially larger or smaller than the 10mm x 14mm gemstone beads that I used. Otherwise, proceed with the instructions for the bead frame, as written.
Form the Core Wires for the Portico Pendant Bead Frame
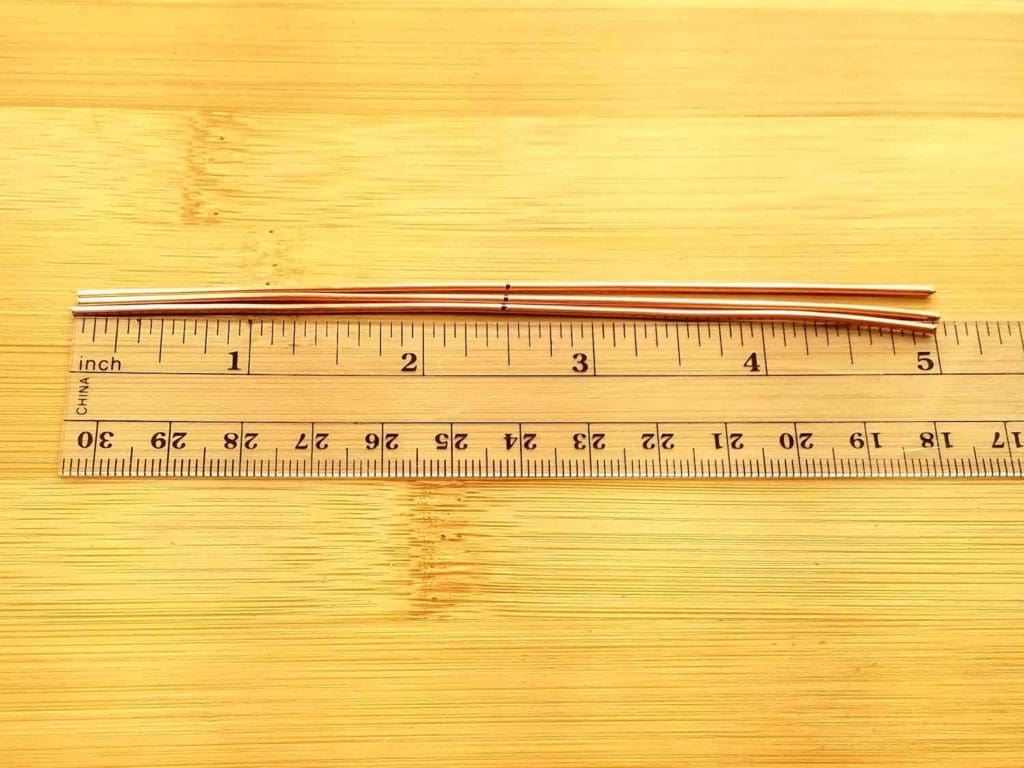
Step 1
Measure and cut three pieces of 16g wire at 5 inches.
File the ends smooth, if necessary, and mark the center of each wire with your permanent marker.
These 16g wires are the core wires that make up the bead frame. They provide the foundation for your bead frame and form the bezel around your focal stones, so you want these wires to be sturdy. Always choose the heaviest gauge wire that makes sense for your focal beads for your foundation core wires.
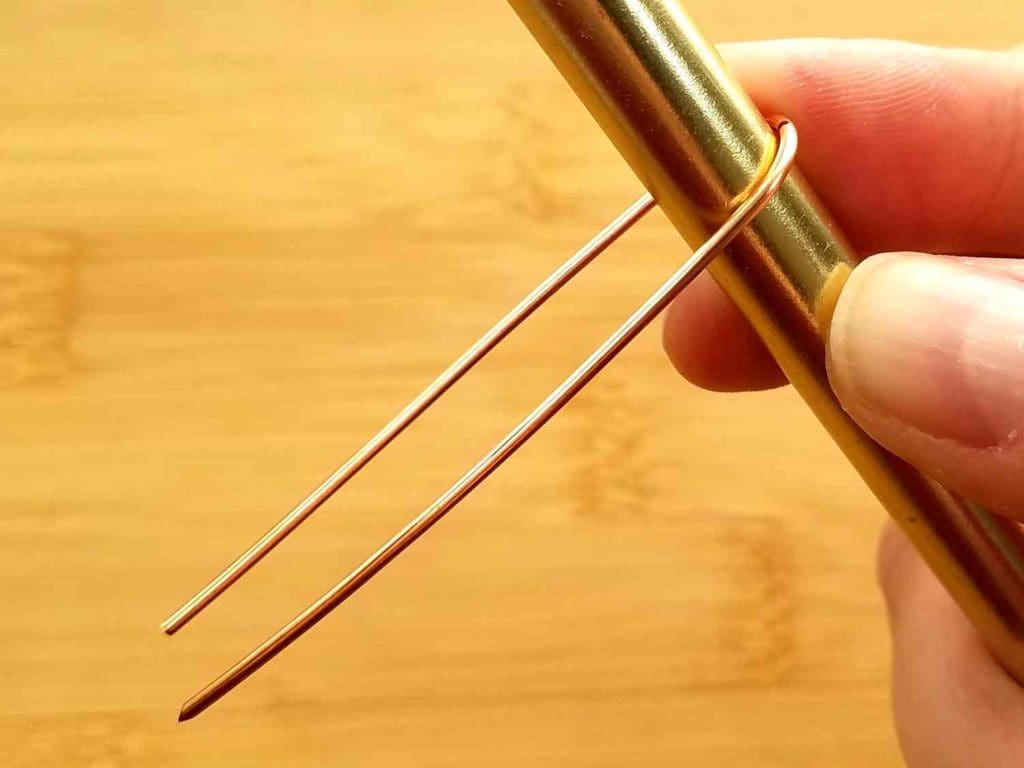
Step 2
Align the center mark on one of your 5-inch 16g core wires with the center of your 10mm mandrel. Bend that wire into a long U shape, as shown.
Make sure the ends of your wire are even as you form the wire. We’ll call this Wire 1.
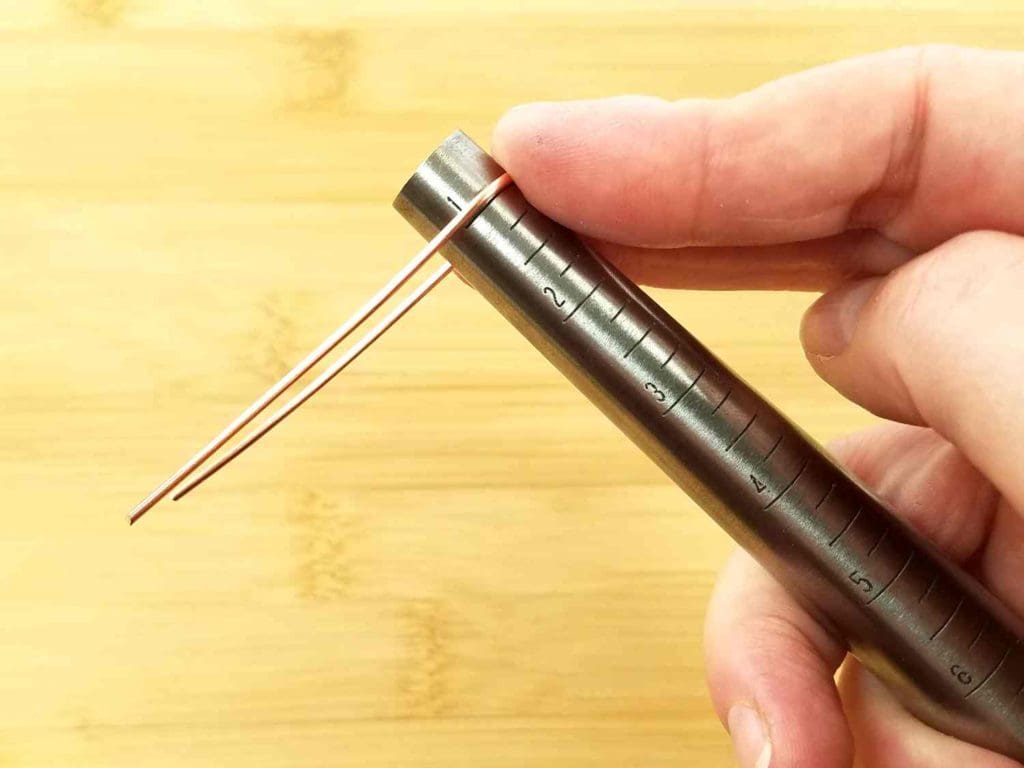
Step 3
Center your second core wire on the Size 1 mark on your ring mandrel and form an elongated U. Make sure the ends of your wire are even with one another. We’ll call this Wire 2.
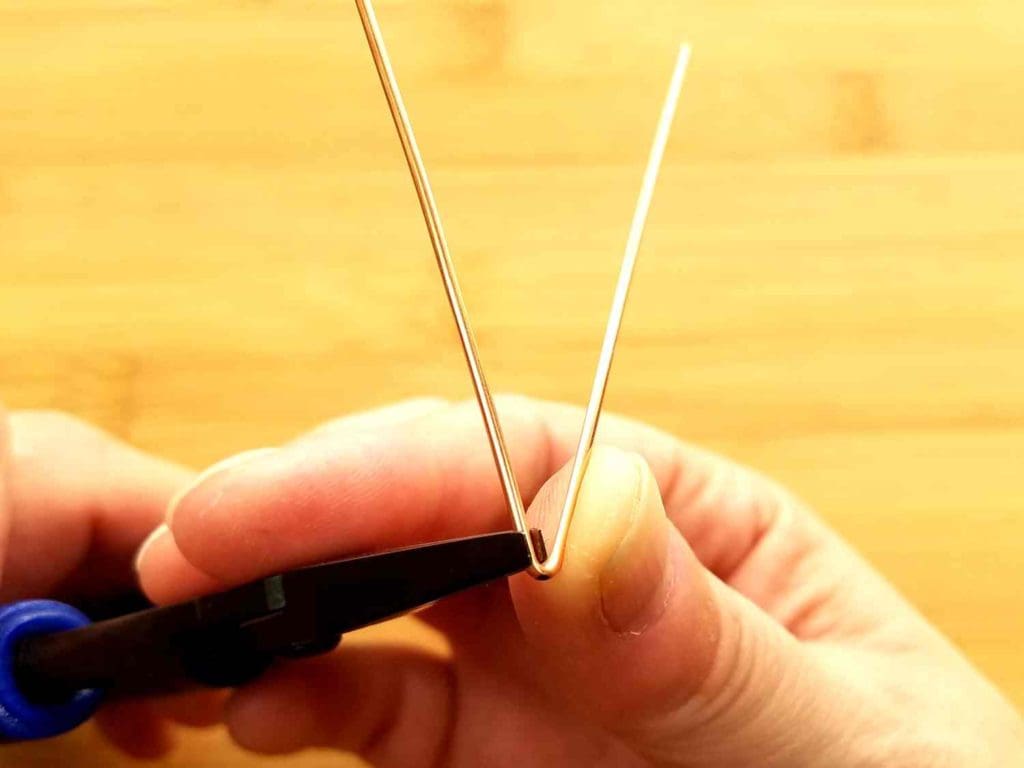
Step 4
We’re now going to shape the third and final core wire. Position one edge your flat nose pliers at the center mark on the remaining core wire.
Then bend the wire firmly with your thumb to form a sharp V in the wire. Again, make sure the ends of your wire remain even. We’ll call this Wire 3.
Step 5
Continue pressing the wire into a tighter V. Once the two ends of your wire are nearly parallel, use the tips of your flat nose pliers to tighten the bend until the two wire ends are completely parallel to one another, as shown.
Check the ends of your wire and make sure they’re even at this point. If not, trim the ends with your wire cutters. File the ends flat, if necessary, using your needle file.

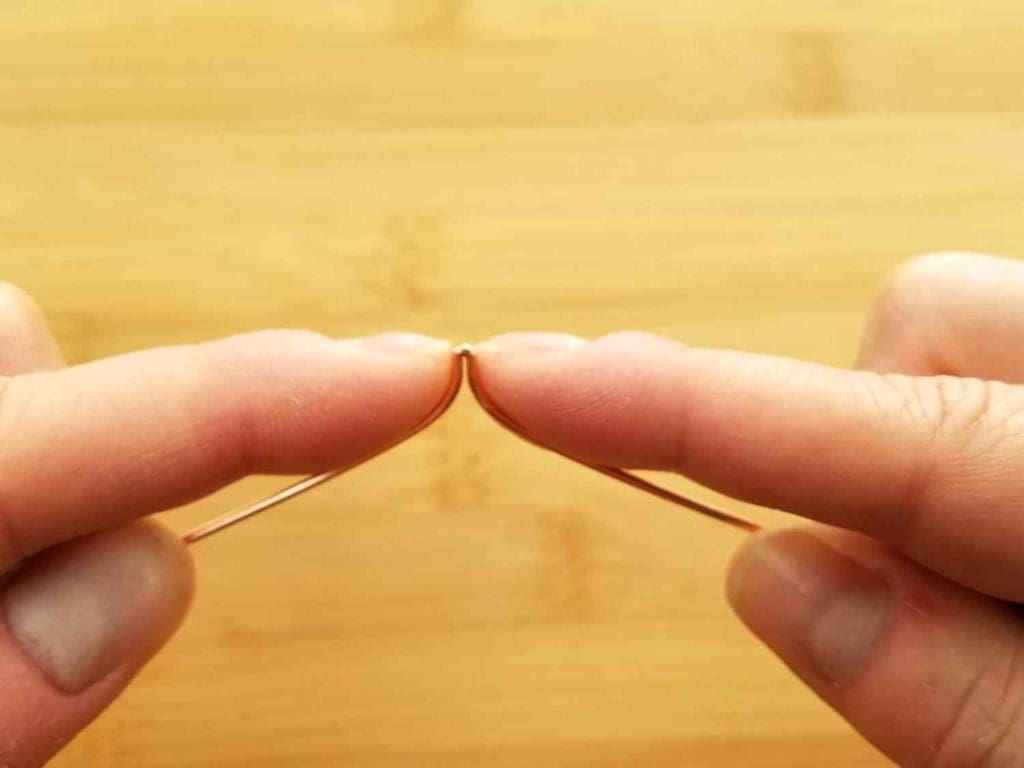
Step 6
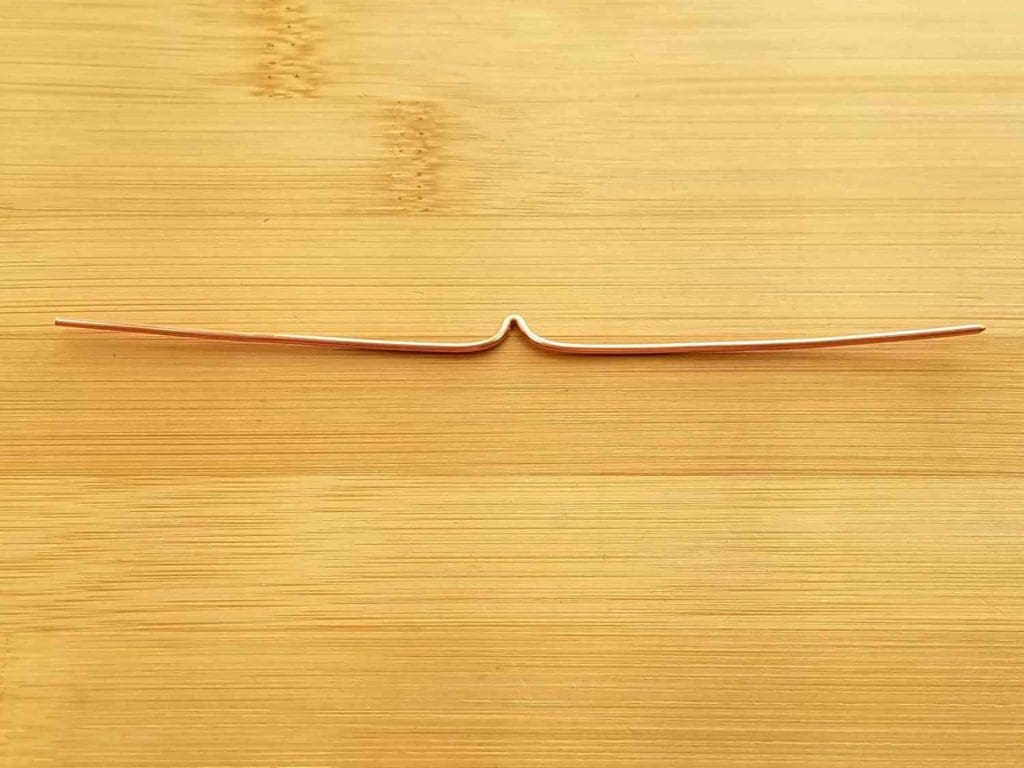
We’re now going to straighten Wire 3 before forming the final arch in our Portico bead frame.
Gently pull the ends of the folded wire apart. Use your fingers, as shown, to maintain even curves on either side of the folded point that you made in Steps 4 and 5.
Step 7
Continue to carefully straighten the ends of the wire until it lays mostly flat on your bench surface. Except for the peak in the center of the wire, of course.
Your wire should look something like the one shown here when you’re done.
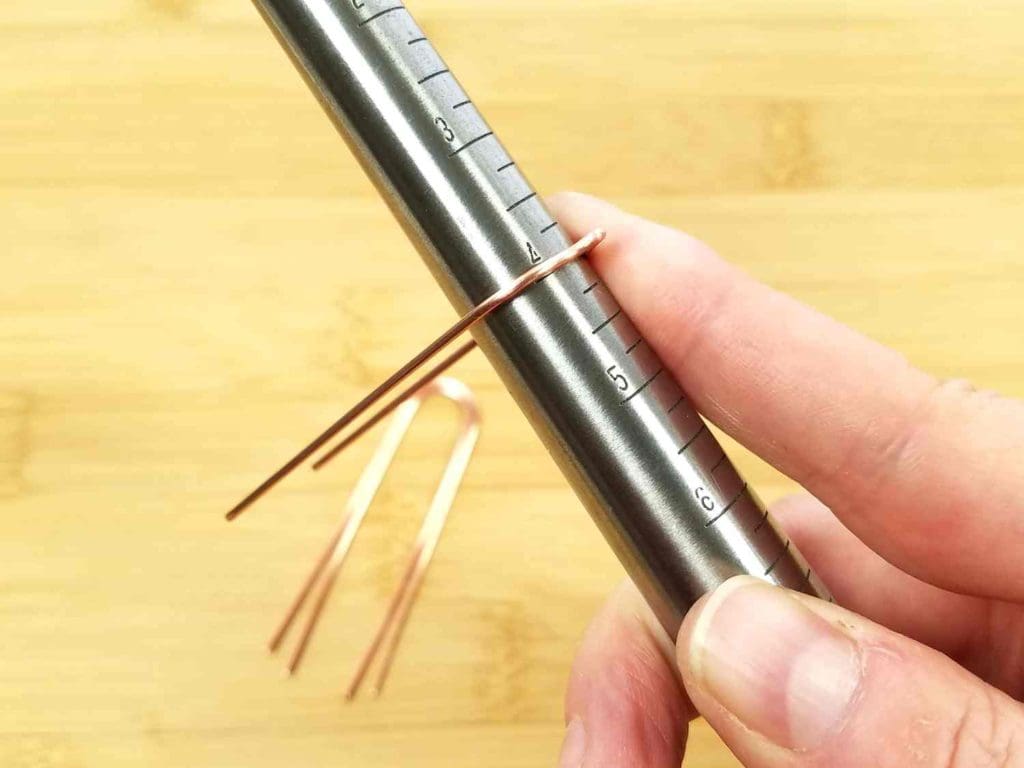
Step 8
Now position the peak on Wire 3 at the Size 4 mark on your ring mandrel.
Make sure the peak of your wire is centered over the barrel of the ring mandrel, and then form the final elongated U shape on Wire 3, as shown.
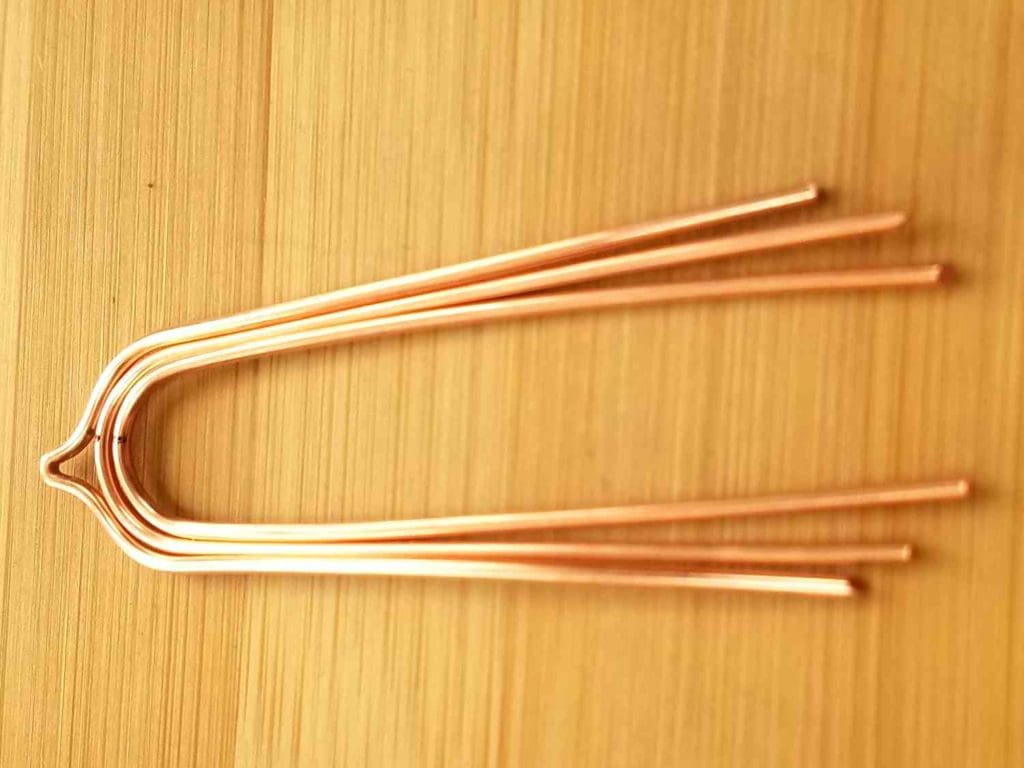
Step 9
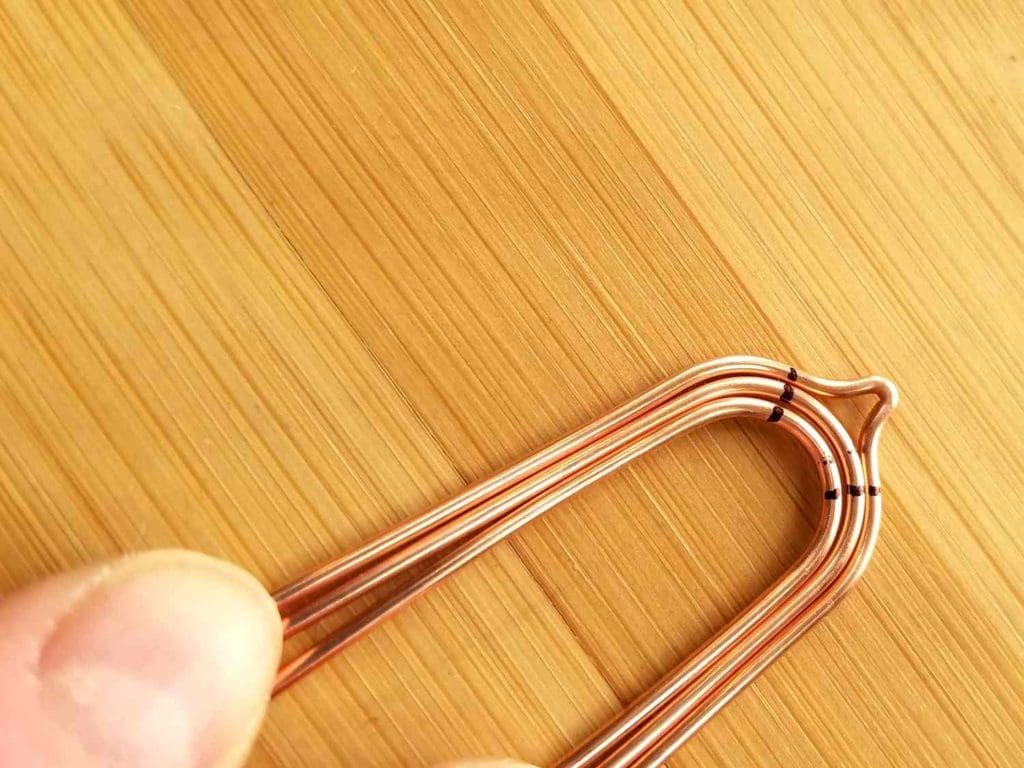
Now that your three core wires are fully formed, we need to make sure they all fit together symmetrically.
Nest your three core wires together with Wire 1 on the inside, Wire 2 in the middle, and Wire 3 on the outside.
Make any necessary adjustments until your three wires nest neatly together, as shown.
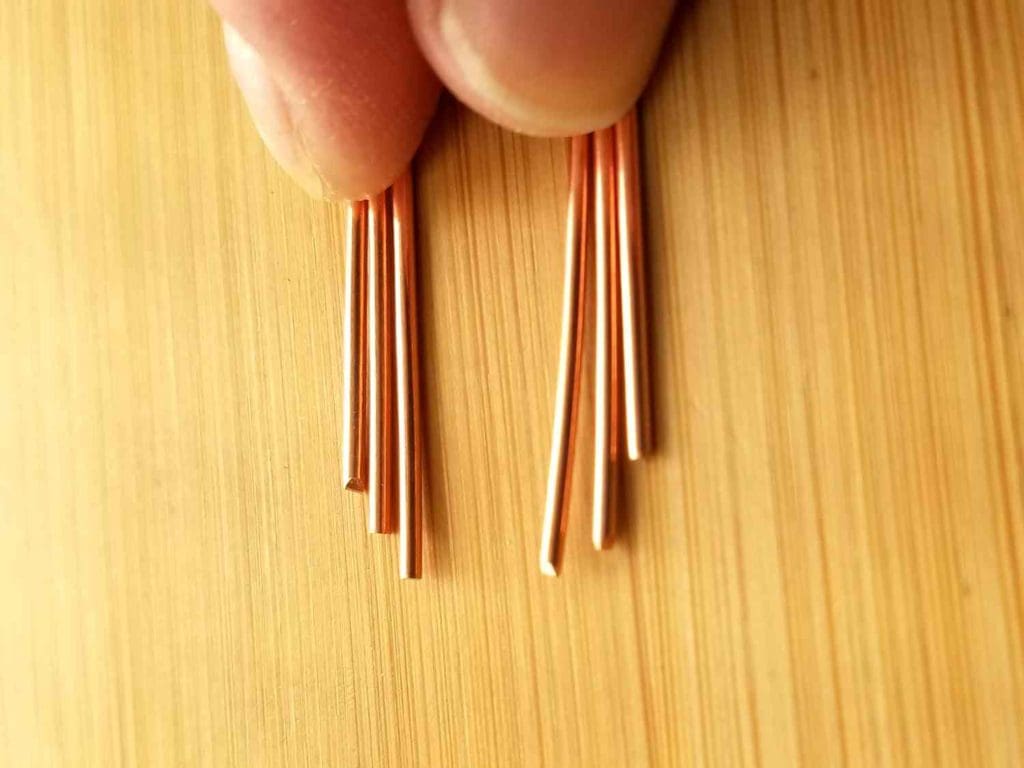
Step 10
Next, we’re going to make sure the ends are stepped evenly. Leaving the three wires nested together, carefully examine the ends of the wire.
Make sure the steps are symmetrical from Wire 1 to Wire 3.
Trim and file the ends, if necessary, making sure that the two ends of each individual core wire are even with one another as well as evenly spaced across the three wires.
Step 11
Now that your three core wires are refined and ready for the final step, we need to mark some weaving reference points.
Using your fine-point permanent marker, mark the three core wires on either side of the peak on Wire 3, as shown.
These points indicate where the weave will incorporate Wire 3 on either side of the bail peak.
Step 12
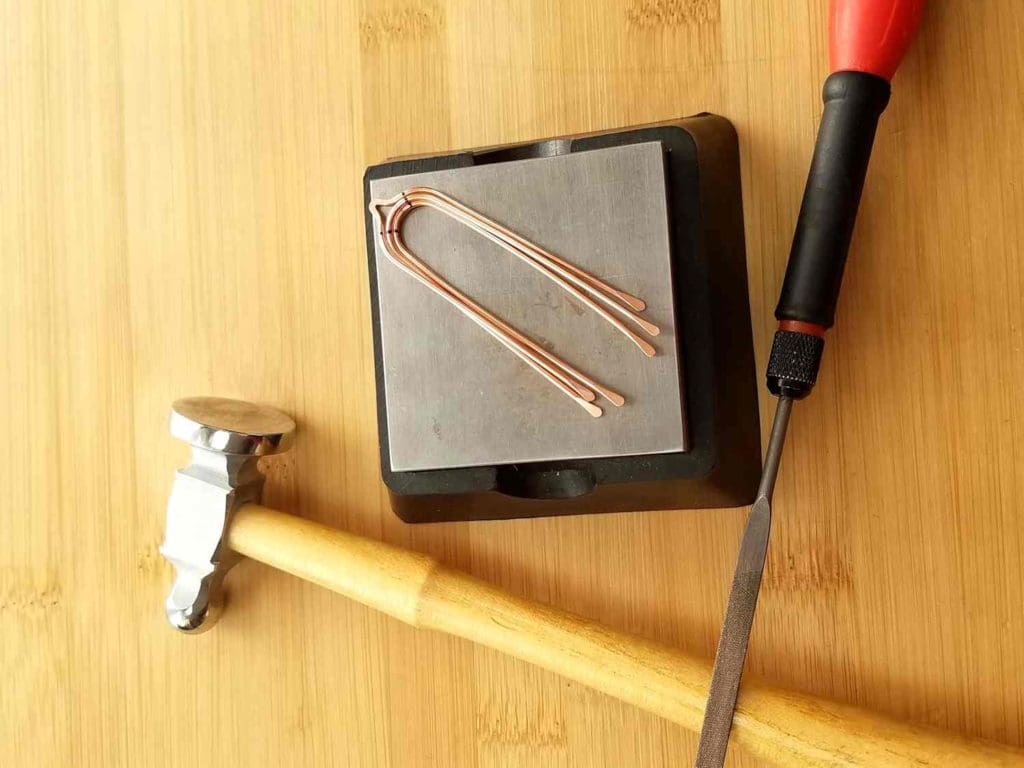
Use your chasing hammer and bench block to paddle the ends of all three core wires and slightly flatten the pointed bail on Wire 3.
Your three core wires should look something like those shown in this image when finished.
Weav e the Core Wires
Step 1
You’ll need about 10 feet of dead soft 28g wire for weaving.
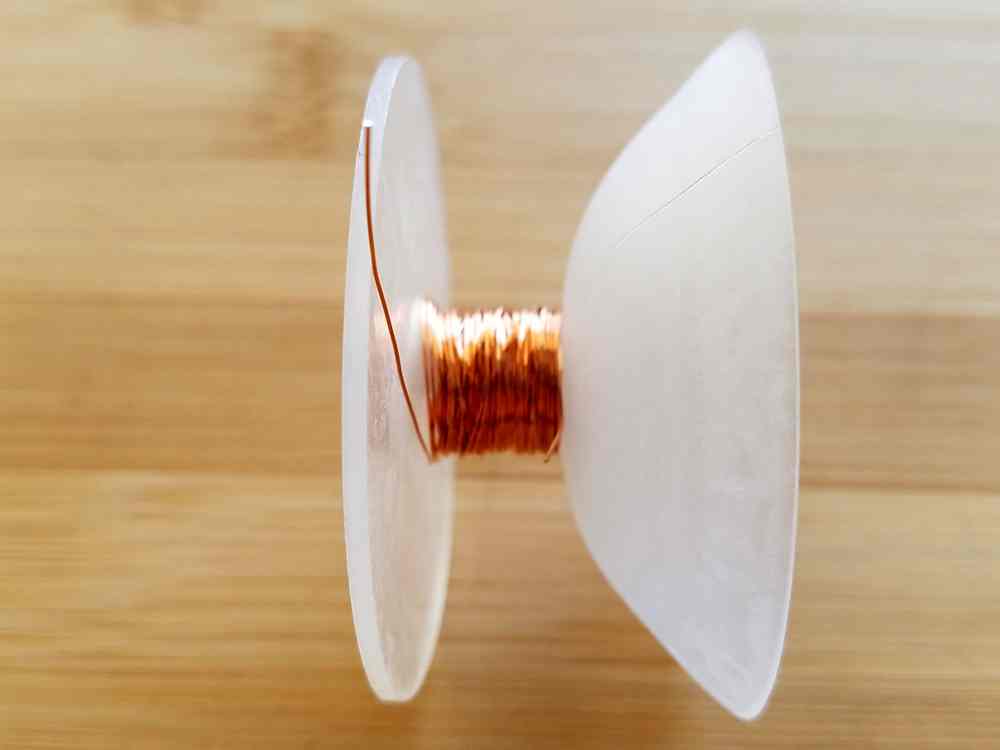
I like to work off a plastic Kumihimo bobbin when dealing with this much wire. Wind your bobbin with more than enough wire to complete the weaving for this project.
I usually wind my bobbins with between 50 and 100 feet of wire, and then I use that bobbin for multiple projects.
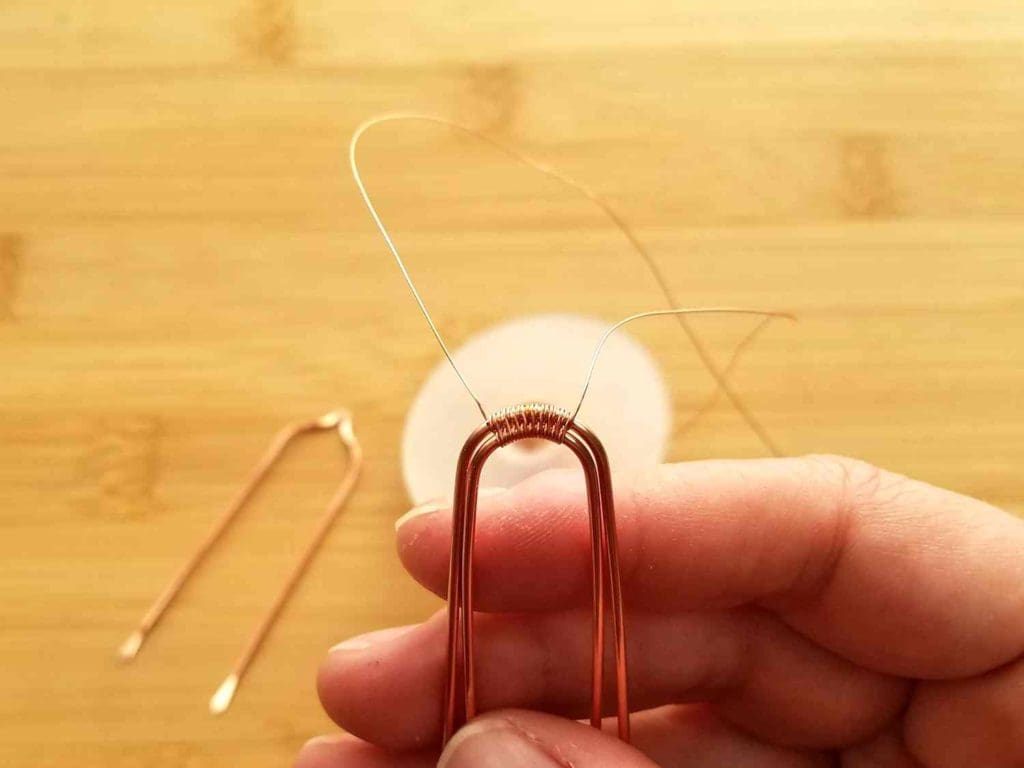
Step 2
Pull about 5 feet of wire off your bobbin, but don’t cut the wire. Nest Wires 1 and 2 together and start weaving the two wires together at the top of the bend.
Weave in one direction to the marks you made in Step 11 of the previous section. Then flip your two core wires over and weave in the other direction to the other marks made in Step 11.
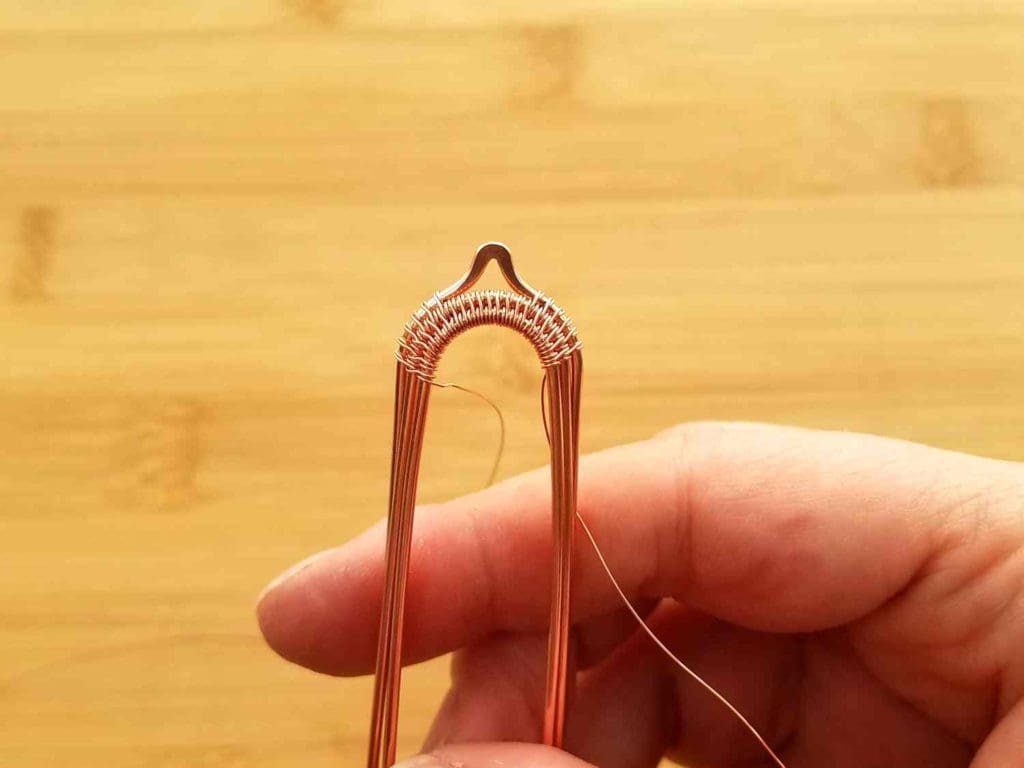
Step 3
Place Wire 3 in position around Wire 2. Continue weaving all three wires together from this point forward.
Complete about six full pattern repeats on both sides of your bead frame so that Wire 3 is fully secured in place. Your bead frame should now look something like the one shown here.
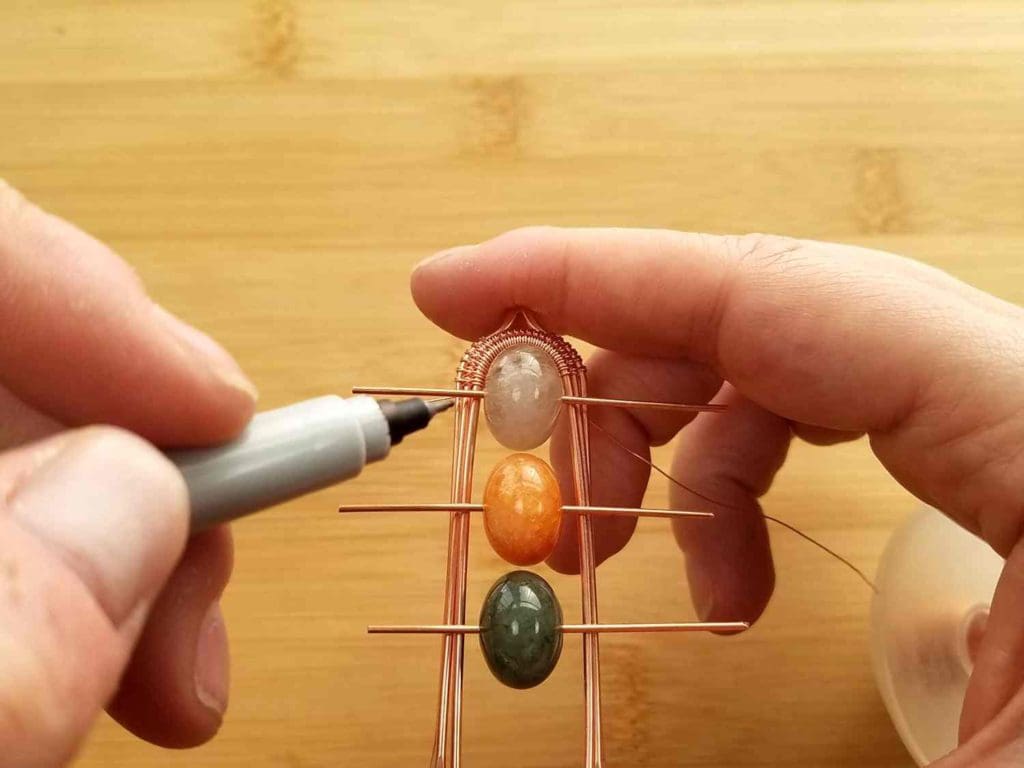
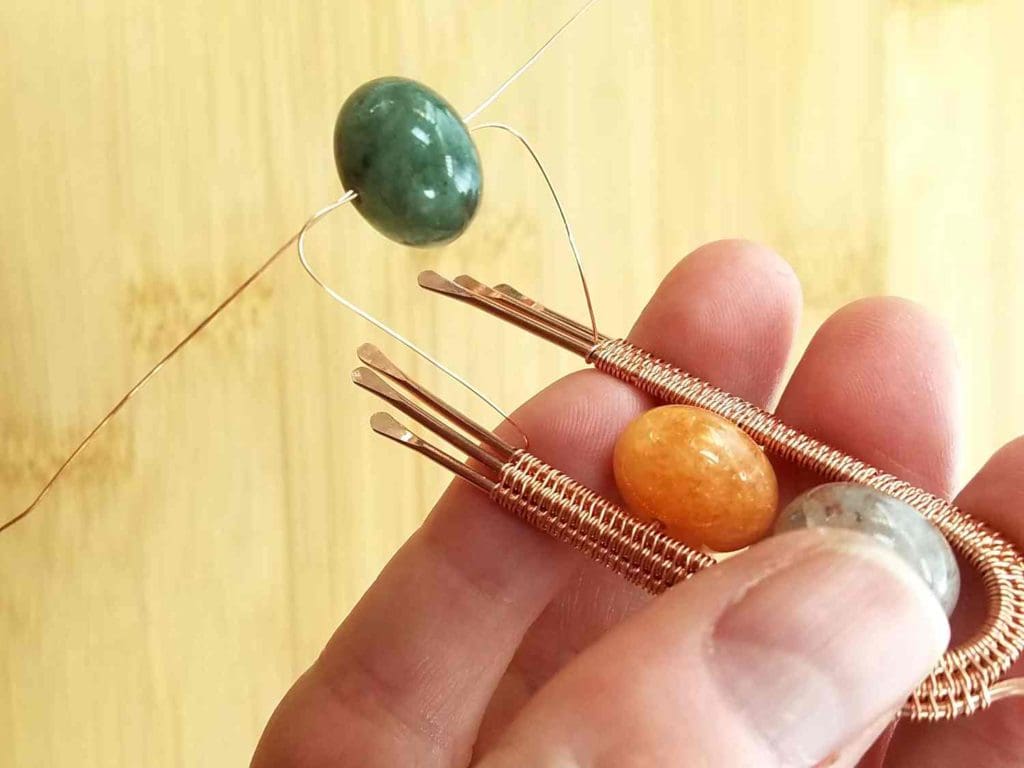
Step 4
Using three straight pieces of scrap wire, position your beads on the Portico bead frame to determine at what points you need to thread your weaving wires through each bead.
Use your fine-point permanent marker to mark those points on both sides of Wire 1.
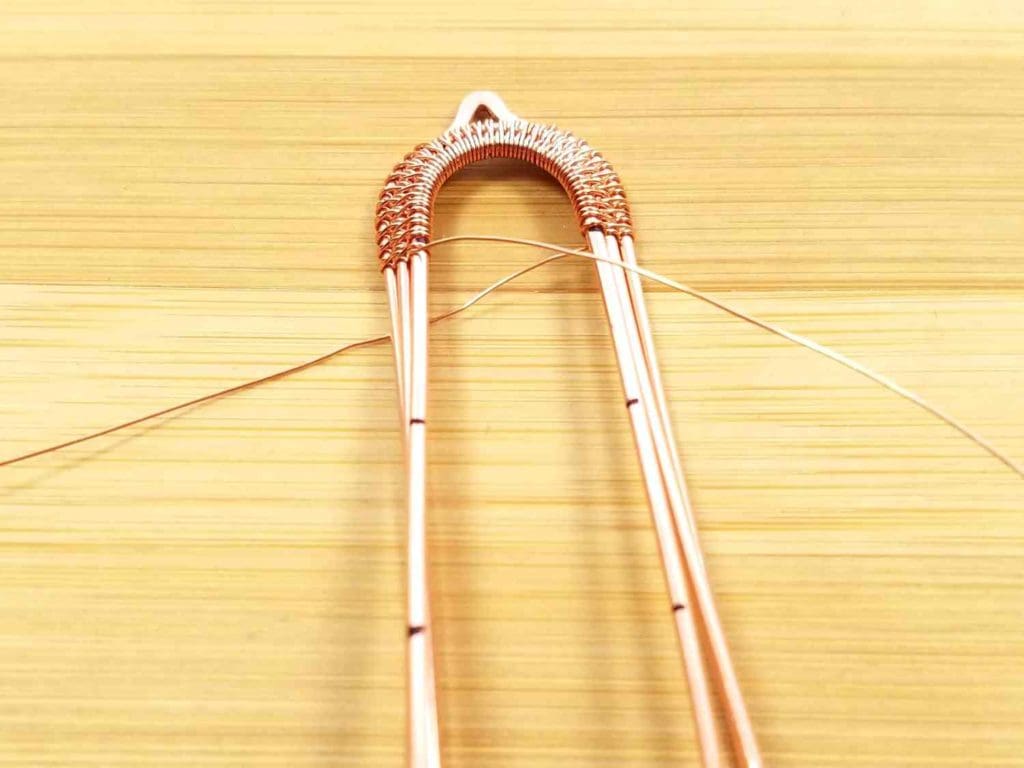
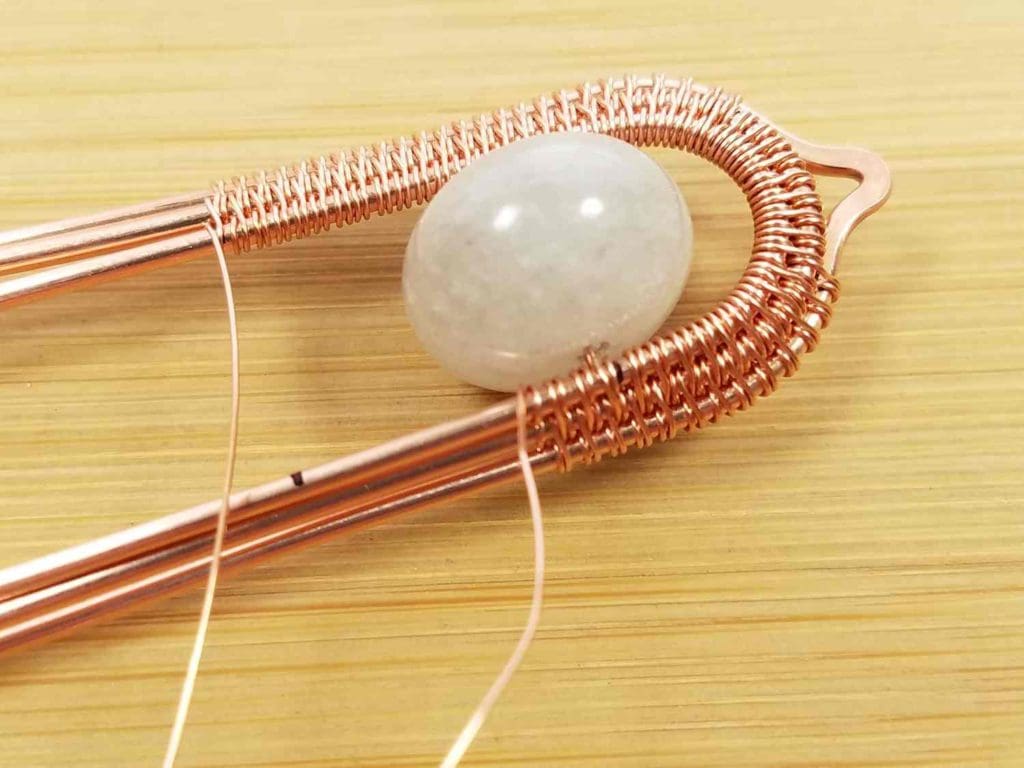
Step 5
Continue weaving in pattern on both sides of your bead frame until you reach the first marks you made in the previous step.
Your bead frame will look something like this when you’re done. Notice that one wire comes out on top of Wire 1 while the other comes out under Wire 1.
Pay attention to these wire positions so you can continue your weave seamlessly to the next two marks after suspending your first focal bead within the frame.
We’re now going to suspend the focal bead from the frame by integrating it seamlessly into the weave. This part takes some patience and determination the first time you do it. Work slowly and carefully so you don’t create kinks in your weaving wire or you’ll compromise the strength of your weaving wire.
Step 6
Again, one end of your weaving wire should be in front of Wire 1 while the other is behind Wire 1. Pay attention to this pattern because you’re going to continue the weave exactly where you left off after passing each end of the weaving wire through the hole on the bead.
Place your bead flat on the table within your Portico bead frame. Take the weaving wire on the left side of the bead frame and pass it from left to right through your first focal bead.
Repeat on the right side of the bead frame, passing the wire through the first focal bead from right to left.
You should now have two wires passing through your first (top) bead, as shown.
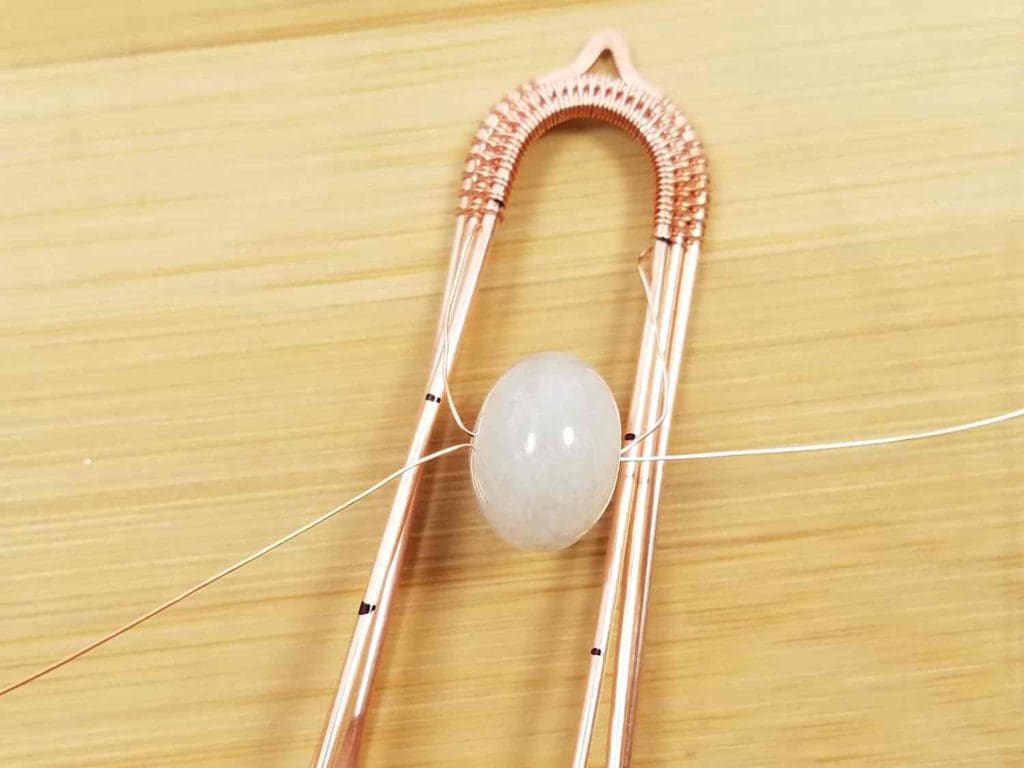
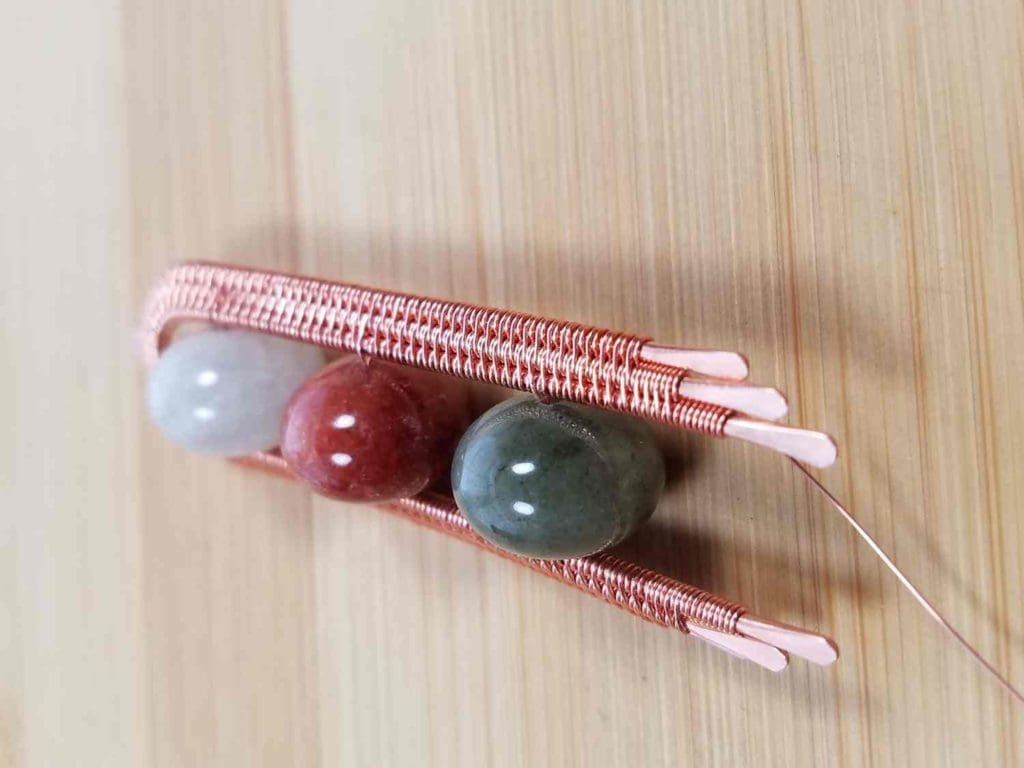
Step 7
Gently pull both ends of the wire until your bead slides up into position within the bead frame.
Work the bead into position slowly and carefully to avoid creating kinks in your wire. Once the bead is in place, pull both ends of the wire until the bead sits snugly in the frame with no slack in the wires.
NOTE: This image illustrates this step, only on the middle focal bead. The process is the same for suspending all three beads, so don’t feel like you missed anything. I just didn’t get a clear photo of this step while suspending the first focal bead.

Step 8
If the hole on your focal bead will accommodate four passes of wire, complete one full weave pattern repeat and then pass each end of your weaving wire through the beads again, just as you did in Step 6.
Again, go slowly to keep your wire from forming kinks. Once both ends of the wire have been successfully threaded through the bead, continue your weave seamlessly where you left off.
If your bead won’t accommodate four passes of wire and you’re confident that two passes will bear the weight of your bead (my beads won’t and I am), continue to the next step.
Otherwise, consider using the alternate bead suspension mentioned in Step 4 above. You’ll find a free tutorial for that alternate focal bead suspension method here.
Step 9
Once your bead is secure, keep weaving in pattern on both sides of the frame until you reach the next two marks that you made in Step 4.
Again, pay attention to your weaving pattern and make sure that one wire comes out on top of Wire 1 and the other comes out beneath Wire 1. Repeat Steps 6 through 8 to secure that focal bead.
Step 10
Repeat step 9 to secure the third and final focal bead in your Portico Pendant bead frame.
Step 11
With the third and final focal bead secured, continue weaving in pattern until you reach the top of the paddled end on Wire 3.
At that point, reduce your weave to just Wires 1 and 2. Continue weaving in pattern until you reach the top of the paddled end on Wire 2.
Finally, coil the weaving wire around Wire 1 until you reach the top of the paddled end. Break your weaving wire and repeat on the other side of the bead frame.
Step 12
The core wires of your bead frame may naturally slip into a convex curve as you’re weaving the frame, but once the weaving is complete, we need to lock in that shape, which creates a bezel effect around the focal bead.
Use your fingers to gently push Wire 1 forward and Wire 3 back. Once you’re satisfied with the shape of your bead frame, use your chain nose pliers to gently flare the paddled ends of all three core wires outward, as shown.
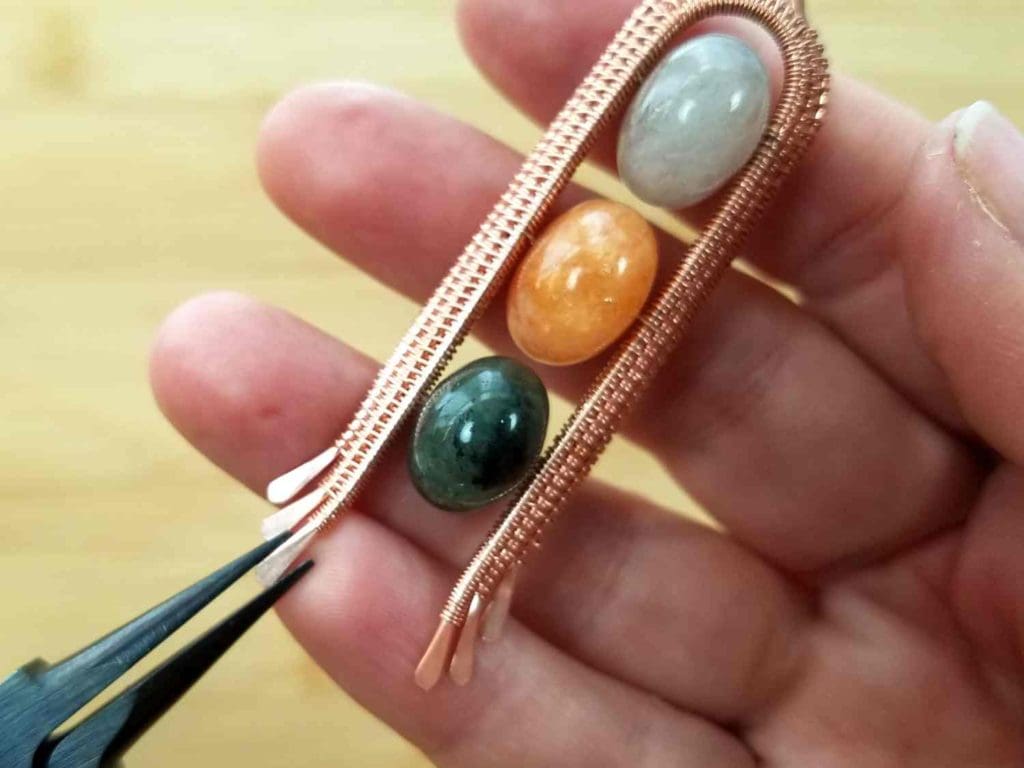
Your pendant is now complete and ready to finish and string on the necklace material of your choice.
This is a versatile piece that looks beautiful on either a chain or cord. It also works beautifully on a Rosary-style chain.
See the Variations section below for a few different stringing ideas and frame variations that I used while writing this tutorial.
Next Steps
Now that you’ve made a pretty Portico Pendant, how about a pair of matching Portico Earrings to go with it?
Variations

Beads that work well for this pendant are easy to locate, and this design can be easily adapted to center-drilled beads of nearly any size and shape. The bead frame, as sized in this tutorial will accommodate rondelle beads up to about 10mm wide x 15mm high.
Remember, your goal is to make sure that the size of your bead frame is in balance with the size of your beads. So be sure to consider the size of your core wires when modifying the size of the bead frame. You can also use lighter or heavier gauge core and weaving wires to make a frame suitable for each bead.
I used 16ga core wires with 28ga weaving wire for all of the Portico Pendants shown above. All of the beads used for these pieces came from the same strand of 10mm x 14mm Rutilated Quartz rondelles.
Experiment with Different Stringing Materials
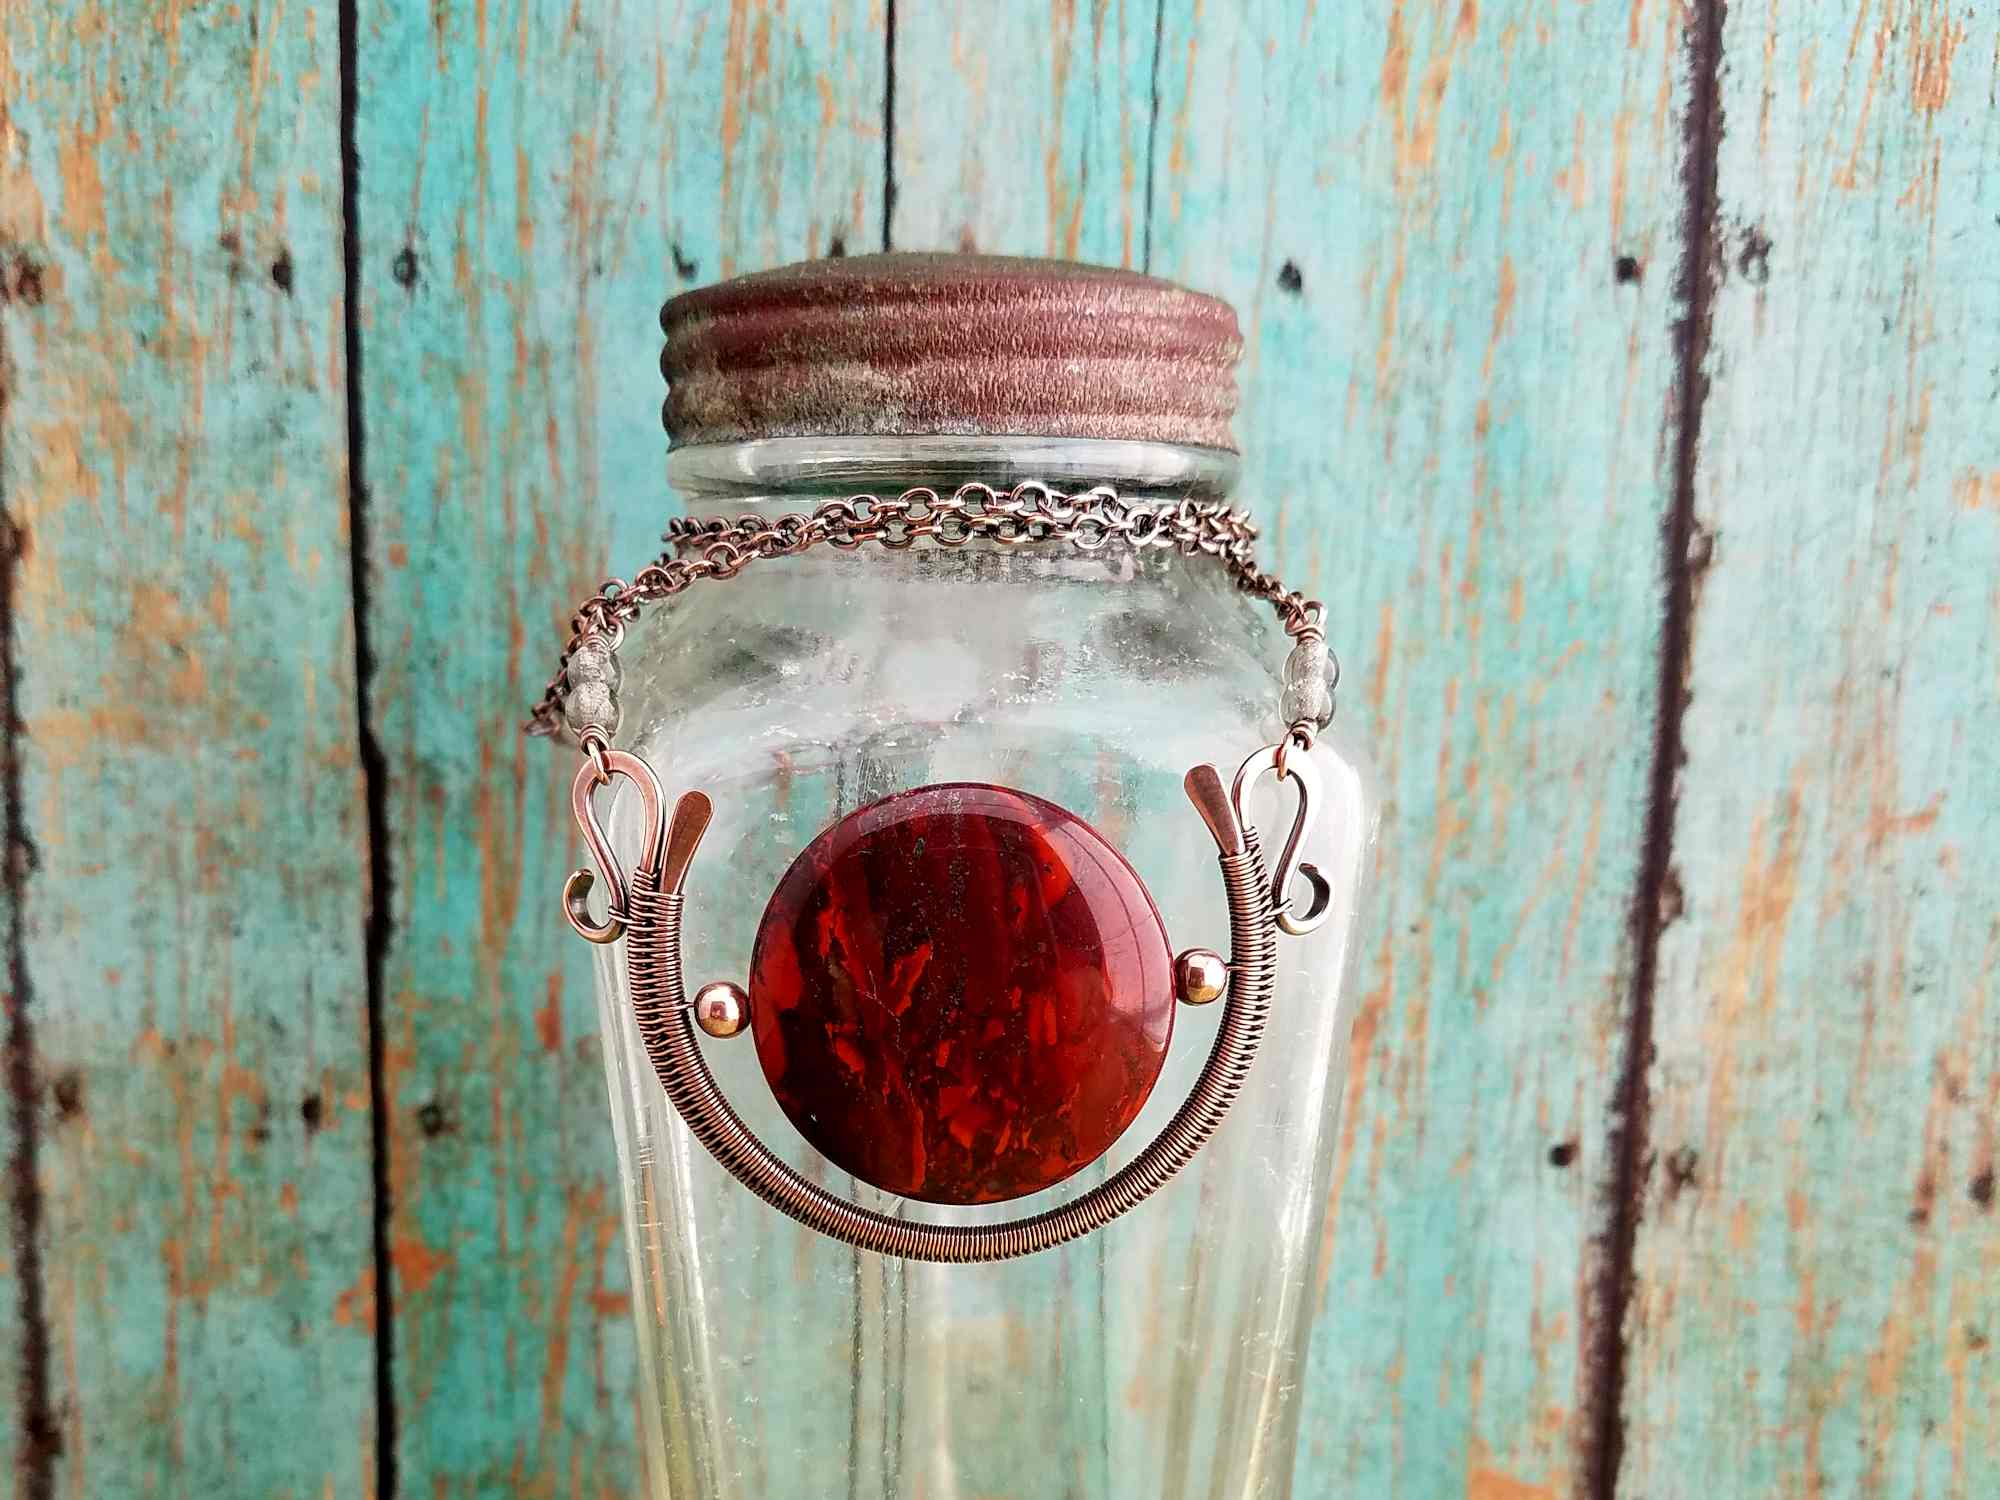
You can completely change the look of this pendant by simply changing your stringing material. For example, the pendant pictured on the far left was strung on a rosary-style jewelry cord featuring hand-knotted copper and Tree Agate beads.
The beauty of using jewelry cord for wire woven pendants is that you can create adjustable necklaces. This particular necklace can be adjusted from 26 inches to 40 inches with the slide knot closure.
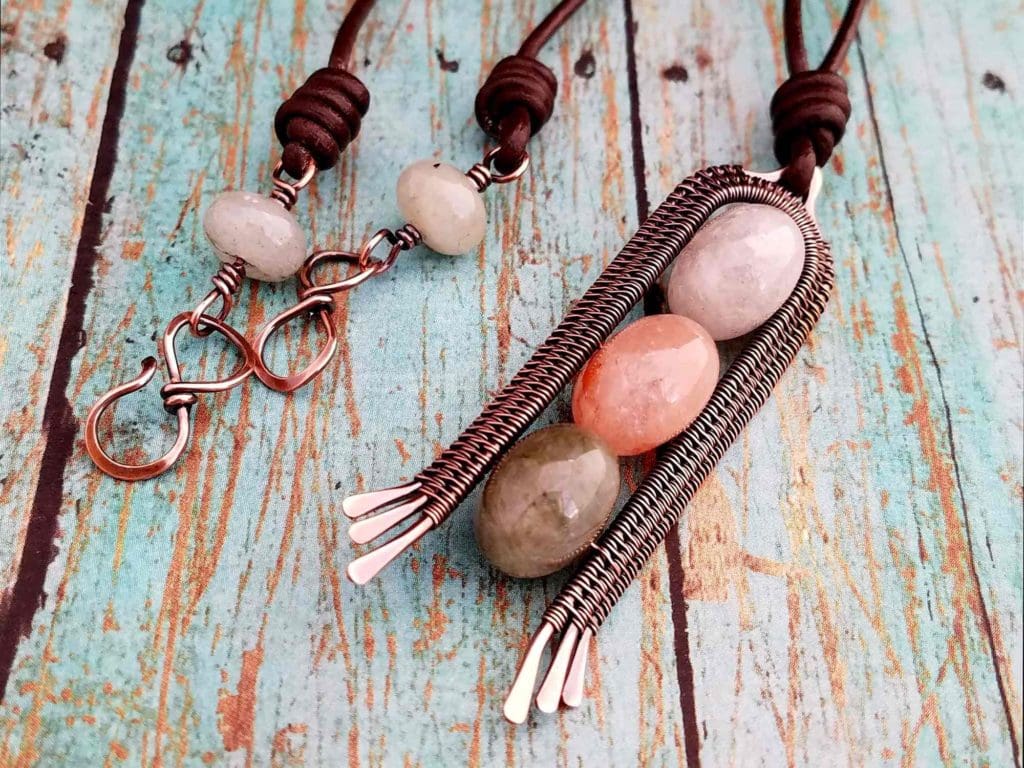
The basic pendant featured throughout this tutorial (pictured second from right) was strung on a 28-inch leather cord, making it the perfect layering piece for any wardrobe. As always, the pendant can also be strung on a basic chain. That’s what I did with the third version of the basic pendant pictured on the far right.
Add Dimension to Your Portico Pendant with Layers
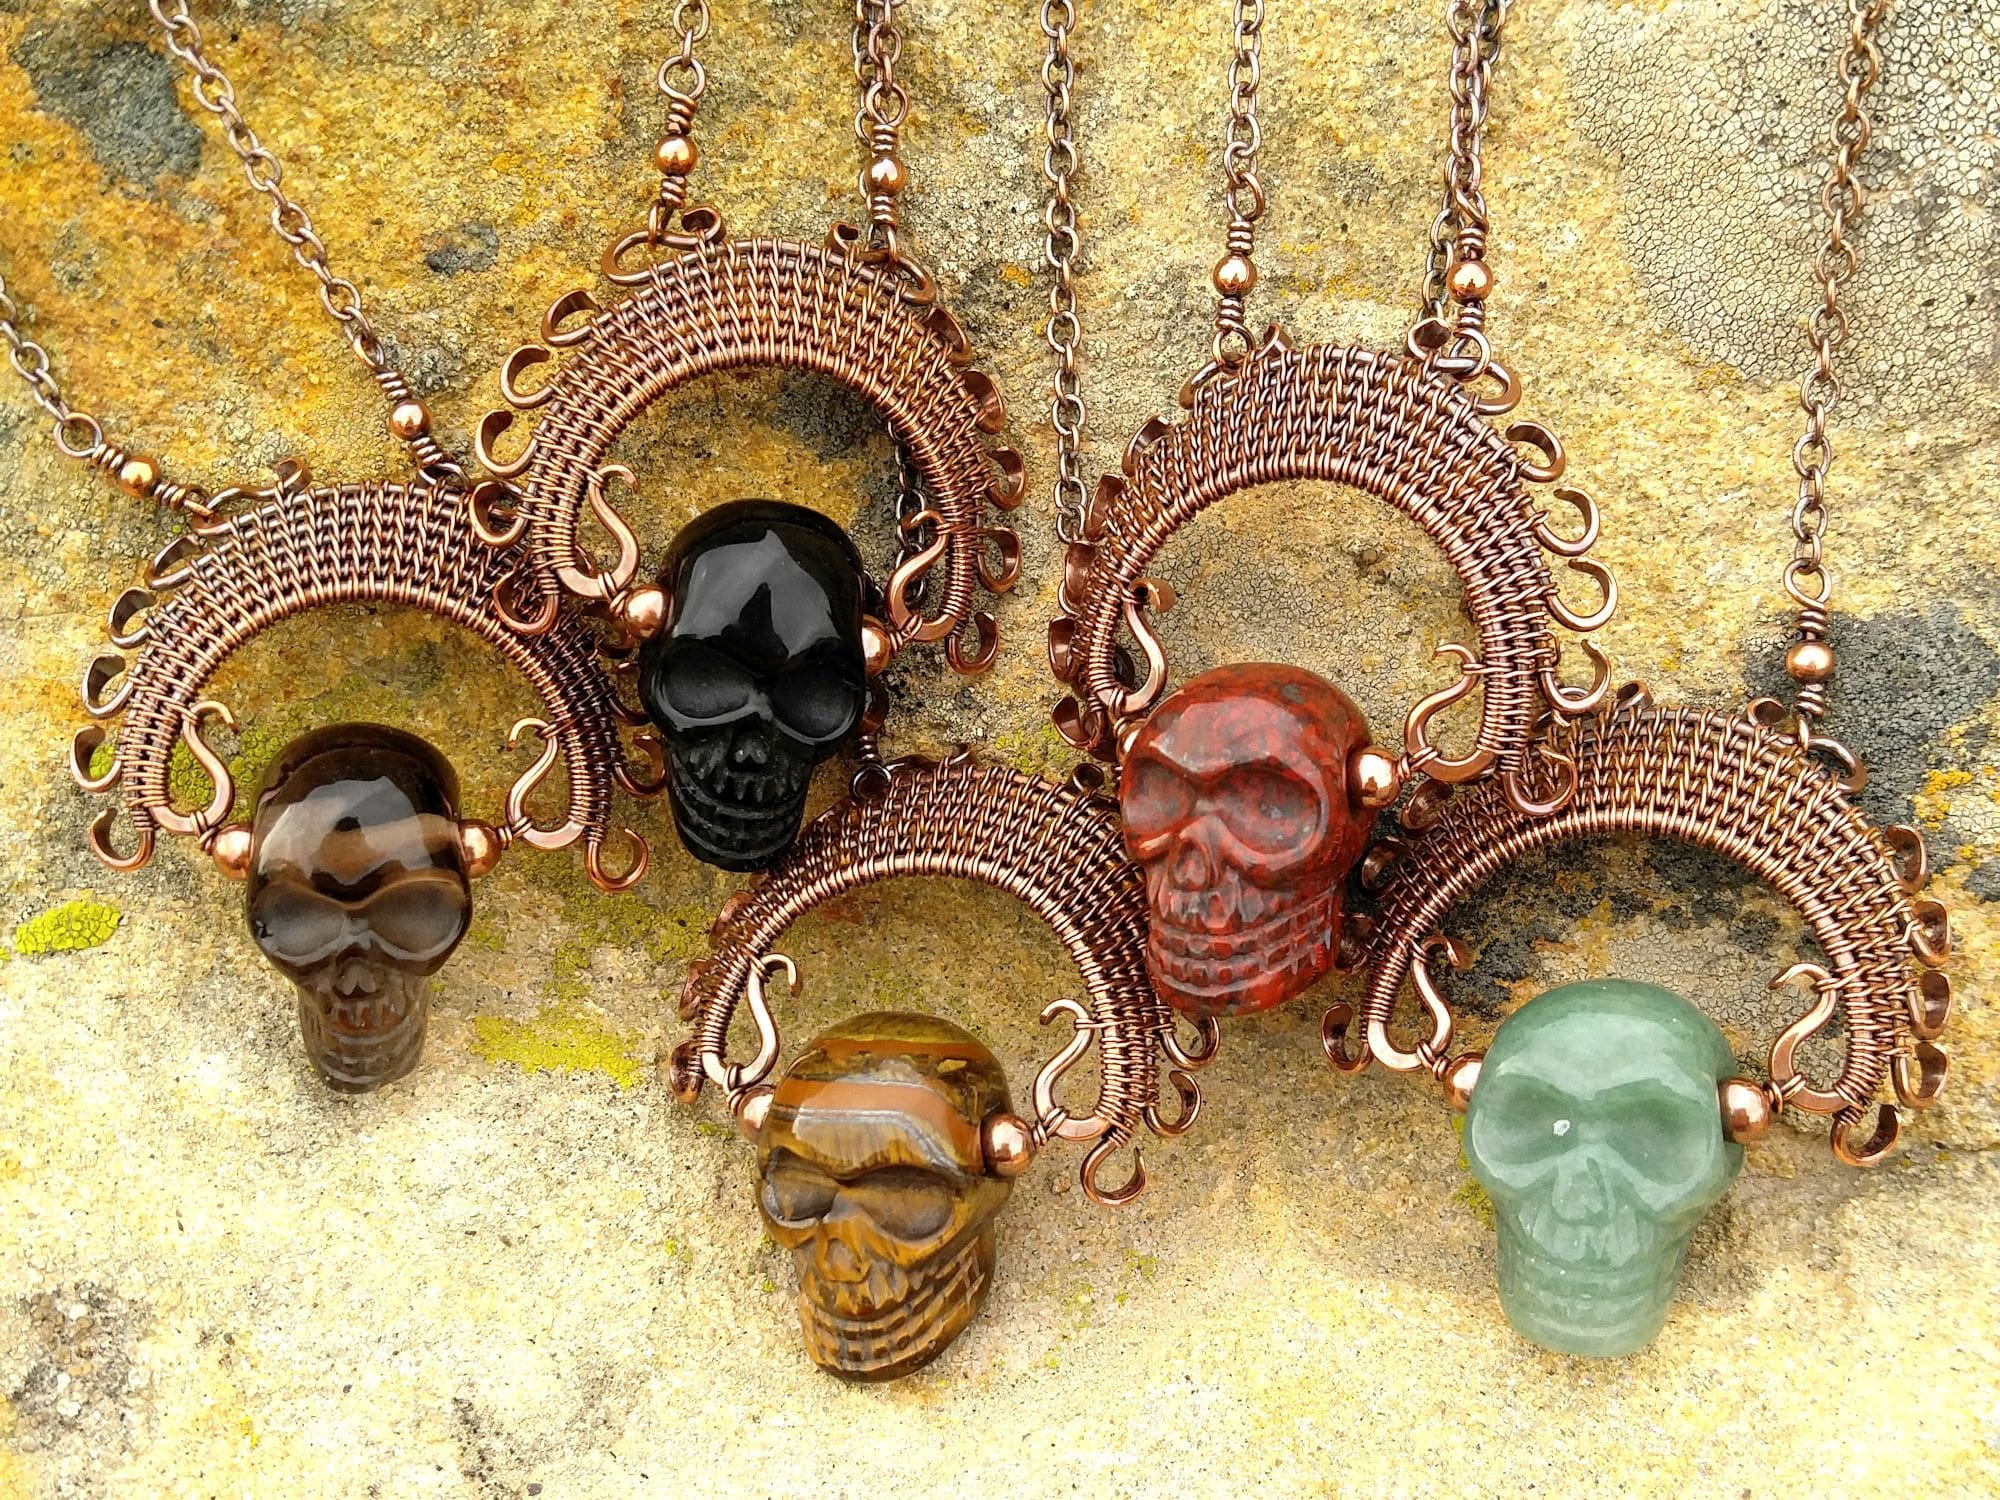
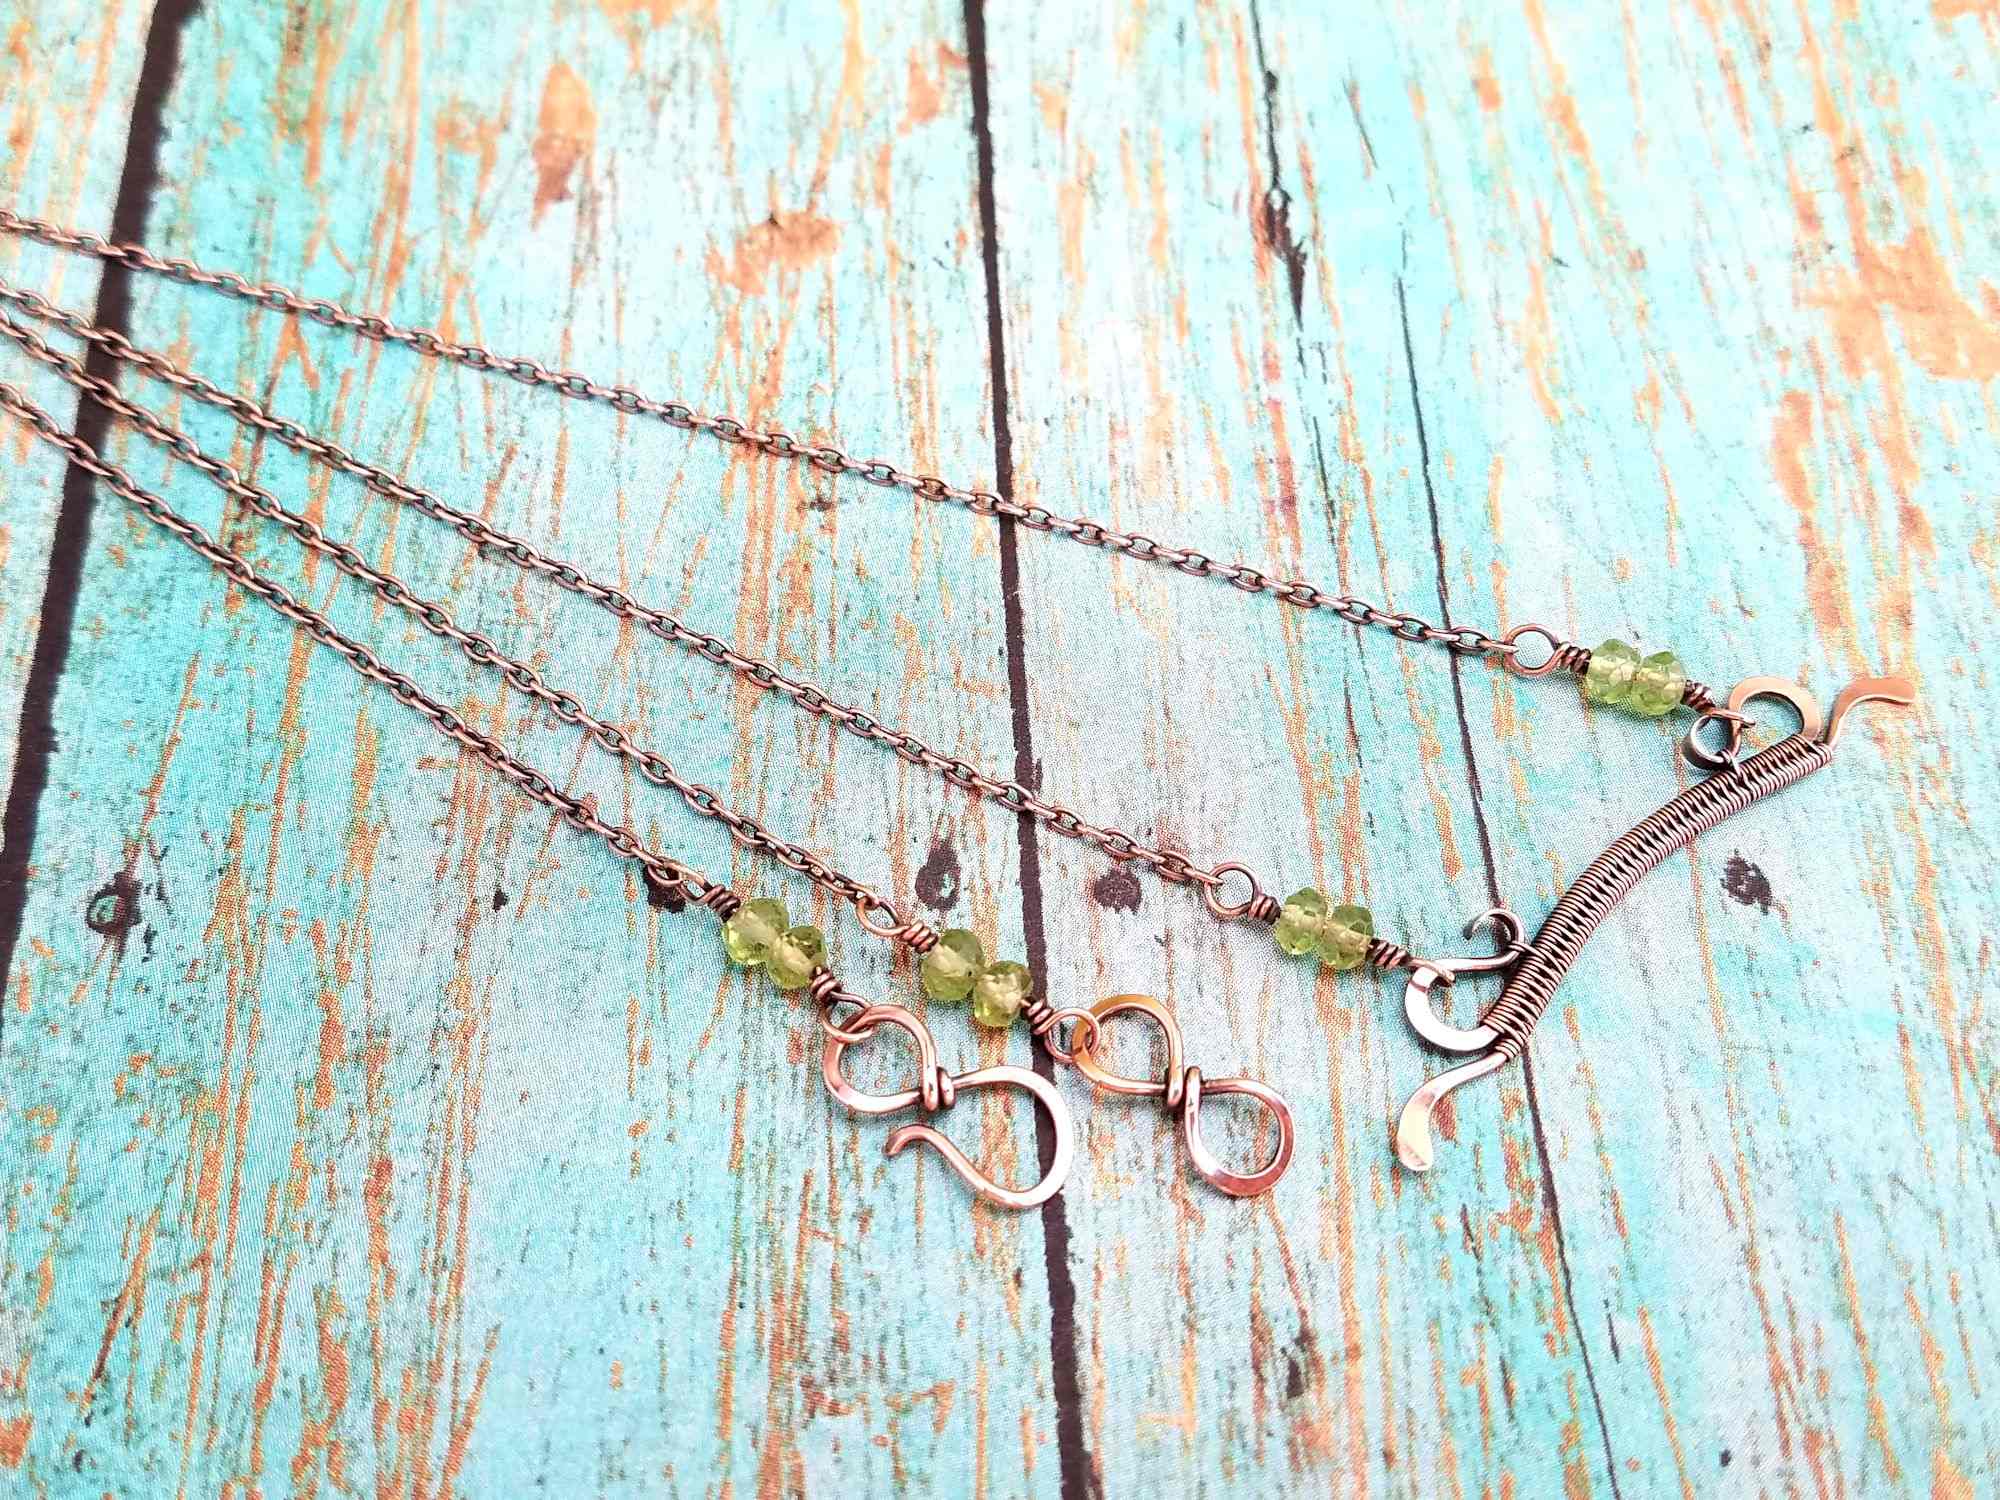
If you’re feeling adventurous, you can modify this pendant in a multitude of ways by cutting longer core wires. Then ball the ends of those wires with a torch, as I did on the two pendants pictured center and second from left.
This allows you to sculpt the ends of the wire to create a layered effect. Notice that I flipped one of those pendants upside down and used the peak of the portico to hang a handmade tassel.
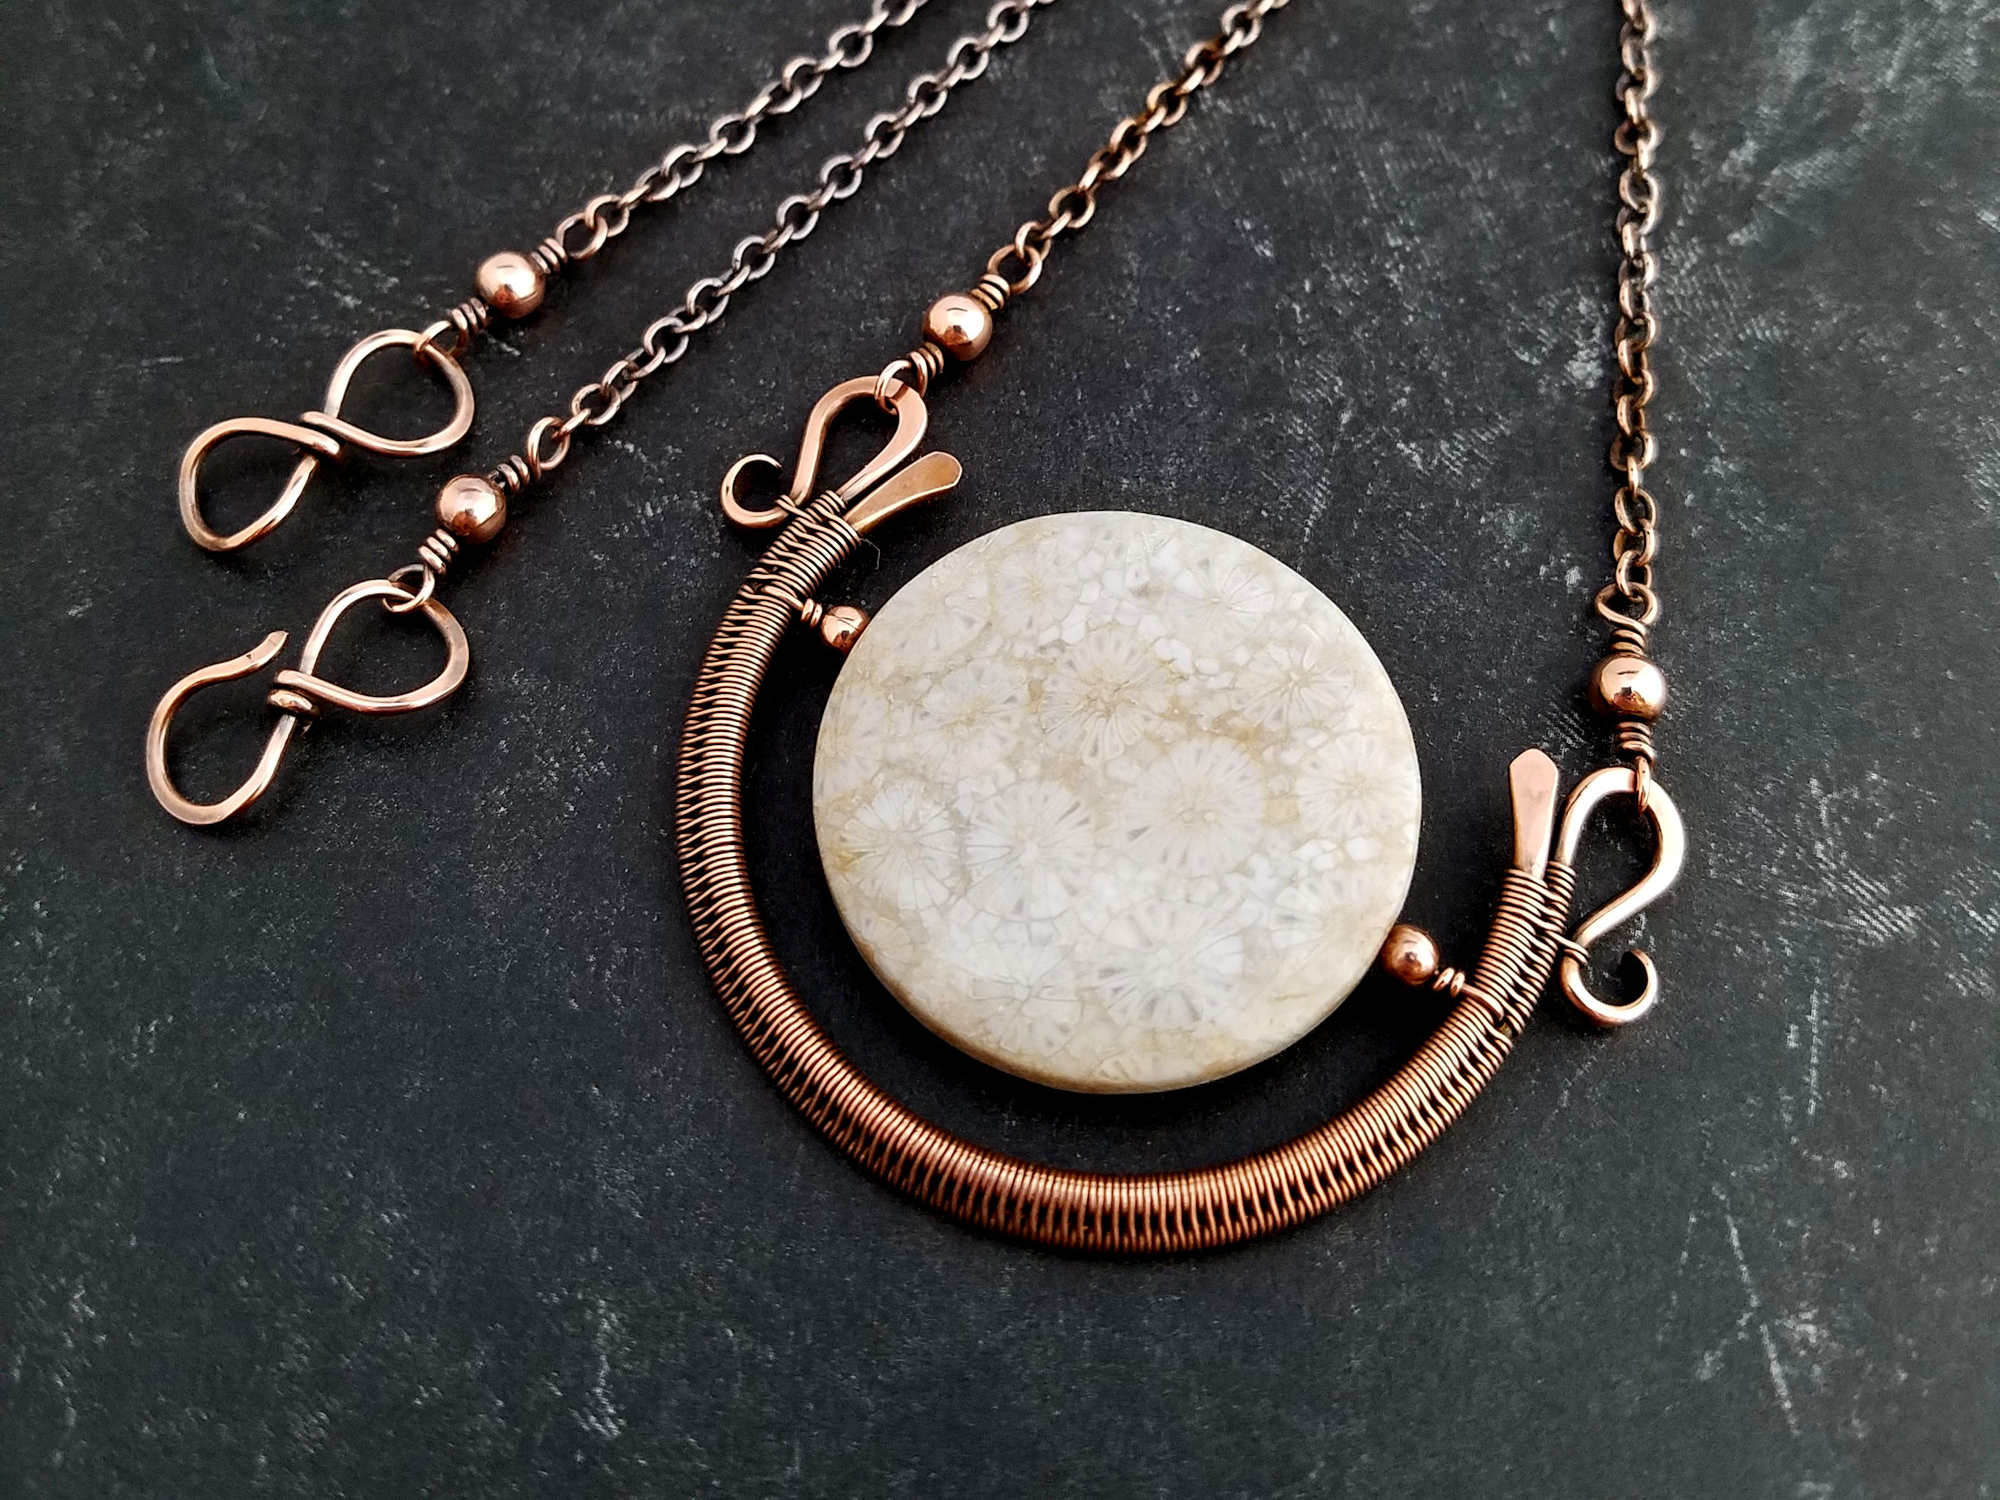
Experiment with this design. I think you’ll find that it’s very versatile and works beautifully with a number of other jewelry components like tassels or even a variation of my Delicate Bar Pendant, pictured below.
The Simple and Elegant Delicate Bar Pendant
Modifying this frame to fit smaller or larger focal beads is as simple as changing the sizes of your mandrels and the lengths and gauge of your core wires.
Choose a mandrel that’s the same width as your focal beads and then step up from there. When nesting formed wires for bead frames that can be shaped on my ring mandrel, I typically make each core wire about three full ring sizes larger than the wire it surrounds.
The principles for forming and weaving the core wires are the same regardess of the size of the focal beads. Simply adjust the cut lengths of your core and weaving wires and the size of the mandrels that you use to shape those wires.
You can then fine-tune any gaps between your focal beads and your bead frame by using metal spacer beads. And don’t forget to keep good notes on the ideal lengths for your core wires and mandrels so you can easily repeat your modified design.
Finishing Suggestions
I antiqued the Portico Pendants that I made while writing this tutorial with Liver of Sulfur (LOS). Then I burnished the patinated pieces with super fine steel wool (Grade #0000) in a warm bath of water and original Blue Dawn dish soap. The steel wool brings back the bright copper highlights on the high spots.
Once that’s done, I rinsed my jewelry thoroughly to remove any particles of steel wool. Then I put
Learn More About Finishing
If you’re nervous about finishing your jewelry, be sure to read this detailed tutorial that walks you through my 7-step patina process. And if you’re wondering why I recommend tumble polishing specifically, check out this post as well. Finally, be sure to clean your stainless steel shot regularly. Clean shot is necessary to achieve the best finish on your tumble-polished jewelry.
One last bit of tumbler advice before you go. Always make sure that any beads or stones that you use for your jewelry are safe to tumble. I don’t recommend tumbling natural pearls, soft gemstones, ceramic beads, or glass beads with polymer coatings, such as glass pearls and certain frosted-look glass. If you’re not sure if your beads can handle the tumbler, run a test tumble with a bead that you’re willing to sacrifice.
Discover More Behind Door 44
Thanks so much for joining me today. I hope you enjoyed creating my pretty and versatile Portico Pendant. If you’d like a printable PDF version of this tutorial, you can find it here.
Want more free wire jewelry tutorials and tips?
I like to share useful wire weaving tips and tricks on my social media channels, and we have some great conversations about wire jewelry in my private Facebook Group. Also, be sure to connect with me @door44studios on Instagram, and Facebook to keep up with everything that’s happening behind Door 44. And if you haven’t already done so, be sure to subscribe to my YouTube channel where you’ll find new wire jewelry videos weekly.
Until next time, go make something beautiful!

Pin the Portico Pendant Tutorial for Later