

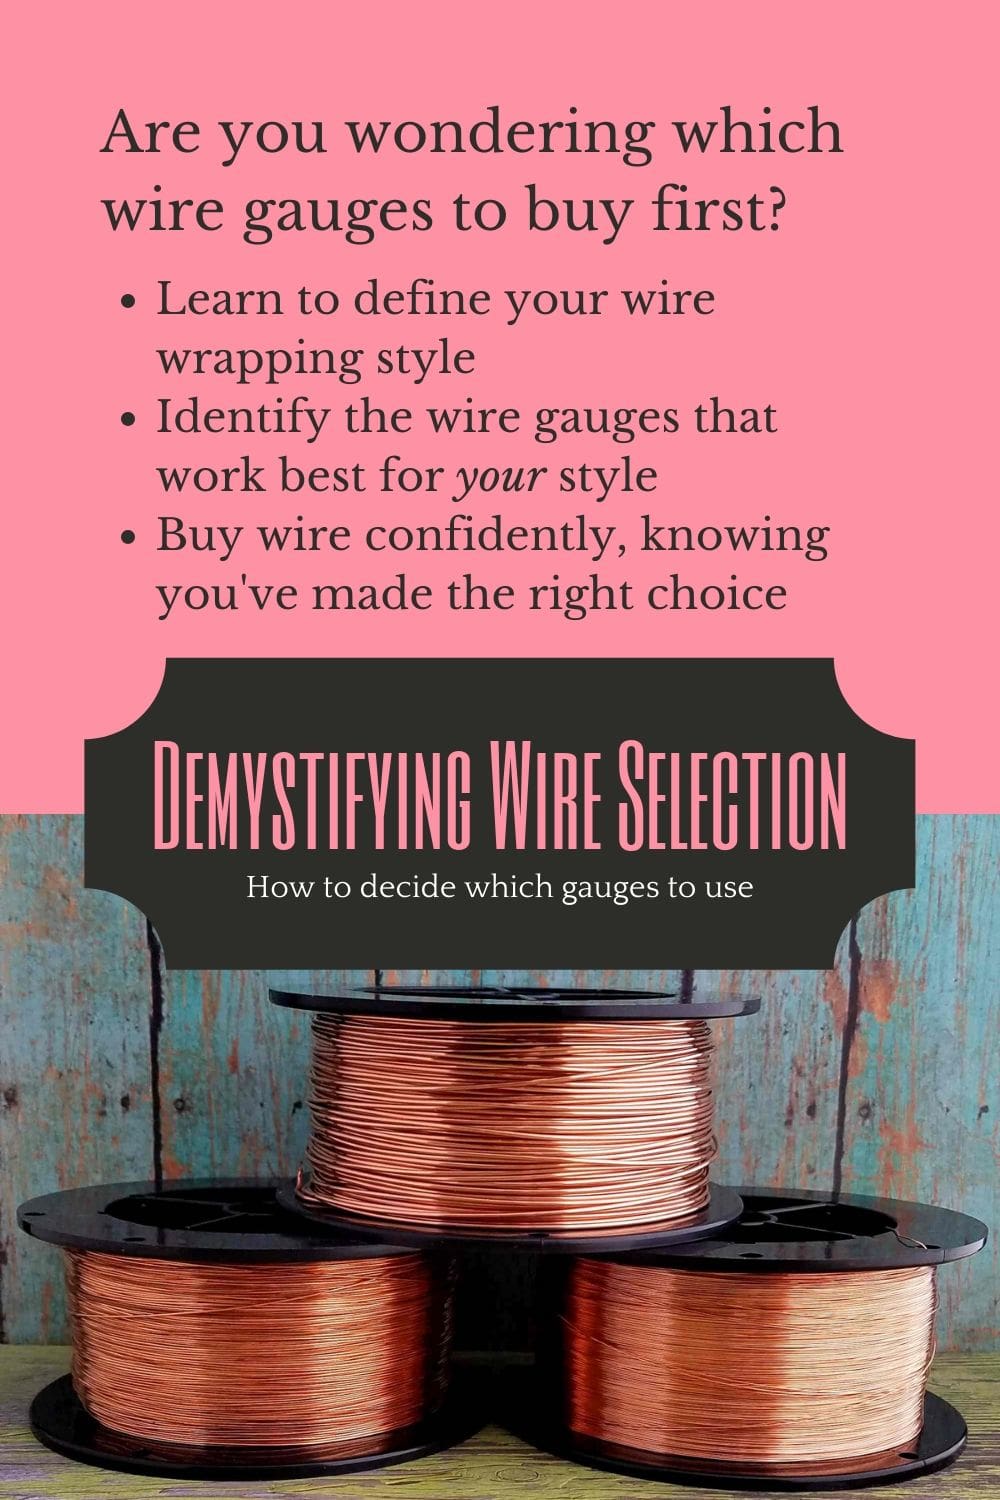
Which Wire Gauges Should You Buy First?
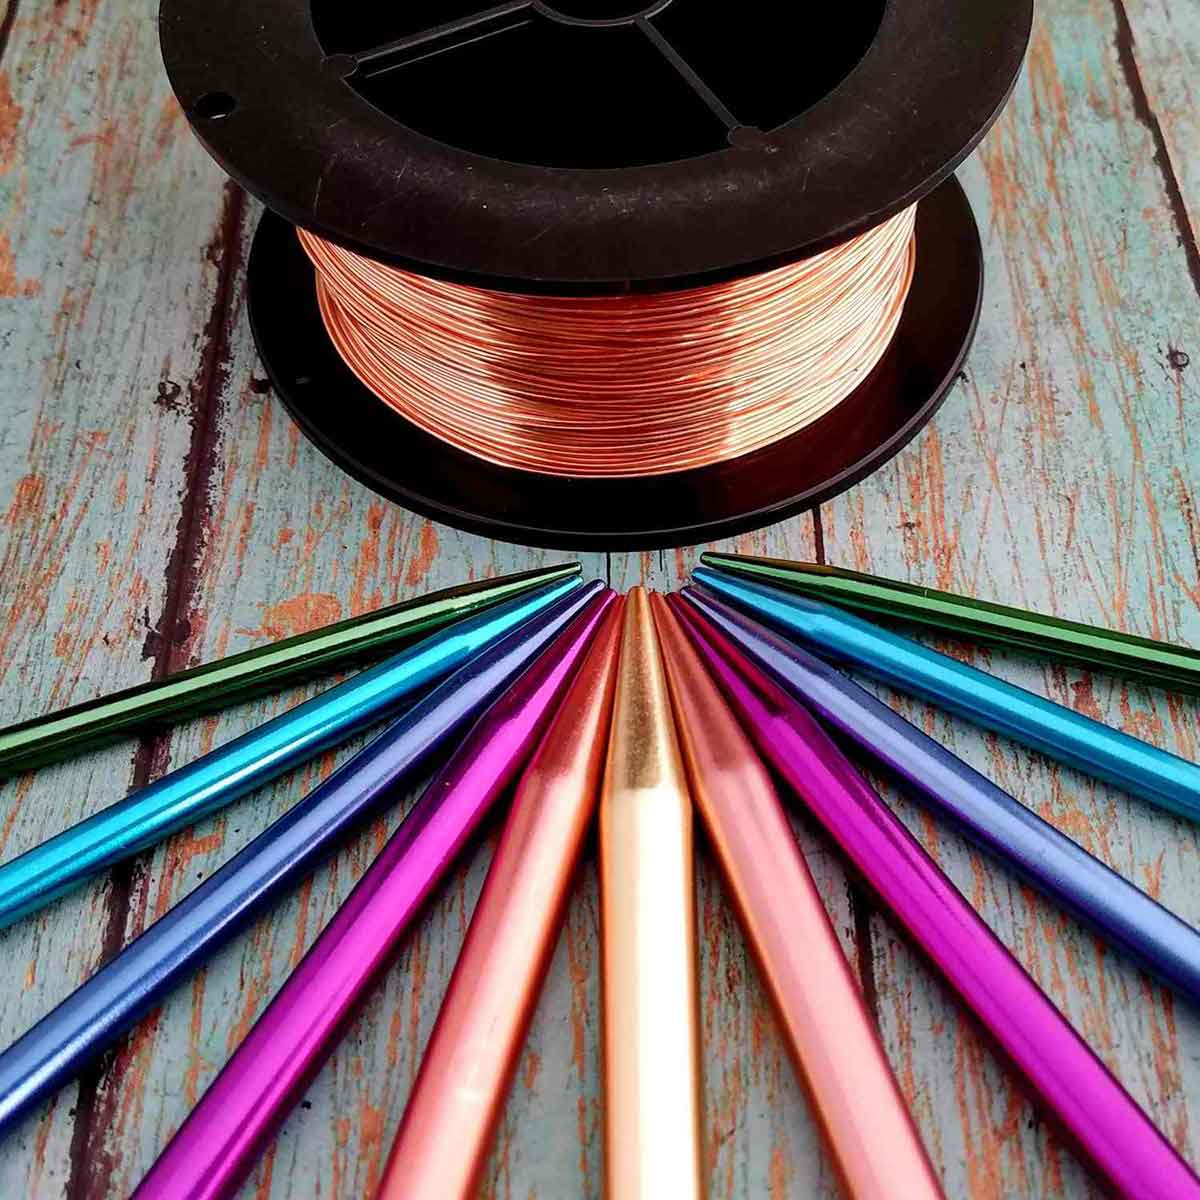
One of the questions I hear all the time is, which wire gauges should I buy first? When you’re first learning to make wire jewelry, wire is probably your biggest investment. This is especially true if you want to work with precious metals. So, I totally understand where
Unfortunately, there’s not a simple answer to that question. I could rattle off a handful of wire gauges that I use most frequently, but that’s the answer that works best for me. The answer that works best for you ultimately depends on what kind of wirework you want to do.
First, What’s Your Wirework Style?
Understanding your personal wirework style is super important because it will help you understand which wire gauges you’ll be reaching for most frequently. For instance, square and half-round wires in medium gauges work best for traditional wire wrapping, if that’s the style you’re drawn to. But in contemporary wire wrapping, which we’re going to discuss in-depth in this article, you’ll use mainly large and medium gauge round wires along with at least one fine gauge wire for lashing, binding, and light coiling.
On the other hand, if you’re dying to learn how to do complex heady wraps, you’re going to need a range of smaller gauge wires for coiling. I can (and I will) tell you exactly which wire gauges I use for specific purposes for
The short answer is this. It ultimately depends on the style of wirework that you’re most interested in pursuing. So, let’s take a closer look at those styles and figure out which one is for you.
This post may contain affiliate links. If you click on a link and then make a purchase, I may earn a small commission (at no cost to you). As an Amazon Associate I earn from qualifying purchases. To learn more, please see my full disclaimer.
The 3 Main Styles of Wirework
It’s not easy to categorize wirework because there aren’t really any clear boundaries in our craft. It’s not like needlecraft where, for example, the differences between knitting and crochet are very clear and distinct. Those two crafts use different tools that result in very different stitches. And almost anyone familiar with these crafts can tell the difference between knit and crochet fabrics.
When it comes to wirework, however, we all use essentially the same tools and techniques. So stylistic differences are much more subtle. And to further complicate matters, the wirework masters of our craft don’t necessarily adhere to a particular style. On the contrary, they tend to develop their own unique and personal styles that completely defy categorization.
Nonetheless, I’ve chosen three tutorials written by artists with three different styles to clearly illustrate how I look at wirework. These three tutorials are representative of the three styles of wirework we’re going to discuss. Hopefully, they’ll help you figure out which style is right for you.
Contemporary Wire Wrapping
I think the distinction between wire wrapping and weaving has to do with the way each individual wire is treated. You’ll use mainly large to medium-gauge wires for wire wrapping. And by wrapping, I mean that the wires are often sculpted or wrapped around a sturdy frame. Or around a focal point, such as a gemstone cabochon.
When I say “larger gauge wires” I mean wires that are at least 20ga or heavier. These are structural wires. You’ll use small gauge wire to secure their larger gauge counterparts in place. Many artists also use metal beads as spacers and braces in their wirework. Contemporary wire wrappers will often coil small gauge wires around wrapping wires to add texture and interest. They also use small gauge wires to lash frame and wrapping wires together. But beyond that, there’s very little wire weaving or coiled coils involved. Small gauge wires don’t play a significant role in contemporary wire wrapping.
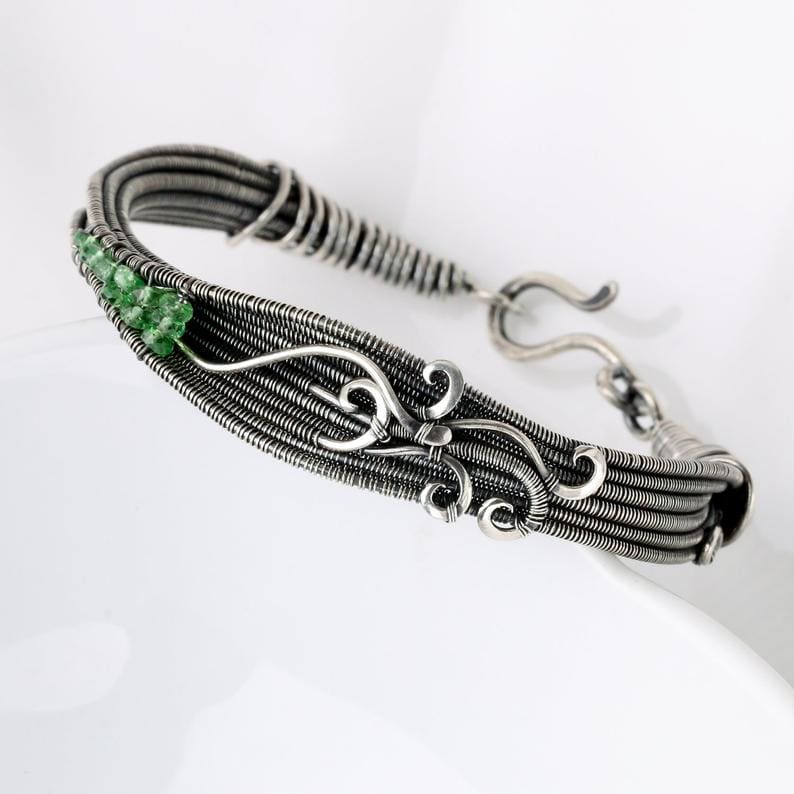
A Beautiful Example of Contemporary Wire Wrapping

I chose Elena Sinelnik of Lena Sinelnik Art to represent the style I tend to associate with contemporary wire wrapping. I’ve admired her work for quite some time, and I recognize her designs on sight. Her nature-inspired jewelry has some of the most graceful lines I’ve seen in this style. And she’s a master at designing around cabochons with irregular shapes (a skill I’ve yet to master myself).
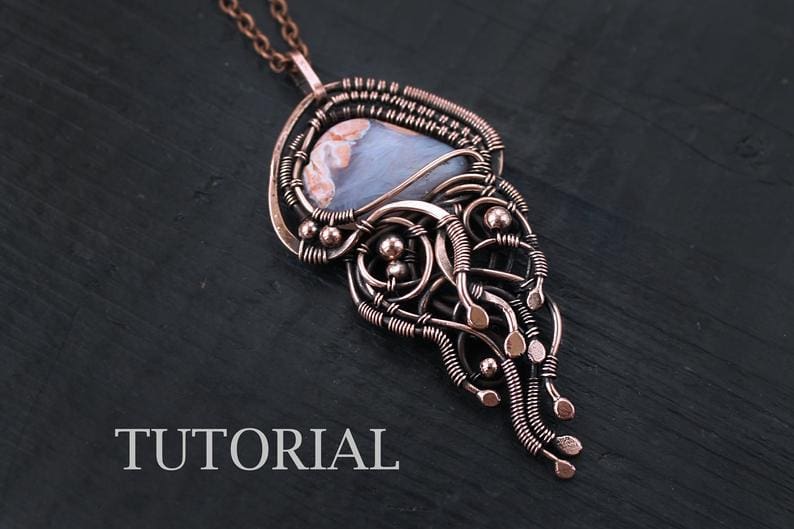
I chose to feature Elena’s wire wrapped Jellyfish tutorial today. I haven’t attempted this tutorial myself, and I’d like to point out that English is not Elena’s native language. However, her photography is excellent. Based on the photos in the Etsy listing for this tutorial, I’ll bet this tutorial is easy to follow.
One other thing to consider is that the varnish and patina Elena uses may not be available in the US. So, you may need to substitute other finishing products. Try my 7-step patina process and a tumbler to finish your Jellyfish pendant instead. This looks like a super fun tutorial. Try it to see if contemporary wire wrapping is your style.
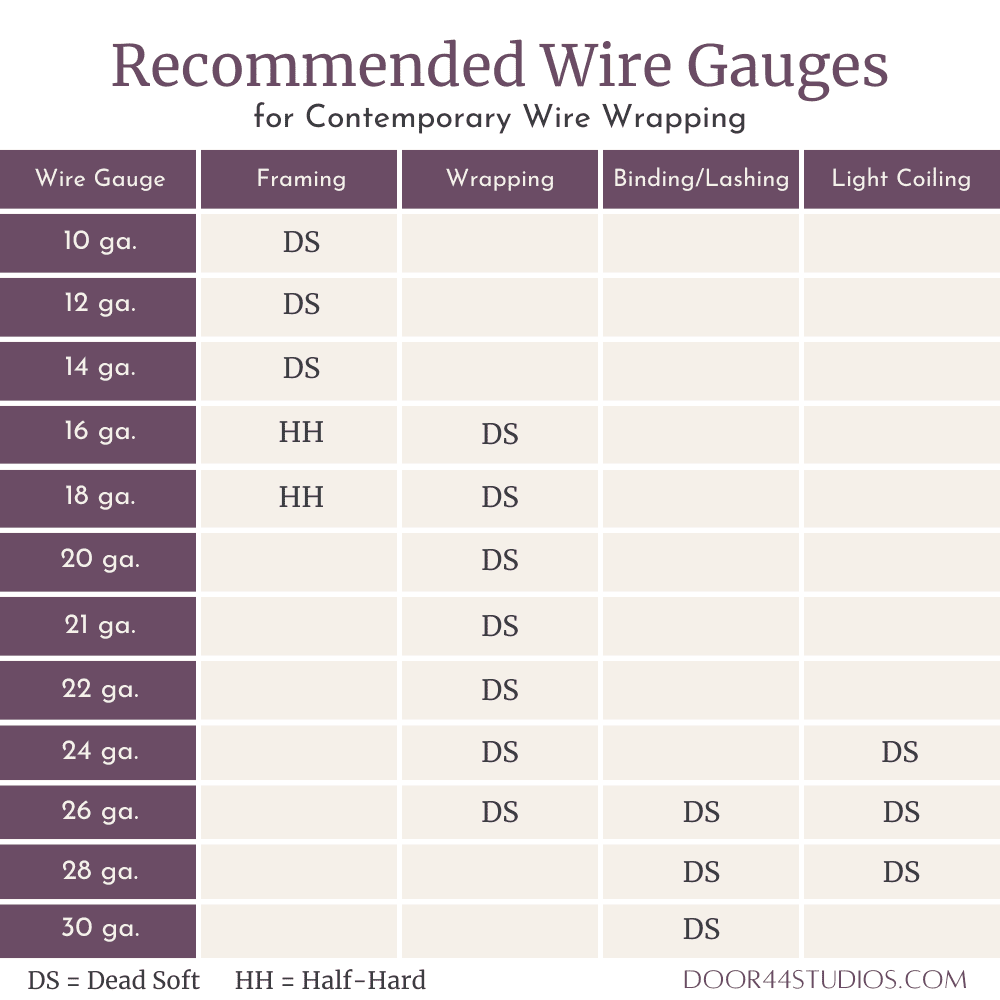
Which Wire Gauges Should You Buy First for Wire Wrapping?
Invest in one or two small gauge wires for lashing larger wires together if you’re drawn to this style. And then invest in a range of heavier gauge wires to use for wrapping. You’ll go through your large gauge wires faster in this style of wirework. Meanwhile, a 1-pound spool of small gauge wire will probably last a very long time.
If this is a style you plan to pursue, I suggest buying some 16ga, 18ga and 20ga wires for wrapping. Then buy either 26ga or 28ga for lashing. And because this style involves a lot of shaping and sculpting of your larger wires, choose dead soft solid wire. Dead soft wire is easier to sculpt. And the process of sculpting and shaping will usually harden the wire enough for long-term durability in your finished jewelry.
The one exception would be maybe the 16ga wire. That’s the gauge that you’ll most likely use for structural frames, which may not involve as much shaping. Using 16ga half-hard wire will give your pieces a bit more strength and shape retention while simplifying your construction process. This is because you won’t have to spend extra time hardening your frame wires. Shape retention is particularly important for bracelets, which take more abuse than necklaces or earrings while worn.
Be sure to refer to the wire gauge charts at the end of this article. These charts are handy quick-references. They’ll help you determine which wire gauges to use for each wire wrapping style.
Heady Wire Wrapping
When I think of heady wire wrapping, I immediately picture coiled coils. Coiled coils are usually (but not always) featured prominently in heady wirework. And because of that fact, this style requires perhaps the broadest range of wire gauges. You’ll need a variety of both larger and smaller gauges of wire to create coiled coils.
The first time I purchased a heady wire wrap tutorial, I was surprised by how many wire gauges were used in a single pendant. That tutorial specified six gauges of wire ranging from very fine 30ga to sturdy 16ga wire. The temper specification for the smaller gauge wires, which ranged in size from 22ga to 30ga, was dead soft. While the two larger gauges, which were 18ga and 16ga, were to be half-hard.
This is, I suspect, a typical wire assortment for the average heady wire wrap project. And you’ll go through a lot of wire in this style — especially the smaller gauges. This is because coiled coils typically involve three or more wire gauges to create a unique coiled texture. That texture is integral to this particular style of wire wrapping.
A Fantastic Example of Heady Wire Wrapping
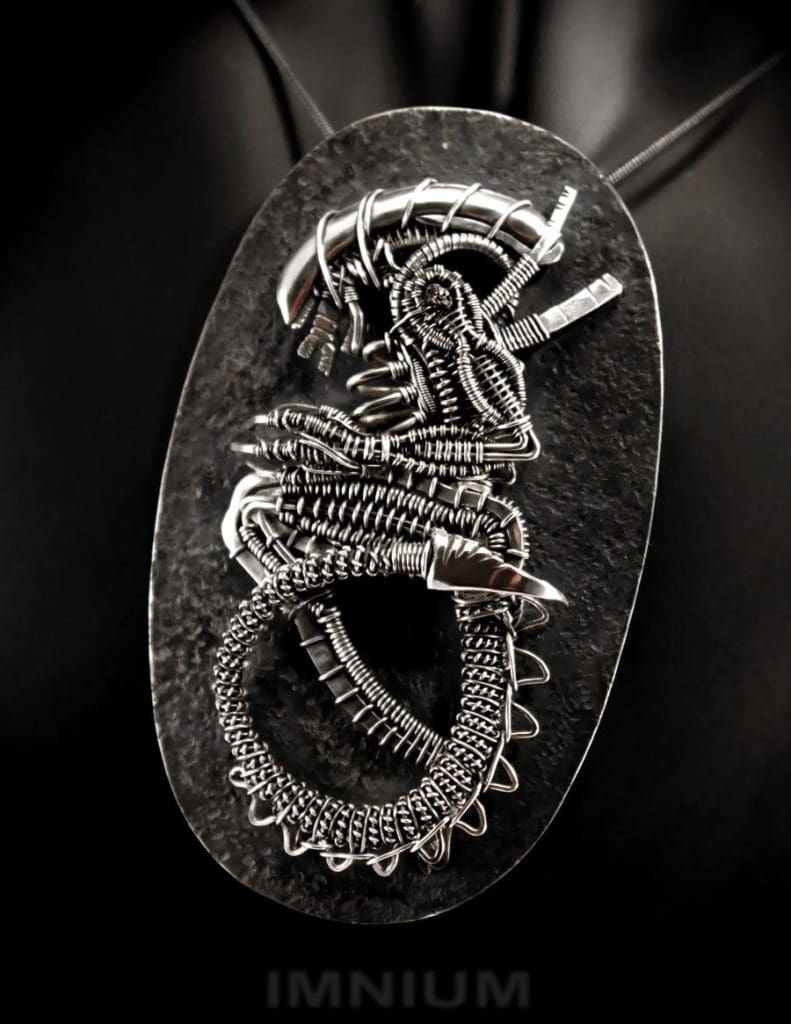
Ivona Posavi Pšak of IMNIUM is the first artist to come to mind when I think of heady wire wrapping. Ivona’s work has an otherworldly feel to it, and she has an absolutely amazing stylistic range. You’ll find classic designs with old-world elegance as well as futuristic pieces in Ivona’s portfolio. I first stumbled upon an image of one of her Alien Fossil designs (pictured above). And I’ve been a huge IMNIUM fan ever since.
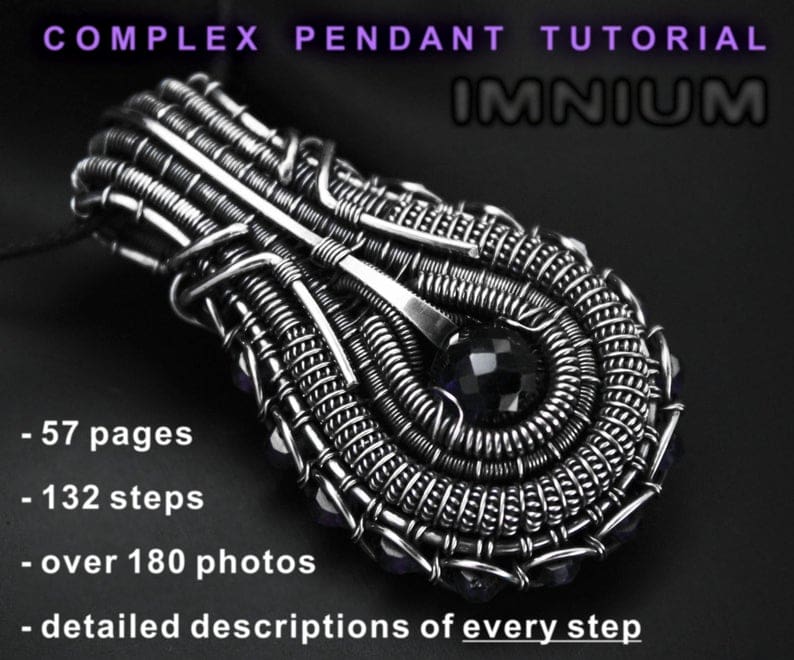
The IMNIUM tutorial that I chose to feature in this article is the Complex Pendant Tutorial. I do own this tutorial, and I’m unashamed to admit that I started this pendant once and never finished it. This pendant is fabulous, and I’d love to wear it. I didn’t enjoy the process of creating it, however. I’d rather scrub my tile grout than make coiled coils. About four hours in, I grew weary of the process and unsatisfied with the way my pendant was turning out.
Someday, I’ll buy an IMNIUM original. Until then, I prefer to admire heady wire wrapping from a distance. Pieces done well in the heady wire wrapping style are amazing. But making heady wire wraps is definitely not my idea of fun.
Which Wire Gauges Should You Buy First for Heady Wire Wrapping?
If heady wire wrapping is your jam, you’ll need to invest in several smaller gauge wires. I’d recommend buying a spool of every wire gauge between 22ga and 30ga (all dead soft).
For structural purposes, I’d suggest buying 16ga, 18ga, and 20ga half-hard wire. If you pursue this style very long, you’ll probably use more of the smaller gauge wires than the larger gauges. So the wire requirements for this style of wire wrapping are basically the opposite of traditional wire wrapping.
Wire Weaving
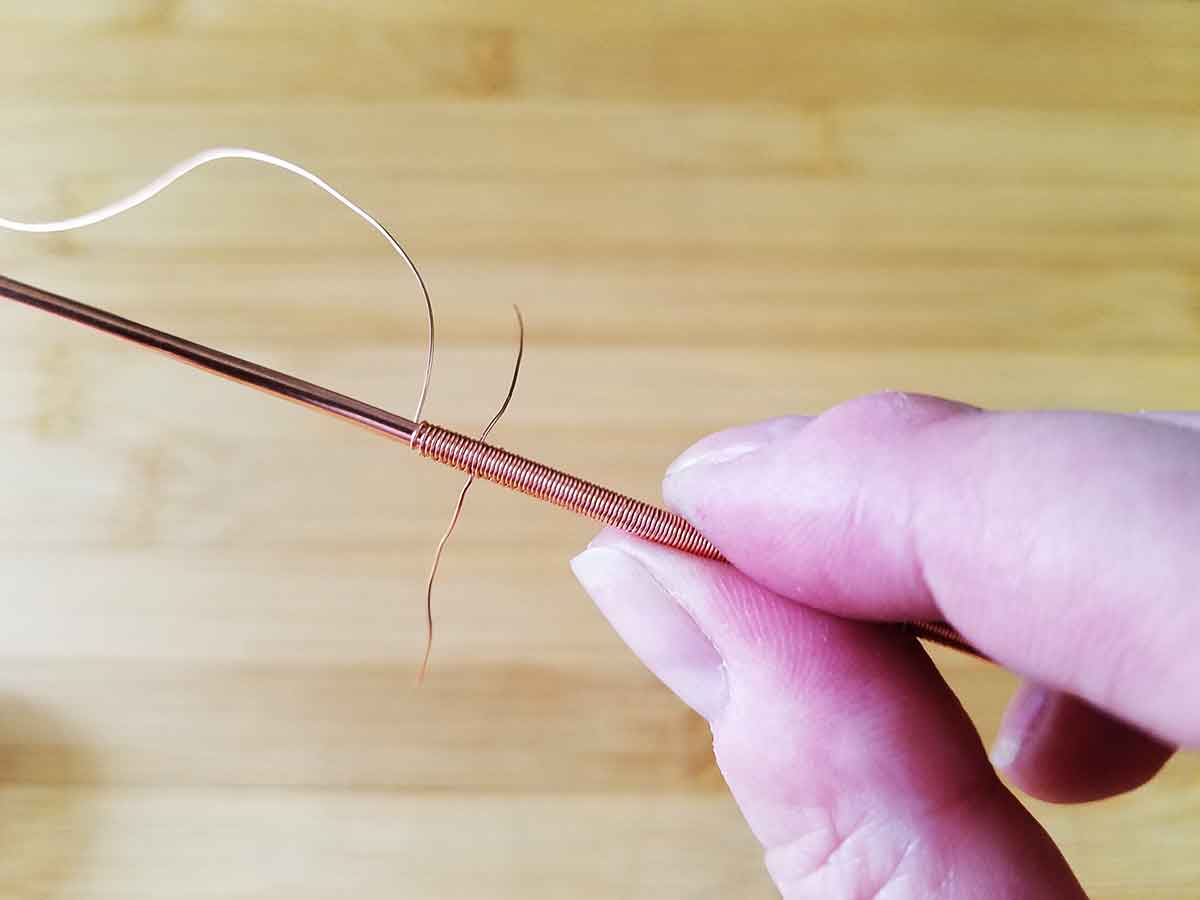
Finally, we’ve come to my own area of expertise. I consider myself to be a wire weaver rather than a wire wrapper. The distinction is subtle, but here’s the way that I see it. Wire weaving involves literally weaving two or more heavier gauge core wires together with a very fine gauge wire. In this style, the texture of the weave becomes the most prominent feature of the work. Much like the texture of coiled coils is a prominent feature of heady wirework.
Texture is what it’s all about for me. I was a very frustrated and dissatisfied wireworker for a long time before I had a major breakthrough. My wirework journey began with chainmail more years ago than I care to admit. I was drawn to chain weaving because, as I’ve discussed before in other posts, I’m a little obsessed with connections.
I see connections where others don’t, and I’m happiest when I’m creating connections of some sort. So chainmail seemed like a natural craft for me when I gave up stained glass. But I grew bored with chainmail pretty quickly. I really enjoyed working with wire, though, so I took a wire wrapping class at my local bead shop.
My Own Journey to Wire Weaving
The very first wire wrapping project that I made was based on a Lisa Barth pendant tutorial. And it was beautiful! Someone actually bought that pendant, right off of my neck. I took that as a sign that I was on the right path.
Lisa is another example of a true wire wrapper in that her work involves mostly larger gauge wires. And her work is lovely. I particularly admire her wire and leather bracelets. But there was something about that style of wirework that didn’t fully resonate with me. I enjoyed it enough that I knew I wanted to learn more. But I wasn’t in love with wire wrapping at that point.
The next step on my wire weaving journey brought me to Nicole Hanna. Nicole is perhaps the most well-known American wireworker. She’s a prolific writer of tutorials and a very accomplished and versatile artist. She’s wildly talented at sketching, writing, and photography. And all that is in addition to being an amazing wireworker. Oh, and did I mention that she also does some pretty fantastic bead embroidery, too?
I imagine there are other talents in her toolbox that I don’t even know about. There doesn’t seem to be much this lady can’t do. And I enjoyed exploring Nicole’s unique style of wire wrapping for a while. But there was still something missing for me. I couldn’t put my finger on it. But much as with Lisa Barth’s style, there was something about Nicole Hanna’s style that simply didn’t resonate with me.
A Major Breakthrough
And then I stumbled across Sarah Thompson‘s work on Etsy. I’ll never forget it. I was looking for that thing that was missing in my wirework when I found a pair of Sarah’s earrings. My jaw no doubt hit the floor while I gawked at those stunning silver earrings. It was like the sky opened up to reveal the heavens. Complete with a chorus of Angels singing and harps playing. I knew the instant I laid eyes on those earrings that I’d just had a breakthrough.
Tight Weaves Versus Open “Weaves” (aka Wraps)
I finally found that thing that was missing for me. And it was ridiculously simple, once it was right in front of me. Can you guess what it was? It was the weave. More specifically, it was the texture of the weave that made all the difference for me.
What I learned that day is that I’m particularly drawn to tight weaves. And I actually have a fairly strong dislike for open “weaves”, which are really wrapped rather than woven. By “open”, I mean that the core wire is clearly visible through the weave.
The stepped wraps of Nicole Hanna’s jewelry and the graphic wraps of Lisa Barth’s jewelry are examples of open weaves. Whereas in a tight weave, such as the Modified Soumak weave, the core wires are fully covered.
Learning from a Wire Weaving Master
It really wasn’t long after that major breakthrough that Sarah published her first book, Fine Art Wire Weaving. I spent probably the next ten months absorbing every bit of knowledge from Sarah that I could. I bought her book and made every project in the book. Multiple times. I also read every magazine in which her work was featured, and I completed those projects too. Finally, I took her Wire Weaving Bracelets course through Craftsy. When her second book, Woven in Wire, was published last year, I bought that book, too. Even though I’d already figured out my own style by then, I still learned a ton from Sarah’s second book. I recommend all three of these resources if you want to learn more about wire weaving.
I’ve learned a lot from many wirework artists
My work is much simpler than Sarah’s. I don’t do as much layering, and my wirework tends to play more of a supporting role in my designs. Whereas with Sarah, her wirework is definitely the star. And it apparently took all of that exposition for me to finally get to my point.
The thing that sets wire weaving apart from wire wrapping, in my mind, is the textures. And those textures, which are created by weaving, are central to wire weaving design. Large segments of wire woven jewelry consist of woven elements. And those woven elements are balanced with bare or lightly coiled wires.
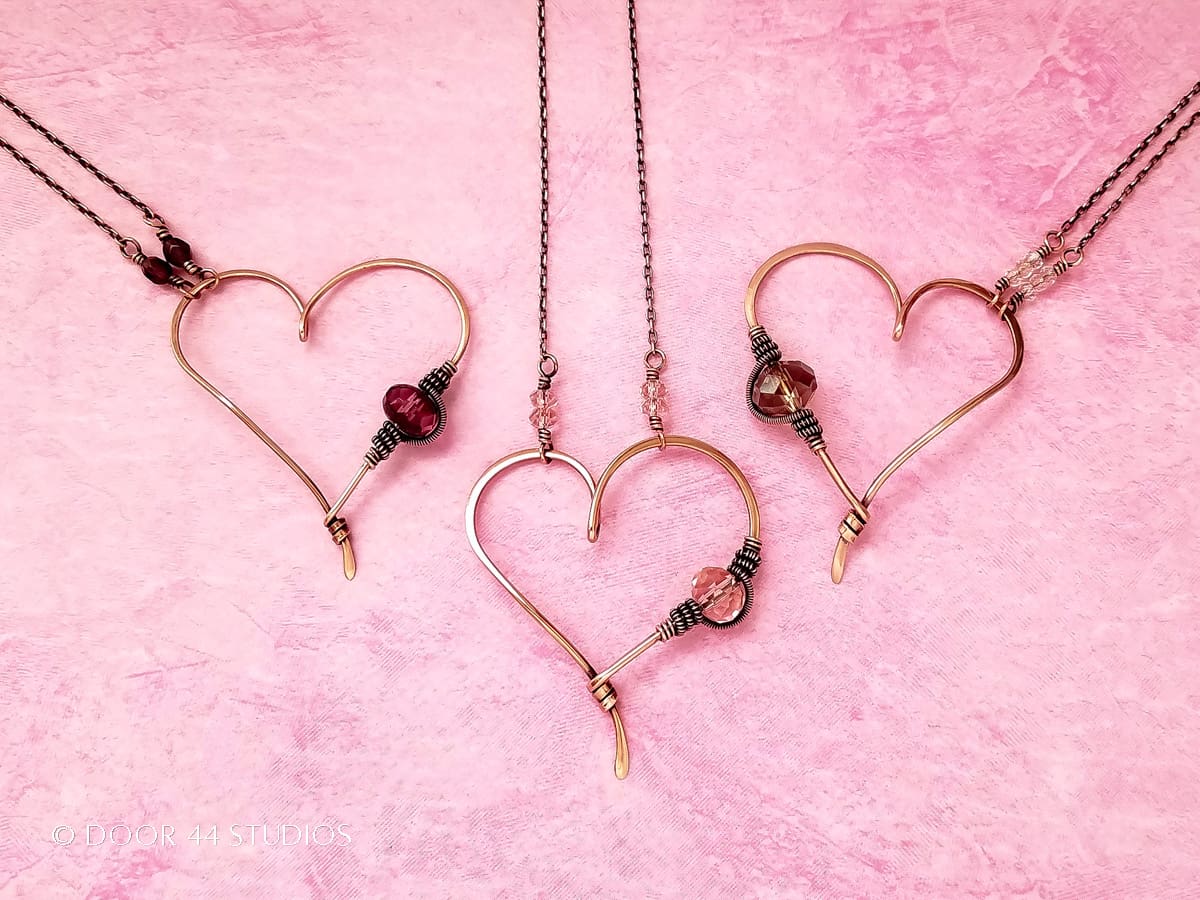
A Stunning Example of Wire Weaving
The Lillium bracelet is a classic Sarah Thompson design, which she generously shares in her latest book, Woven in Wire. Much like Lena Sinelnik and Ivona Posavi Pšak, Sarah is a master designer. She also has a very distinct style that is immediately recognizable on sight. She works almost exclusively with sterling and fine silver wires. And she uses a broad range of wire gauges to achieve the striking lines that are characteristic of her style.
As you explore Sarah’s work, you’ll also find that she enjoys playing with fire. I suspect her love of silver has a lot to do with the fact that silver plays well with fire. Much more so than any other jewelry wire alloy.

The tutorial that I chose to feature in this article is
Every time I’ve sat down to study one of Sarah’s tutorials, I’ve learned something. The same can be said for her books, her bracelet course, and her magazine features. I’ve become not just a better designer, but also a better engineer by studying Sara’s work.
The Maria Pendant is no exception in that regard. This is a really simple project that will teach you a ton about securely capturing a faceted crystal or gemstone. It’ll also help you decide if wire weaving is really for you.
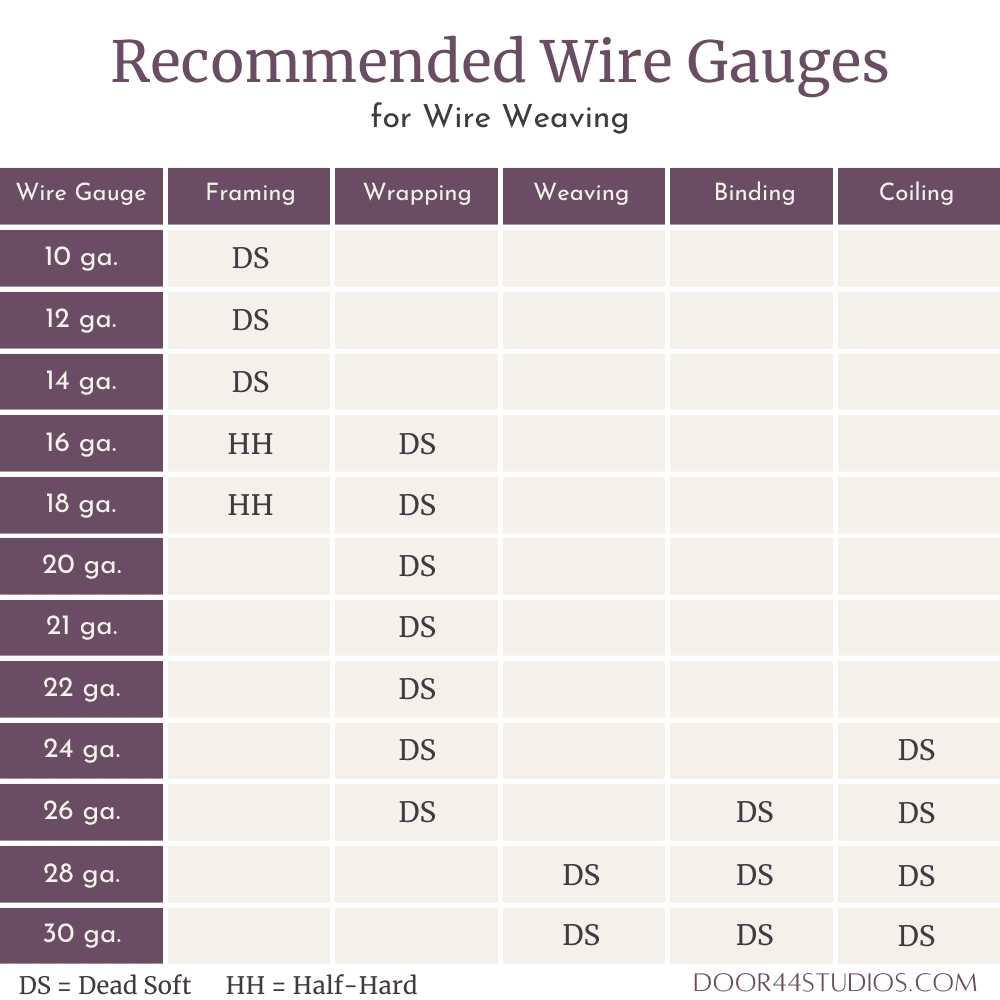
Which Wire Gauges Should You Buy First for Wire Weaving?
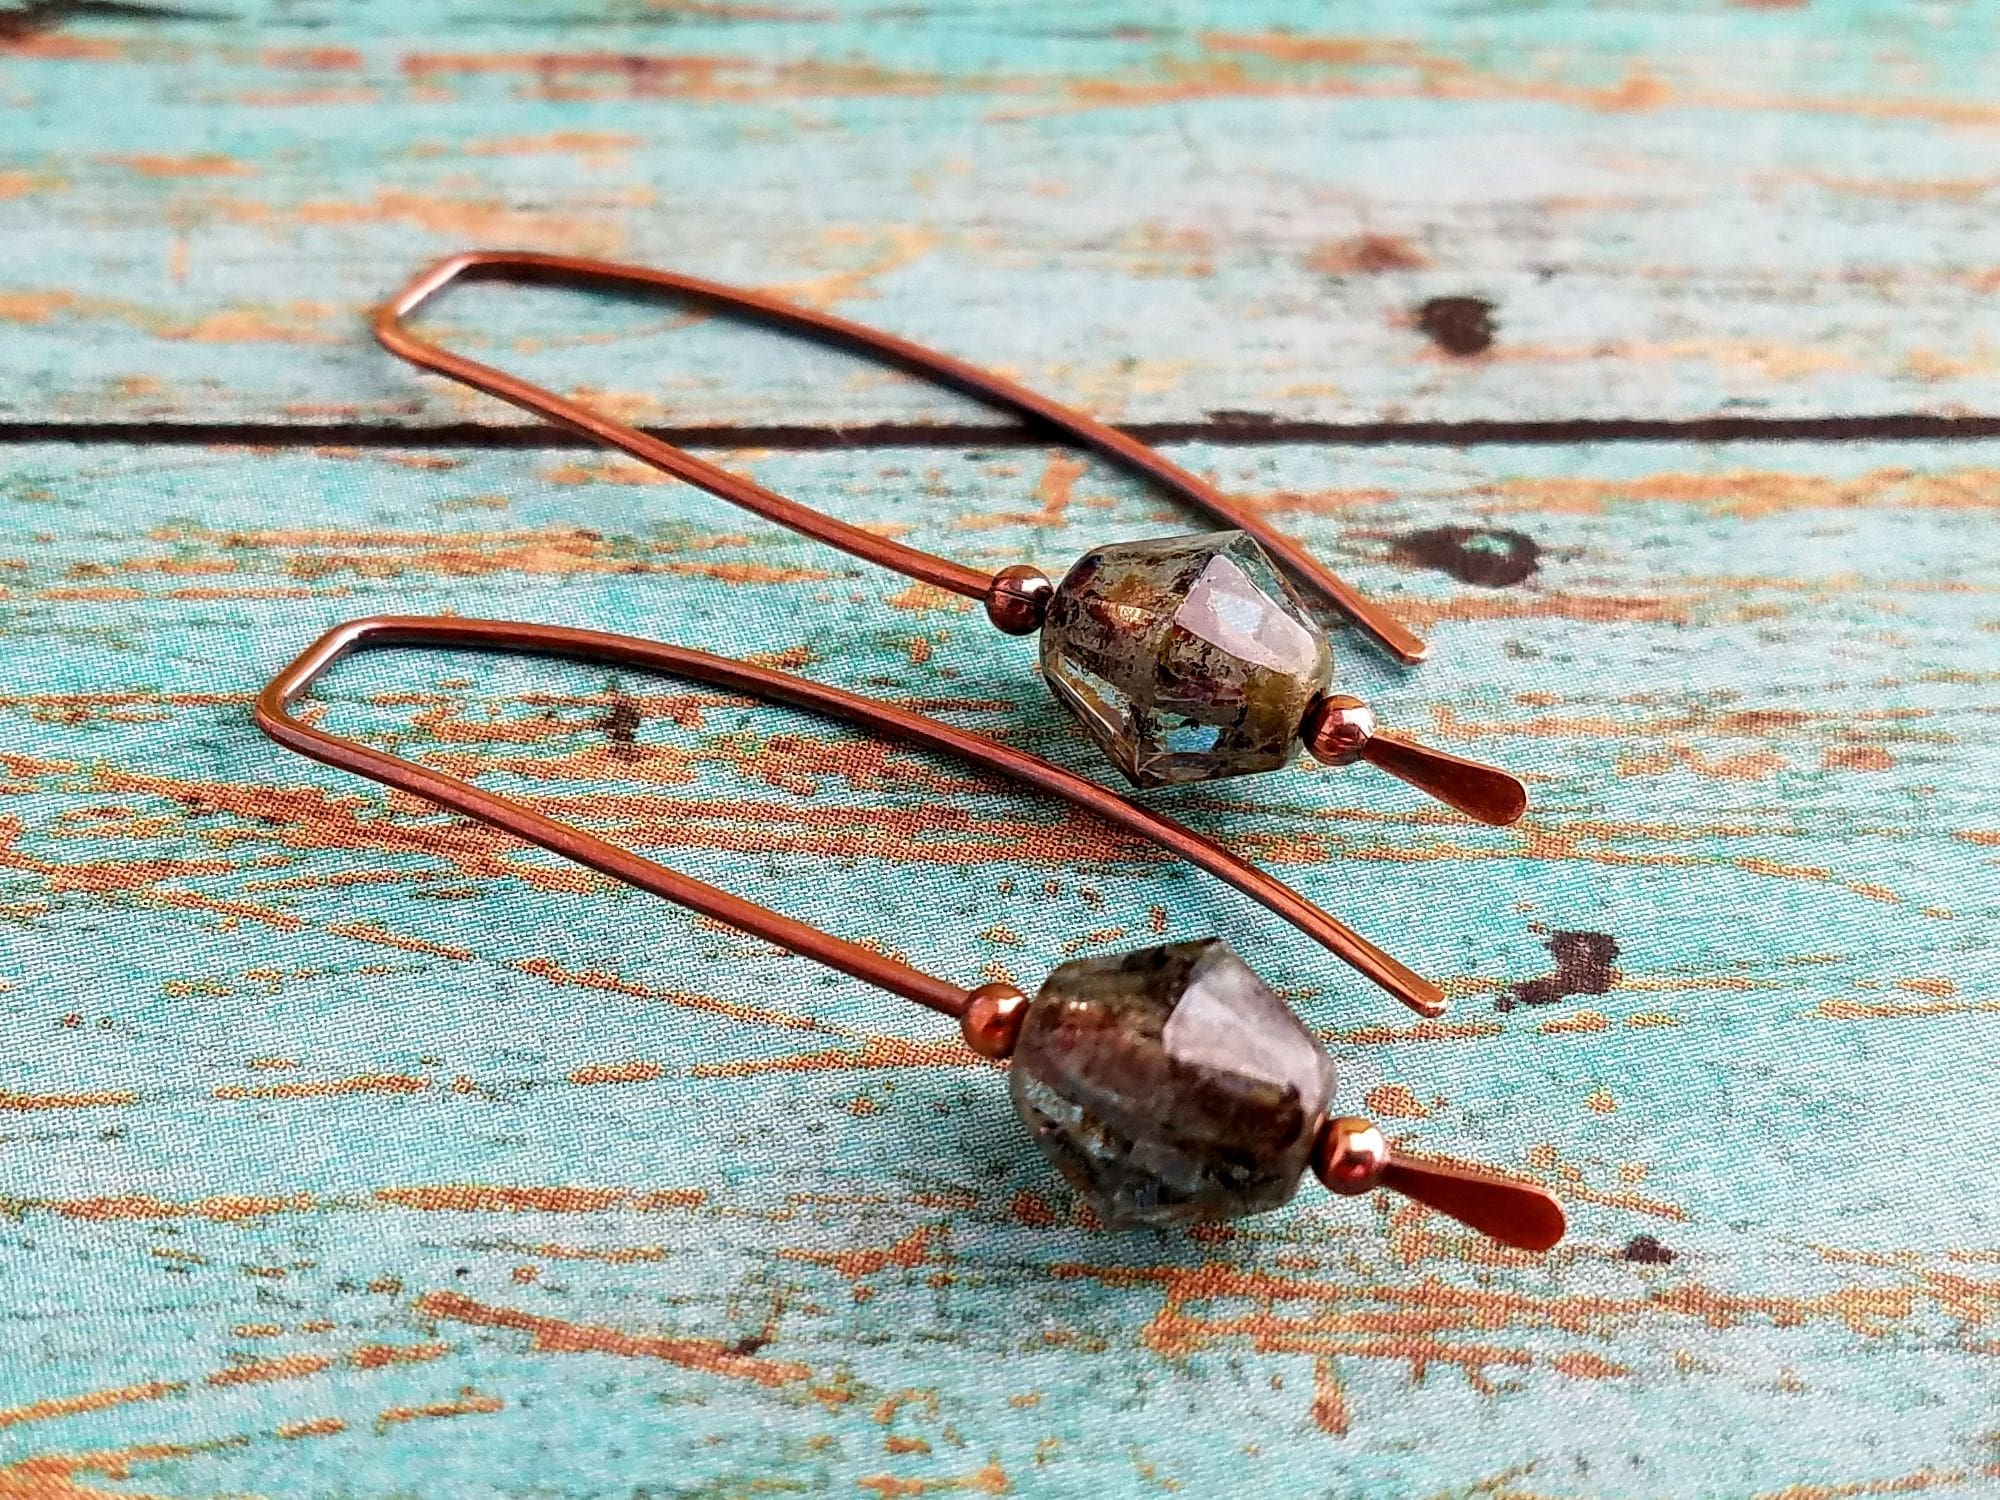
Wire weaving lands somewhere between contemporary wire wrapping and heady wire wrapping in terms of wire usage. My wire inventory consists of every gauge of copper wire between 12ga and 30ga wire. I use 12ga for structural support or when I just want a very strong line. And I use 30ga exclusively for weaving on delicate pieces. Two examples of my delicate pieces are my Delicate Bar Pendant and my Lyonesse Pendant.
I use 28ga exclusively for weaving. And I use
Summary
I know what you’re thinking. This is a really long article to answer what seems like a pretty basic question, right? Well, I belong to a couple of wire wrapping groups on Facebook. It annoys me when I see some poor unsuspecting newbie ask what she thinks is a really basic question. She’s then bombarded with snarky and terse replies. No one will take the time to help her figure out her wire wrapping style first. Instead, they carelessly rattle off a few wire gauges that they use and
That’s not acceptable to me. I’m here to answer all the questions about wirework. And I will always take the time to get you set on the right path because that’s my job. It’s why I created Door 44 Studios in the first place.
So, let’s quickly review everything that we’ve talked about today. First, I roughly categorized wirework into three different styles:
- Contemporary Wire Wrapping
- Heady Wire Wrapping
- Wire Weaving
Then we took a closer look at each of those styles. We also looked at three artists whose work is representative of each style.
- Elena Sinelnik of Lena Sinelnik Art
- Ivona Posavi Pšak of IMNIUM
- Sarah Thompson of Sarah-n-Dippity
Next, I suggested a tutorial from each of those three artists for you to try. Because the only way to figure out which of these styles is your jam is to explore them all.
Who knows? Maybe your personal style will be a hybrid of two (or even all three) of these styles!
- Jellyfish Wire Wrapping Tutorial by Lena Sinelnik Art
- Complex Wire Wrapped Pendant Tutorial by IMNIUM
- The Maria Pendant Tutorial by Sarah Thompson
Try these tutorials out to see which style you like best. From there, finally, we can answer your original question. Which wire gauges should you buy first?
I’ve summarized that for you in the handy quick-reference charts below. These charts list all the wire gauges that are readily available on the market. Here in the US, that is. And they define the purposes for which each wire gauge is most commonly used, based on the wire jewelry styles we’ve discussed.
Keep in mind that you don’t have to buy all the wires listed for each style right away. And notice that there is a lot of overlap between styles. So
Wire Gauge Selection References by Wire Jewelry Style
All of the following charts assume that you’re using round jewelry wire. Shaped wires, such as square and half-round wires, are used primarily in traditional wire wrapping, as well as heady style wraps. I don’t cover the traditional wire wrapping style in this post. That said, shaped wires can add interest to any of the wirework styles that we did discuss today.
If you’re curious about shaped wires, I suggest buying a small amount. And then just play with them. Personally, I don’t care for the look of traditional wire wrapping. And I’ve never felt particularly inclined to experiment with shaped wires. But perhaps I should experiment with some shaped wires. Who knows? Maybe shaped wires will add an entirely new twist to Door 44 Studios’ designs!
Finally, keep in mind that you don’t need to buy all of the wire gauges listed for each function. Just choose one or two gauges for each aspect of the weaving style that you want to explore first. Then build up your wire inventory gradually from there.
Which Wire Gauges Are Used Most Frequently in Contemporary Wire Wrapping?
Notice which gauges work for multiple purposes in these charts. And consider choosing those gauges first to minimize your initial investment.
Which Wire Gauges Are Used Most Frequently in Heady Wire Wrapping?
Of the three wirework styles we’ve discussed today, this is the style that benefits most from a broad range of gauges. Examine some heady wire wrapped pieces. And see if you can figure out how many wire gauges the artist chose to use.
It’s often the contrast in size of the wires used that makes heady wraps so alluring. Heady wraps are quite literally eye candy because all that subtle texture stimulates your optic nerve.

Which Wire Gauges Are Used Most Frequently in Wire Weaving?
The only gauge on the following chart that I don’t use frequently is 10 ga. All other wire gauges listed below are the same wire gauges that I use day in and day out. Again, the gauges that I use most frequently are 16ga., 18ga., 20ga., and 28ga.
As always, I buy my wire in 1-pound spools almost exclusively at
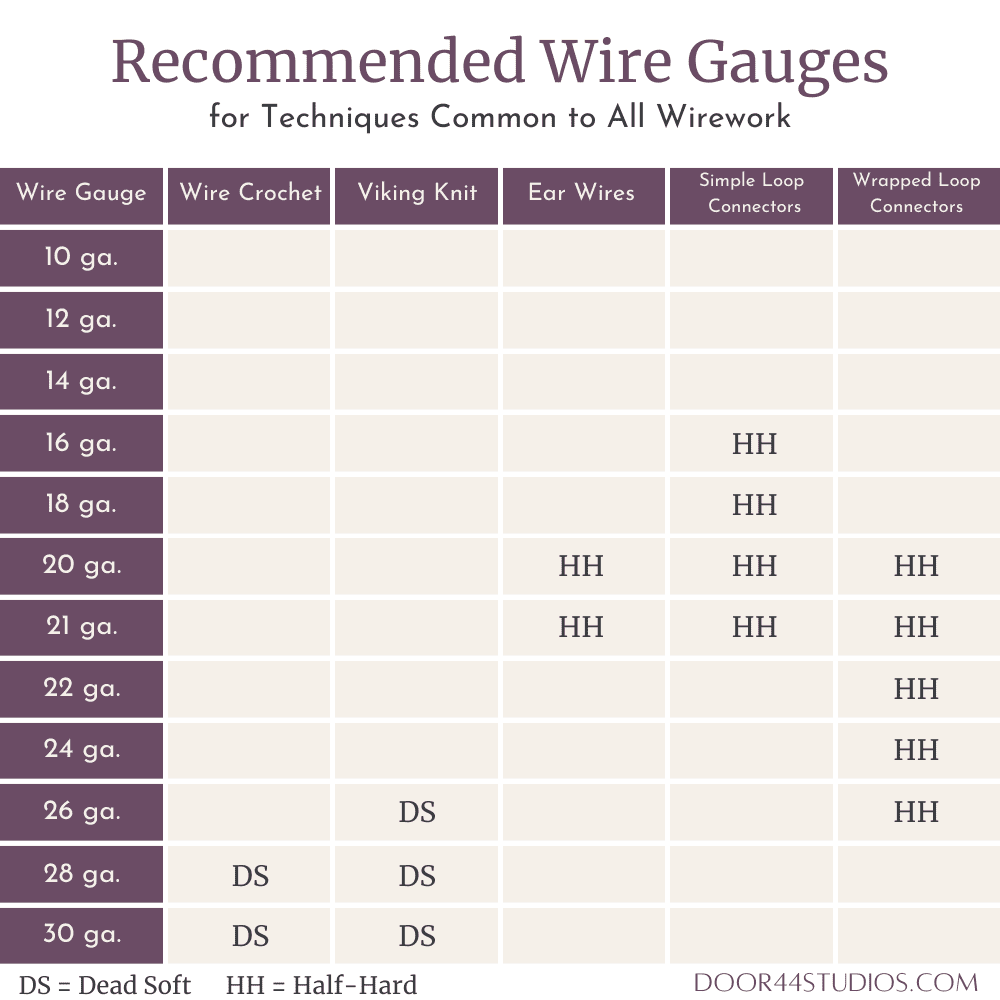
Which Wire Gauges Are Used Most Frequently for Other Common Wirework Techniques?
The following chart includes recommended wire gauges for wirework techniques that are common to all wirework styles. Notice that this chart includes more half-hard wire recommendations than any of the other charts.
Half-hard wire works well for these particular functions, but it’s not strictly necessary. If you have dead soft wire in the appropriate gauge to make your own ear wires, use what you have. You’ll just have to spend a little extra time work hardening those components.
That’s it for today’s discussion about which wire gauges you should buy first. If you’re still not sure about which type of wire you want to use (copper, silver, brass, etc.), be sure to check out this companion post where I explain everything you need to know about the many different types of jewelry wire currently on the market.
Discover More Behind Door 44
Thanks so much for joining me today. I hope you found answers to all of your questions about wire gauges in this article. For more general information about what types of jewelry wire I recommend for Door 44 Studios wire jewelry tutorials, don’t forget to read this companion post.
Want more helpful wire jewelry content like this?
I like to share useful wire weaving tips and tricks on my social media channels, and we have some great conversations about wire jewelry in my private Facebook Group. Also, be sure to connect with me @door44studios on Instagram, and Facebook to keep up with everything that’s happening behind Door 44. And if you haven’t already done so, be sure to subscribe to my YouTube channel where you’ll find new wire jewelry videos weekly.
Until next time, go make something beautiful!

Pin this Post for Later
Thank you so much for sharing your expertise. I am learning wire weaving from Sarah Thompson’s Fine Art Wire Weaving, published in 2015. That’s the only tutorial/book I’ve bought in the 2 1/2 years I’ve been doing wire work. It has been difficult to find information necessary to make really beautiful, professional looking pieces. This article about defining my style will definitely help me to narrow my gaze and focus my work. I appreciate you sharing your tutorials because I really don’t have money to spend on learning. My first sale is a craft show next month. Thank you again!
You’re welcome, Missy. I’m happy to hear that you found this post to be helpful. Defining your style is really half the battle. Once you’re clear on that, the rest will sort of just fall into place naturally. Don’t forget about your local library as a source for books (and maybe even some wirework classes). You’ll be surprised by the resources that you can borrow for free. And good luck with your first craft show!
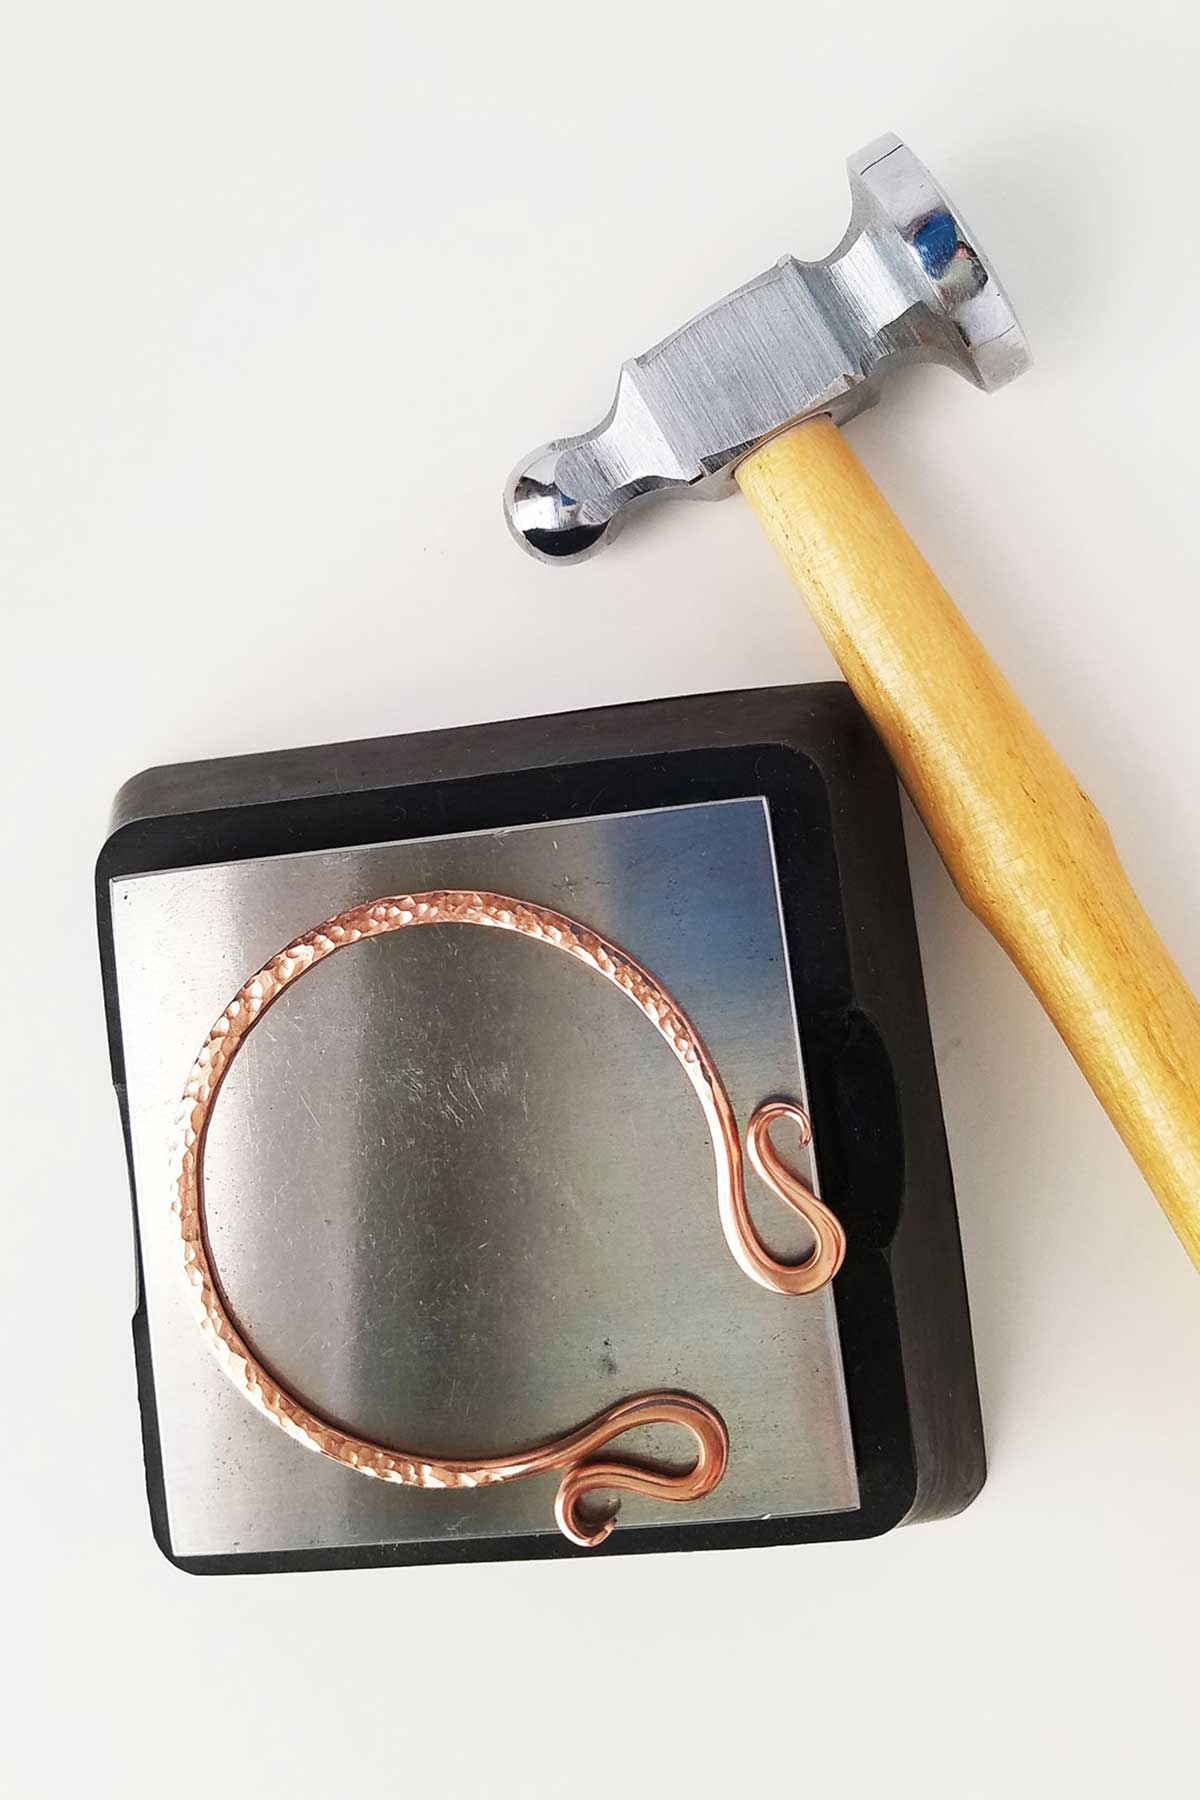
This info has made me want to give it another try. But I have a question; how do you get those hammered/flattened shaped ends in a design? The best example I can give is the jellyfish.
Thanks
Marsha
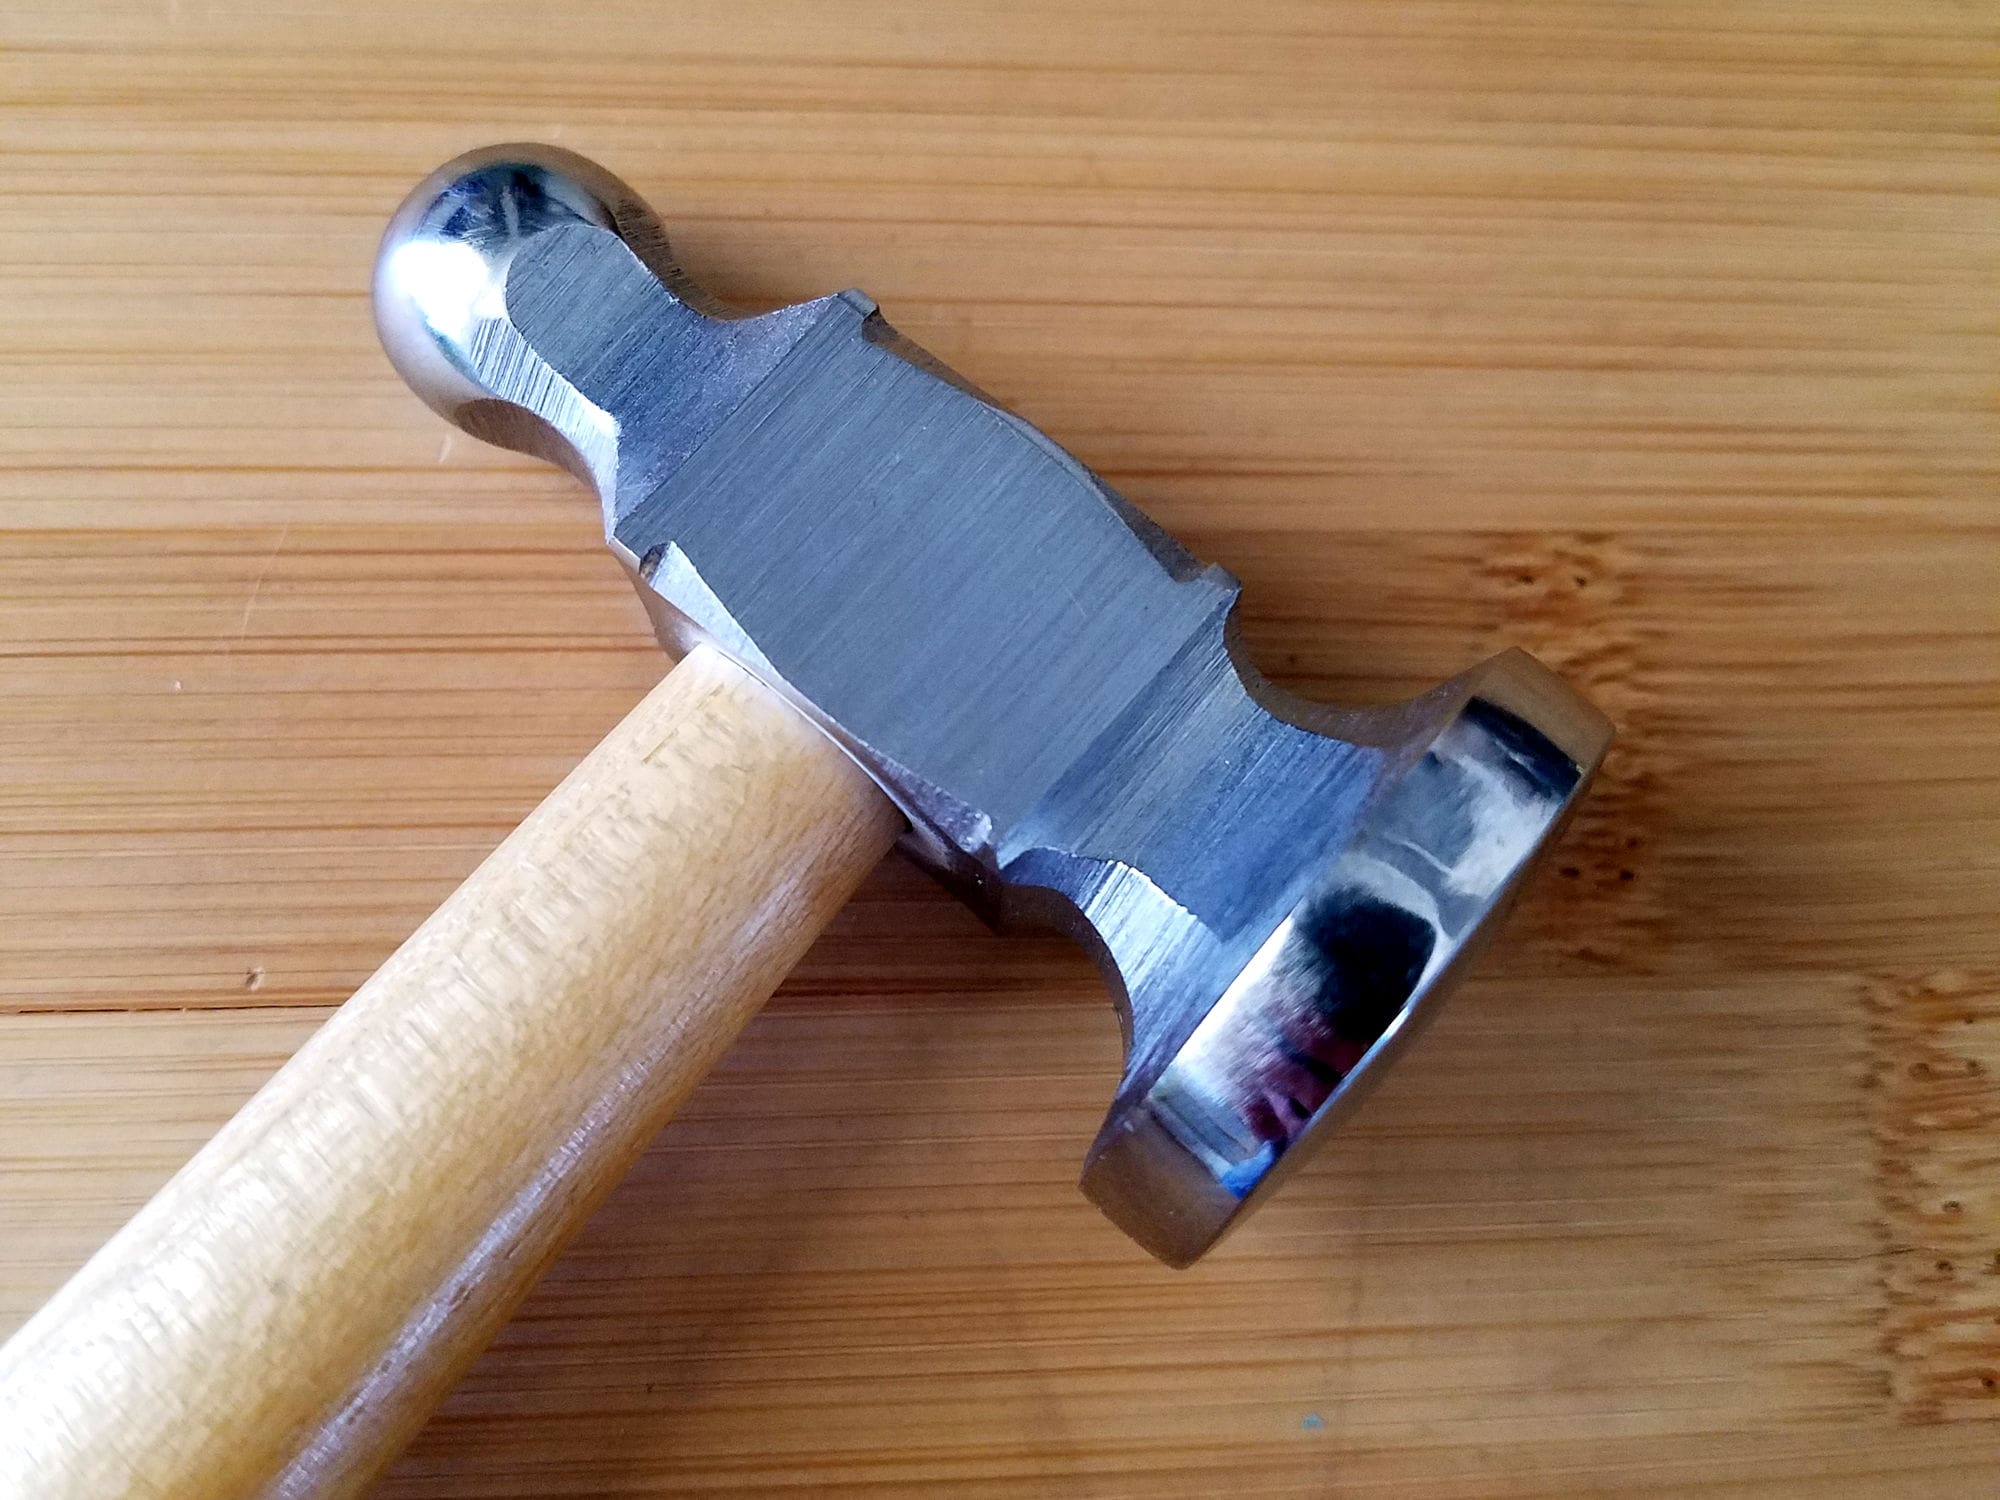
Great question, Marsha! It’s a multi-step process to make those shaped ends. First, you create a ball on the end of the wire using a micro torch. In the case of the Jellyfish, you’ll then need to pickle the copper wire to remove the fire scale that forms naturally when you apply high heat to copper. The pickle solution that I use consists of two simple ingredients: white vinegar and salt heated in a small slow cooker (the heat helps speed up the cleaning process). Finally, you flatten the balled ends of the wire by hammering them lightly with a chasing hammer and a steel bench block. Watch my Wirework Basics category for future posts where I’ll go over techniques like hammering and using a torch to ball wire ends. Both of those topics are already on my editorial calendar for future posts. I’m so glad this post inspired you to give wirework another try!
Thank you, I’ll keep an eye out for wirework basics. If I understand it correctly, you go thru the steps outlined above, & then curve it into place on the piece?
That depends on the piece. You’ll ball the ends of your wire first. But sometimes hammering happens as part of the shaping process. It all depends on the design. In the case of the Jellyfish, I suspect that the balled ends of the wires are flattened after they’ve already been put into place on the piece. When I use hammering in my own tutorials, however, I typically do it after shaping the core wires, but before weaving the wires together.
I want to start by saying that I’m more grateful for your support of new Wire-Artists than I could ever explain using my autism enhanced creativity. Also, prepare for a long read…
When I stumbled across Door 44 studios, -(literally an hour or so ago, from the time of writing this…)- not only was I intrigued by your manner of writing, but I instantly came to the conclusion that this site is where my constant flailing around for any possible guide or information on this one of a kind art would end. I had finally found the complete – or so I thought – collection of my desperately desired guide to further honing my skills.
I started my journey of Wire-art when I was 13 years old, after getting bored of origami, as I had just completed my journey to fold the infamous Ryujin 3.5 model. I was camping with my extended family, when my mother pulled a paperclip out of her pocket. I watched as she bent one of the ends, and then proceeded to pick a lock she lost the key for. My mind raced, as I thought of all the artistic potential that was hidden inside of such a simple, everyday object. An idea popped into my head, as my mom put away the paperclip. I asked my mother for a paperclip, and she gave me the desired little piece of metal. You can only imagine her face when I asked her for 10 more paperclips. Now, if you’ve ever held a paperclip you probably know that they are normally wrapped in some kind of plastic or rubber, which prevents them from sliding off of… well… paper. So being the mischievous little boy I was, I found my father’s pliers, and started to strip the paperclip of it’s outer layer. Being 13, I didn’t know what a wire stripper was, and oftentimes I would accidentally cut of not just the rubber, but oftentimes the metal underneath as well.
During that same camping trip, after around 2 days of tireless work, I had completed my first wire art piece. It was a tiny little bird.(no it didn’t have wings because it was basically just a little lump of metal with a few wires sticking out where you’d expect a bird to have legs, a tail, and a beak) When my grandmother heard my mom complimenting my… uh… “craftsmanship,” she instantly offered me $10 for the tiny piece of scrap.
One thing led to another, and my parents started to notice a suspicious increase in my alone time, as well as an equally suspicious decrease of the paperclips in our house…
All of that, took place around 8 or 9 years ago, and until a few hours ago, I had done literally no research on wire art, besides the kind of research you do by just looking at things. Despite this, I ended up winning a second place overall award in an art contest at my highschool by making a model dragon out of exclusively wires…(if you want to see a photo of the dragon then I can email you a picture). I was looking around on some shopping websites for better equipment, when I started to get frustrated from the little knowledge about wire softness, and sizes that I didn’t have. That’s when I found your website, and I learned that there is a LOT more to wire art than I had previously thought. When I read the first article of yours I came across, my jaw dropped when I found out that work hardening was something that happened.
I know what you’re thinking right now… “What does this have to do with me?”
Well, in order to ask my question, you need to understand that I’m nearly 100% self taught when it comes to this form of art, to the point that I’m quite skilled at brute forcing a sculpture together, but yet I literally don’t even know something that sounds like common sense to other “normal” wire artists. My question is as follows… I want my wire art to look neat and tidy, but I don’t know where to start… so from a strange foreigner to the common craft, to an experienced master like yourself, how do I go about relearning this underappreciated form of art?
Hey there, Angry Pickle. Welcome to Door 44 Studios! I’m so happy you found your way to my website and that it’s been helpful. I may be able to give you some guidance on making your wire sculptures look neat and tidy, but first I need to get a clear sense of your personal style. So, please do send me a photo of your award-winning dragon. I’d love to see it and I’ll happily share my thoughts about what you can do to refine your artwork. Also, along with your photo, please let me know what type of wire you’re using as that will help me help you identify the correct tools and techniques for that particular type of wire.
Based on what you’ve shared so far, I’m guessing that you’re working with some challenging wires. Paperclips are made with spring hard steel wire, which is very challenging to manipulate without annealing it first. And even dead soft steel wire is a challenge for most wire artisans to work with. So, making your work neater and tidier may be as simple as switching to a softer, more malleable type of wire. But let’s not get ahead of ourselves. Go ahead and email me a photo of your work along with some details about the tools and materials you use to create your sculptures, and we’ll go from there. You’ll find my email address in the footer of my website. I’m very much looking forward to seeing your work!