

Lover’s Knot Bracelet Wire Weaving Tutorial
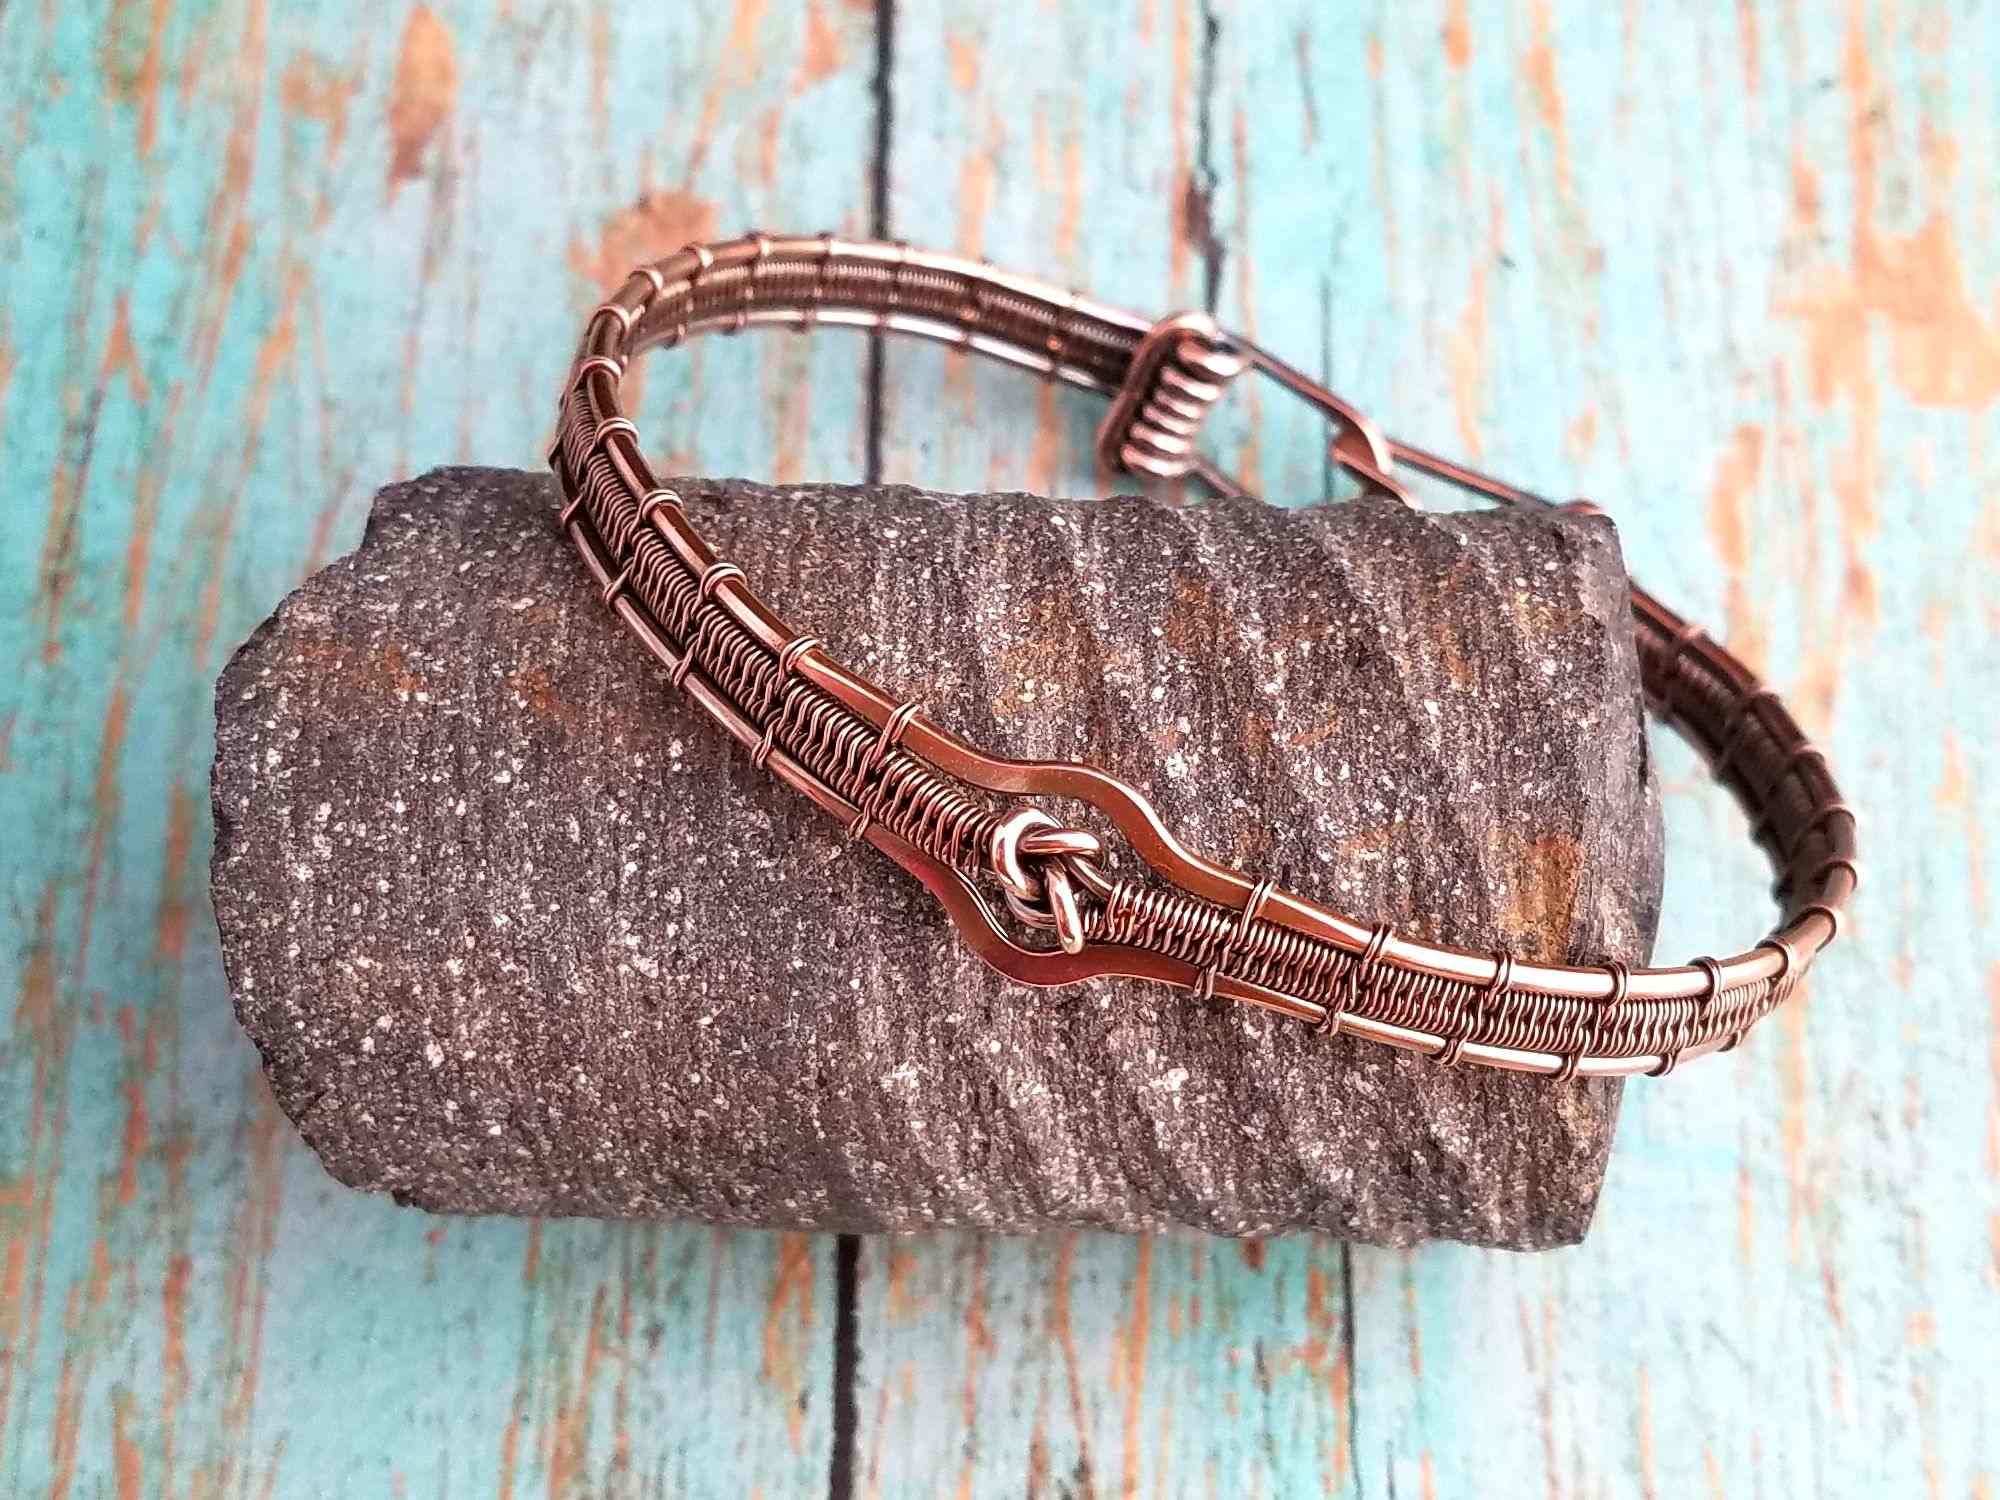
Did you happen to catch my recent tutorial for the Lover’s Knot Stacked Bangle? The Lover’s Knot Bracelet is a slightly more refined version of that design. This bracelet has a one-piece band with a lot less movement. And although the construction of the two bracelets is quite similar, there are some distinct differences that I feel are best communicated in a separate tutorial. So, today we’re going to make this pretty little Lover’s Knot Bracelet together.
Copyright & Disclosure
You’re welcome to make and sell products from this tutorial on the condition that you credit Wendi of Door 44 Studios for the design and link back to this page.
When it comes to my written tutorials, on the other hand, I reserve exclusive rights to all images and written content. You may not reproduce or redistribute any portion of this tutorial in any way, shape, or form. Furthermore, you may not teach the designs contained within this tutorial without my written permission.
This copyright applies to the printable PDF version of this tutorial as well, and it’s included therein. You may share the free version of this tutorial only by linking directly to this page.
This post may contain affiliate links. If you click on a link and then make a purchase, I may earn a small commission (at no cost to you). As an Amazon Associate I earn from qualifying purchases. To learn more, please see my full disclaimer.
Alright. Let’s get started!
About The Lover’s Knot Bracelet Tutorial
I have a weird sort of borderline obsessive fascination with connections. As early as I can remember, I’ve had a knack for connecting dots that not everyone else can see. This fascination with connections leads me to creative expressions in which connections are key features. For instance, my favorite sport is Dressage where success depends almost completely on the connection between horse and rider. And virtually all of the crafts I’ve pursued through the years involve connections as well: stained glass, needlework, macrame, chain maille, crochet, and of course, wire weaving. Whenever I need a break from wire weaving, or when I get the itch to make a multimedia piece, I find that making cord jewelry is
This pretty Lover’s Knot Bracelet is the happy result of one of those experiments. You’ll be surprised at how easy it is to make this bracelet, and it’s just as easy to wear. It’s a fairly delicate piece, but it has just enough texture and interest to make it really pop on your wrist. It layers beautifully as well. I like to stack my Lover’s Knot Bracelet with a couple of knotted cord bracelets for a super comfortable and casual every day look.
Getting Started on Your Lover’s Knot Bracelet
For best results, use solid copper or silver wire for this tutorial. We’re going to tie the 18ga core wires in knots. So, be sure to use dead soft copper or fine silver wire for the knotted band of the bracelet. If all you have on hand is half-hard copper wire and you have a micro torch, you can anneal your half-hard wire to soften it.
The half-hard 16ga wire used for the outer core wires and the clasp gives the bracelet the strength necessary to maintain its shape. If you’re making this bracelet in silver, be sure to use half-hard sterling silver wire for the outer core wires and clasp. Also, if you’d like to learn more about which jewelry wires work best for my tutorials, you’ll find a very detailed discussion about jewelry wire here.

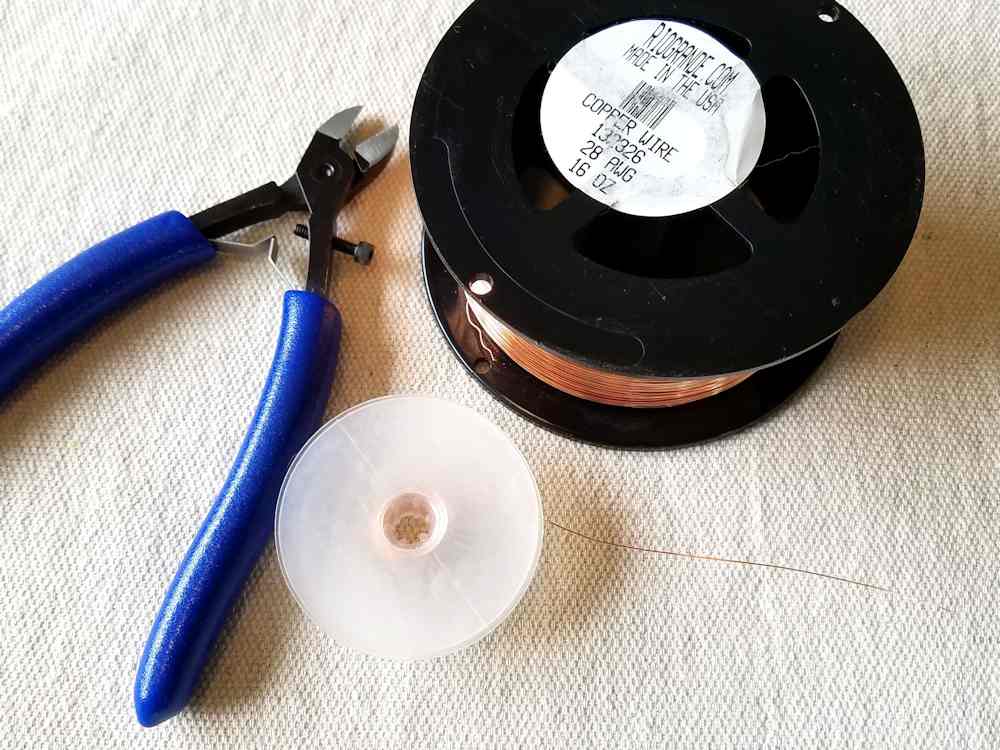
Tools & Materials
- 16ga, 18ga, and 28g dead soft wire
- Stepped Bail-Making Pliers
- Wire Cutters
- Nylon Jaw Pliers
- Flat Nose Pliers
- Chain Nose Pliers (you’ll need two of these, or use your Flat Nose Pliers and one set of Chain Nose Pliers)
- Chasing Hammer
- Bench Block
- Fine Point Permanent Marker
- Ruler
- Bracelet Mandrel
- Rawhide or Nylon Mallet (Optional, not pictured)
- Kumihimo Bobbin (Optional, not pictured)
Material Specifications by Size
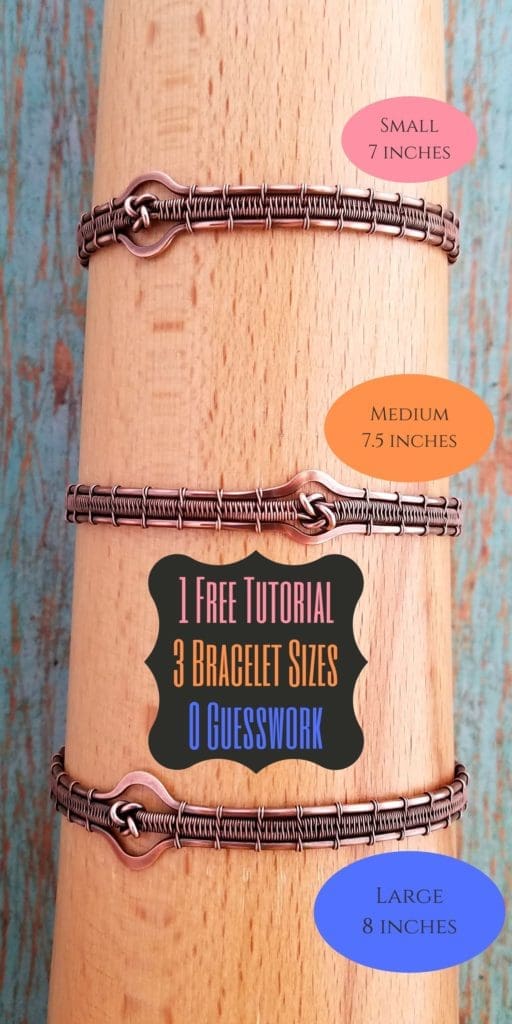
Small
- 18ga dead soft wire – 18 inches
- 16ga half-hard wire – 16 3/4 inches
- 28ga dead soft wire – 12 feet
Medium
- 18ga dead soft wire – 20 inches
- 16ga half-hard wire – 17 1/4 inches
- 28ga dead soft wire – 14 feet
Large
- 18ga dead soft wire – 22 inches
- 16ga half-hard wire – 17 3/4 inches
- 28ga dead soft wire – 16 feet
Determining Size for the Lover’s Knot Bracelet
I’ve written these instructions for three common bracelet sizes: Small (7 inches), Medium (7.5 inches), and Large (8 inches). These measurements are based on the inner circumference of the bracelet. All critical measurements for each size will be indicated throughout this tutorial as follows: S(M-L). The measurements for the clasp are the same for all three sizes.
Bracelet size is a very personal choice for people. Some like a close fit (that would be me). Others like a looser fit. If you need a larger size or a half size in between the three sizes specified, I’ve provided a very useful size chart at the end of this tutorial. Scroll down now to review that chart if you need a different size than the three standard sizes in the tutorial instructions. Based on the information given, you can quickly determine how long you need to make your bangle wires in order to achieve a perfect fit.
The printable PDF version of this tutorial includes an expanded version of the size chart provided here. If your wrist measurement is larger than eight inches or if you plan to make several Lover’s Knot Bracelets, consider spending a few dollars on the printable PDF version of this tutorial as that table will ultimately save you time and frustration.
Skill Level: Intermediate
This is a more challenging project that involves wire weaving. It can be achieved by someone who has some basic wirework skills.
This tutorial uses the Modified Soumak weave, and it requires using a chasing hammer. If you’re unfamiliar with either of these techniques, I’ve linked to additional skill-based tutorials that will help you work through this bracelet project. Just click the links above to review those tutorials.
Making the Lover’s Knot Bracelet
This tutorial is written for three sizes with the measurements for each size shown throughout this tutorial as S(M-L).
The measurements for the clasp apply to all three sizes. Also note, the Medium bracelet is what is shown in all work-in-progress images.
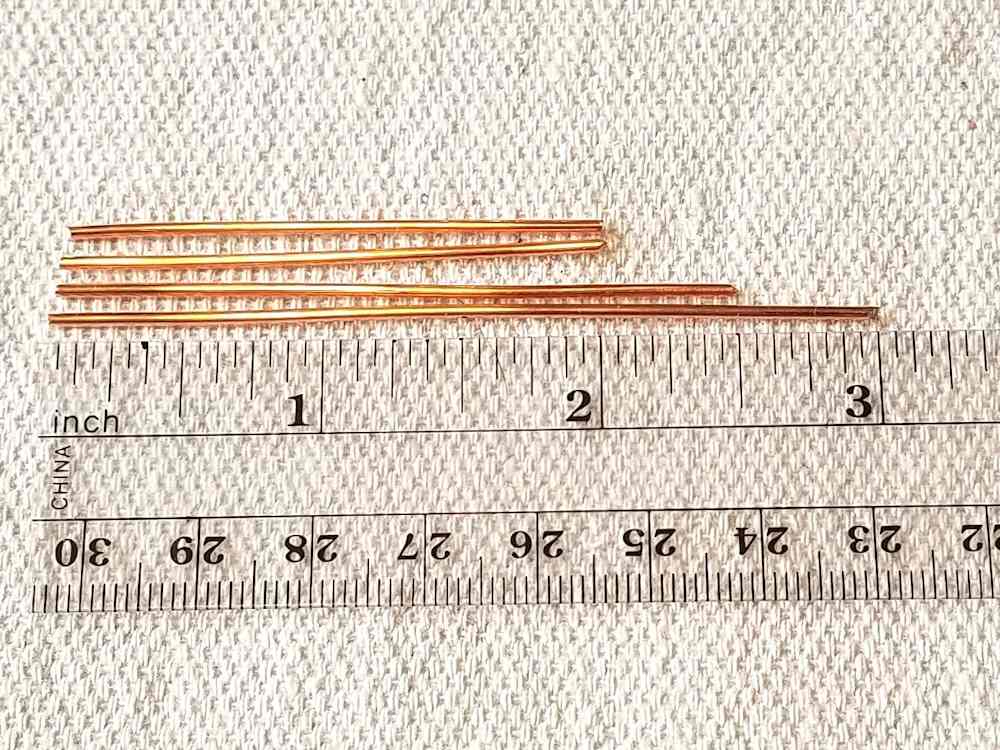
- Measure and Cut the 18ga Core Wires
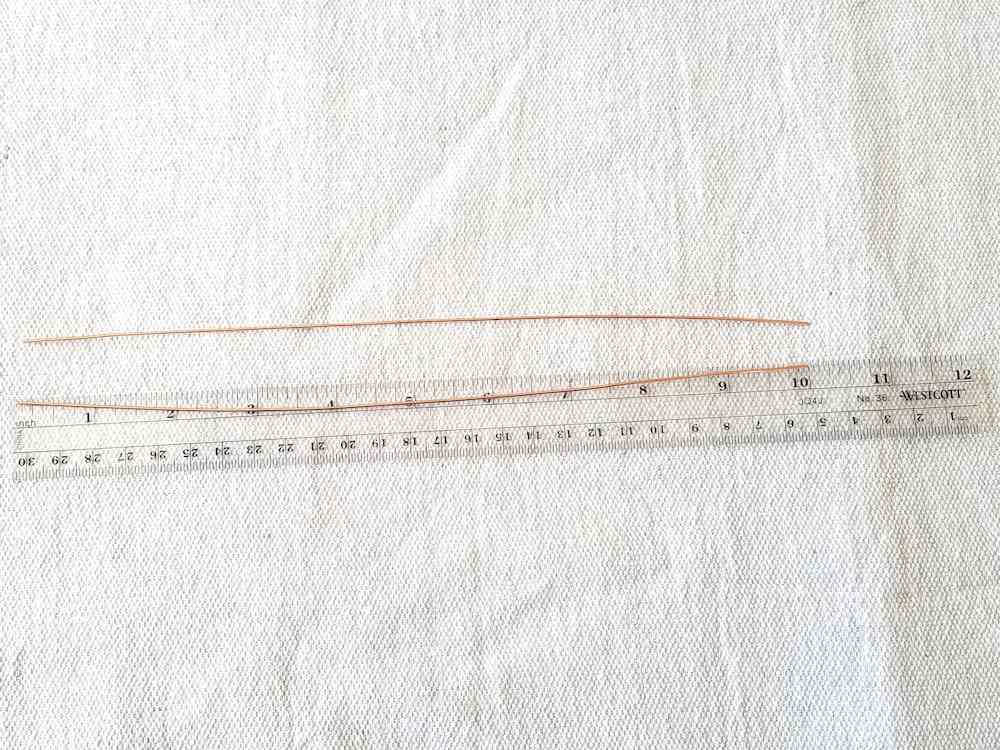
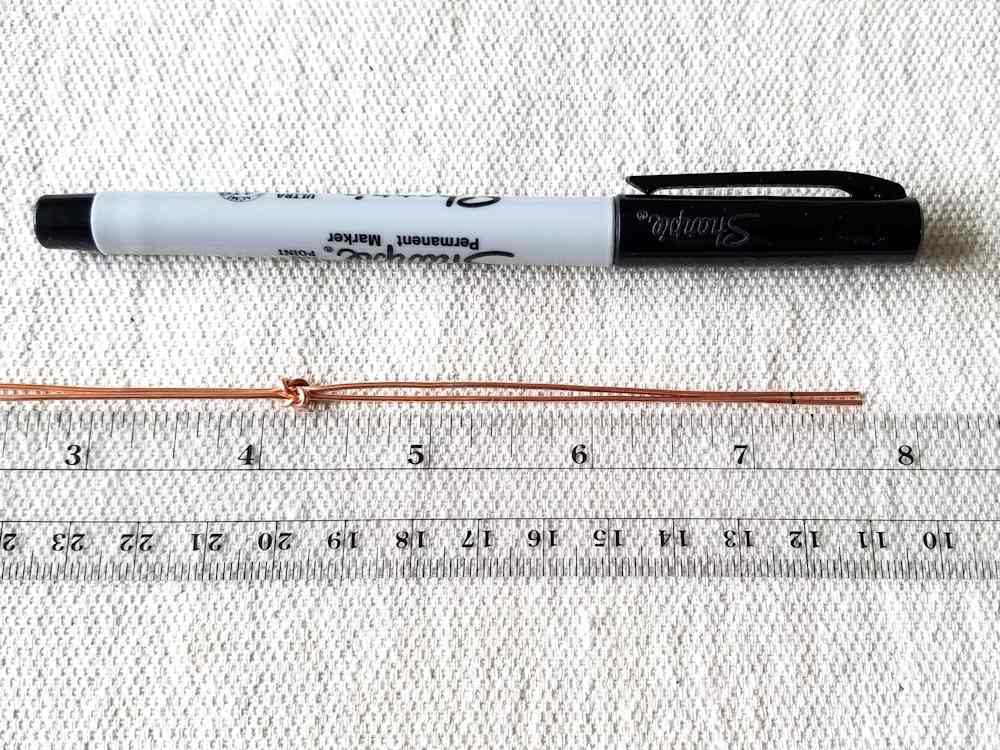
Measure and cut two 9-inch (10-inch – 11-inch) pieces of dead soft 18ga wire.
TIP: Learning to knot these core wires correctly takes some practice, so I recommend using some scrap wire to practice the next five steps before proceeding with the two core wires that you just cut. You can use any sort of dead soft wire for practice. Or even two pieces ofstring will work. The main thing is that you need to make sure you thread the two knots together correctly in order to get them to line up next to one another neatly.
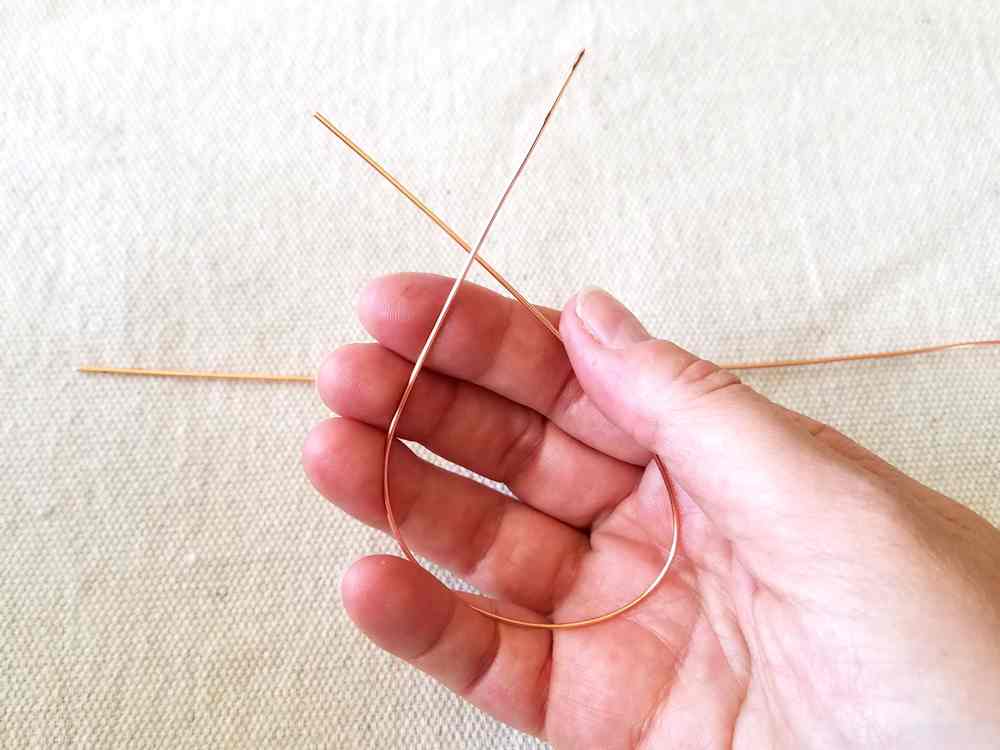
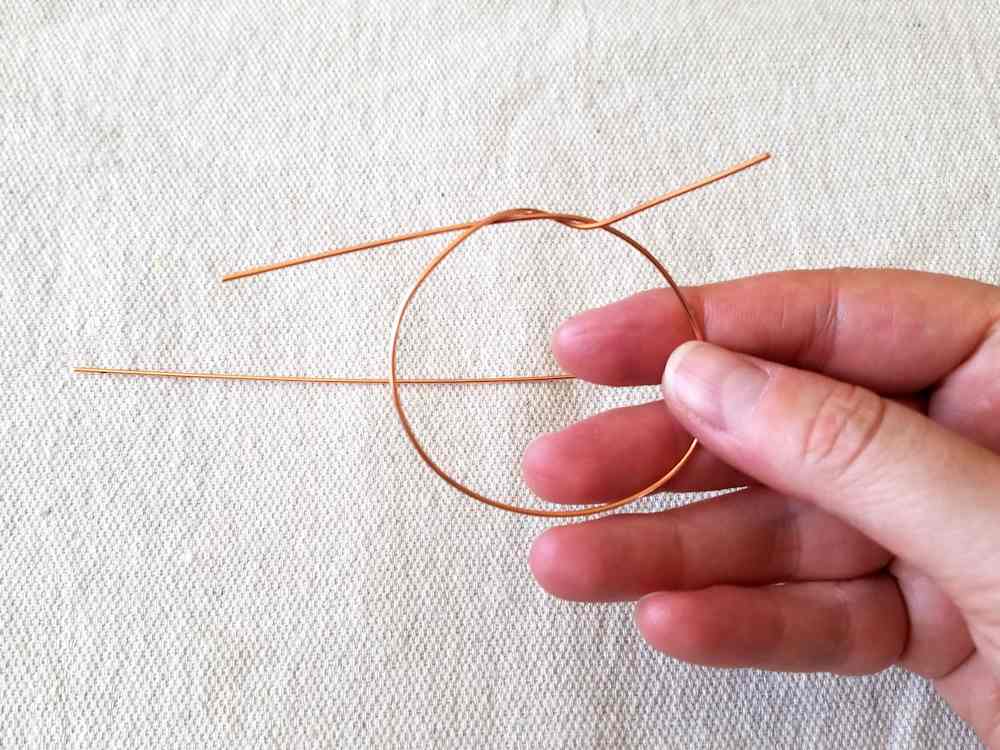
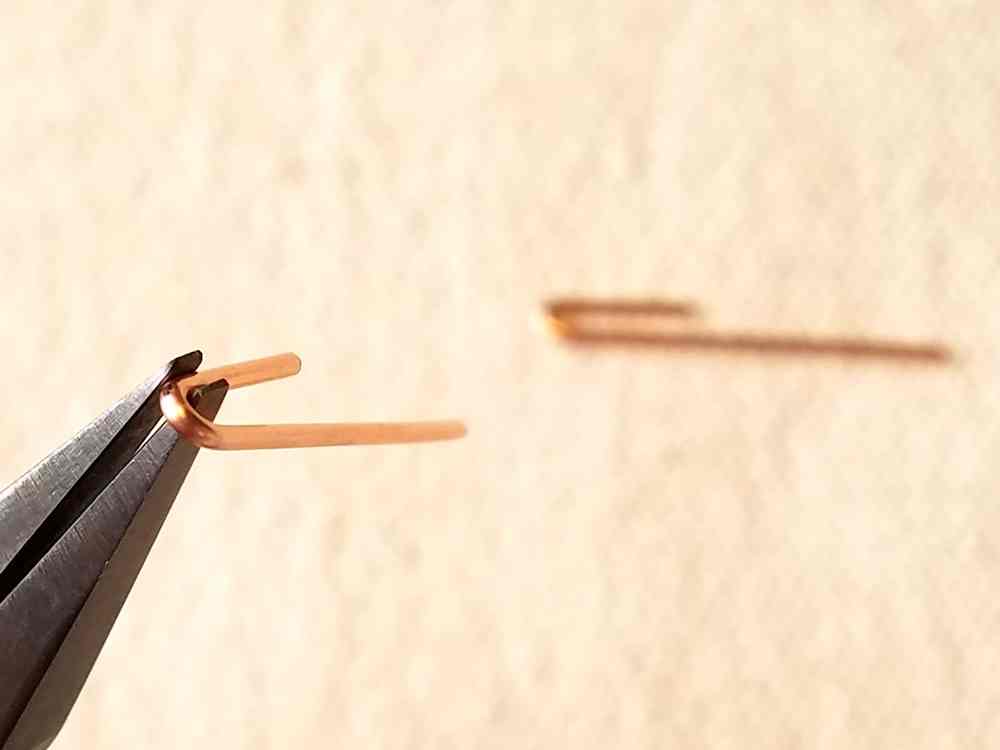
- Begin the First Knot
We’re now going to tie a simple overhand knot with one piece of 18ga wire.
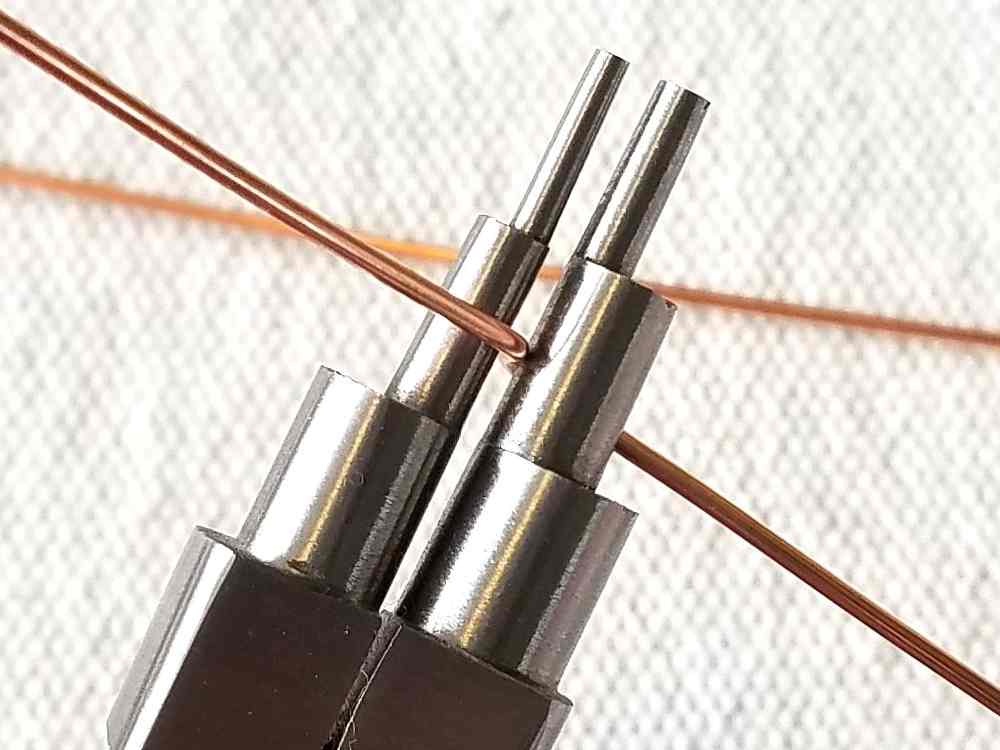
Begin by forming a large loop with one core wire. Cross the left end of the wire over the right end, as shown. - Tie the First Knot
Wrap the end of the wire on the right side around and through the wire loop, as shown. Then gently begin tightening your knot.
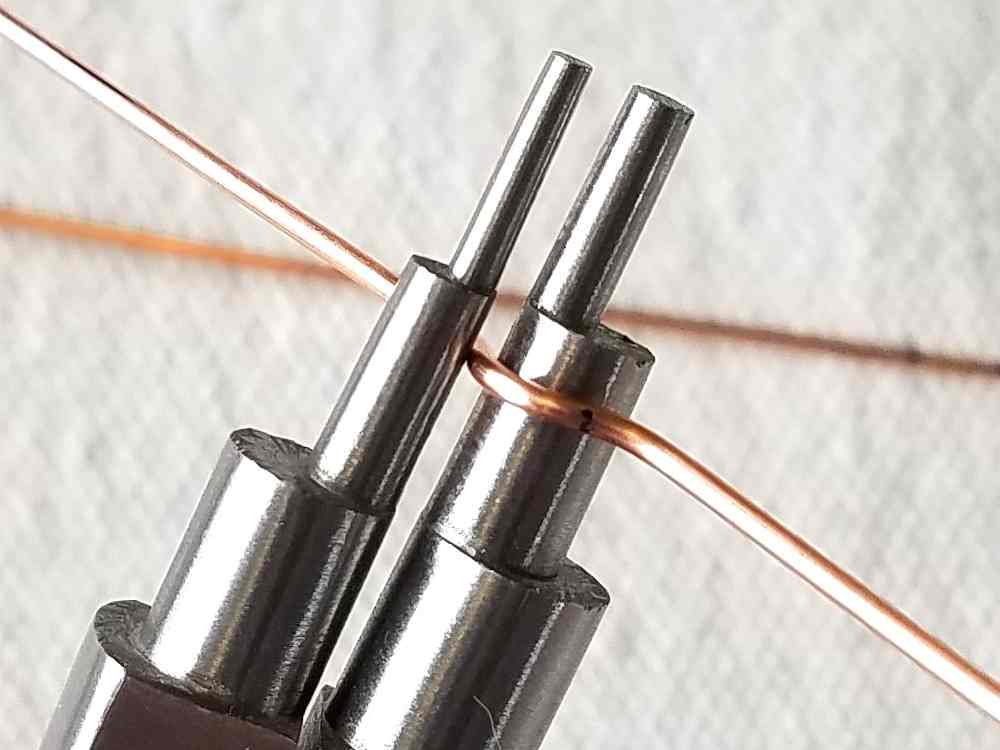
Try to keep the knot near the center of your wire as you gently work it tighter. I like to offset my knots on this bracelet, but this works best if you aim to keep the knot centered to start with. - Tighten the First Knot
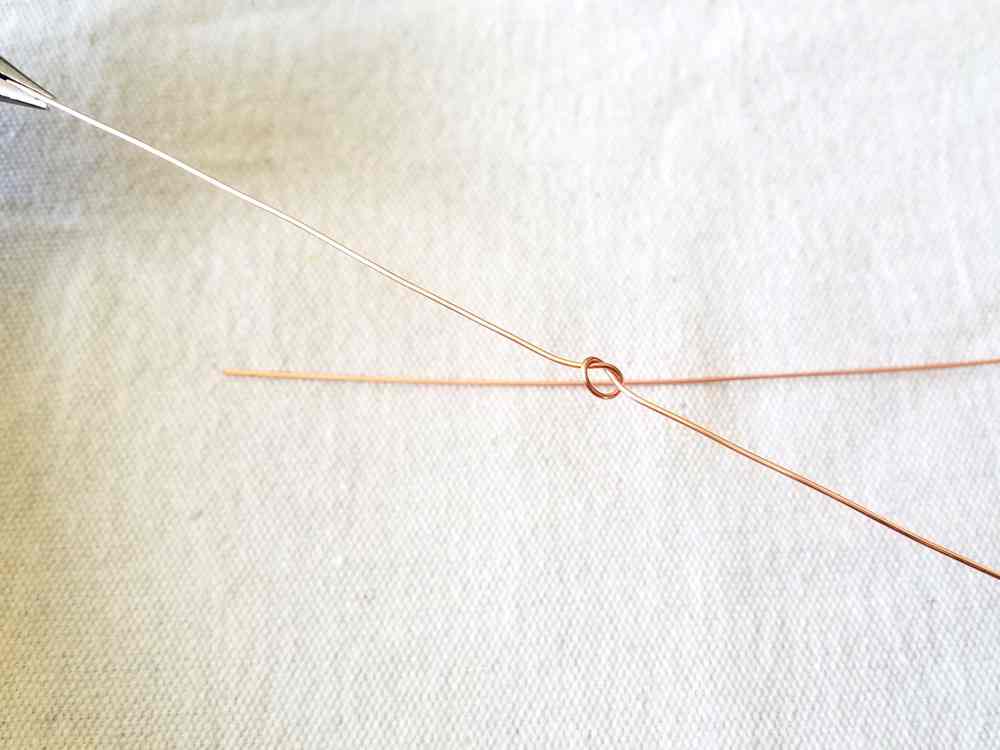
Once you’re satisfied with the general position of your knot, pull the knot snug (but not tight) using two pairs of pliers. Be sure to leave enough slack in the knot to thread your second core wire through the center, as shown.
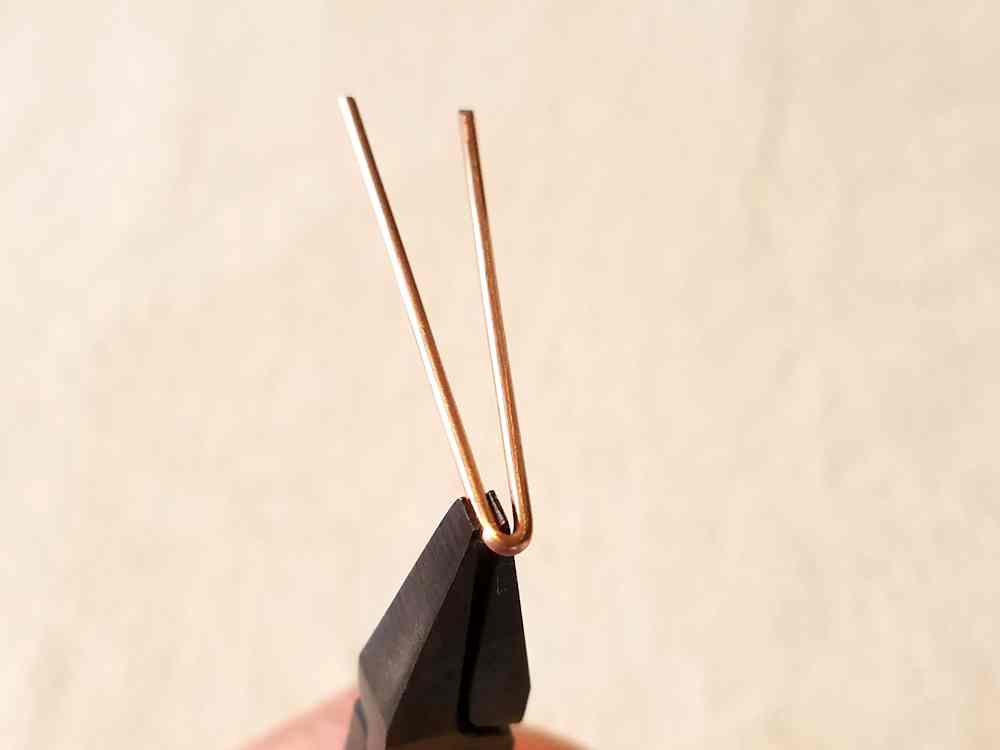
- Begin the Second Knot
Thread your remaining 18ga core wire through the knot you just finished from back to front, as shown.
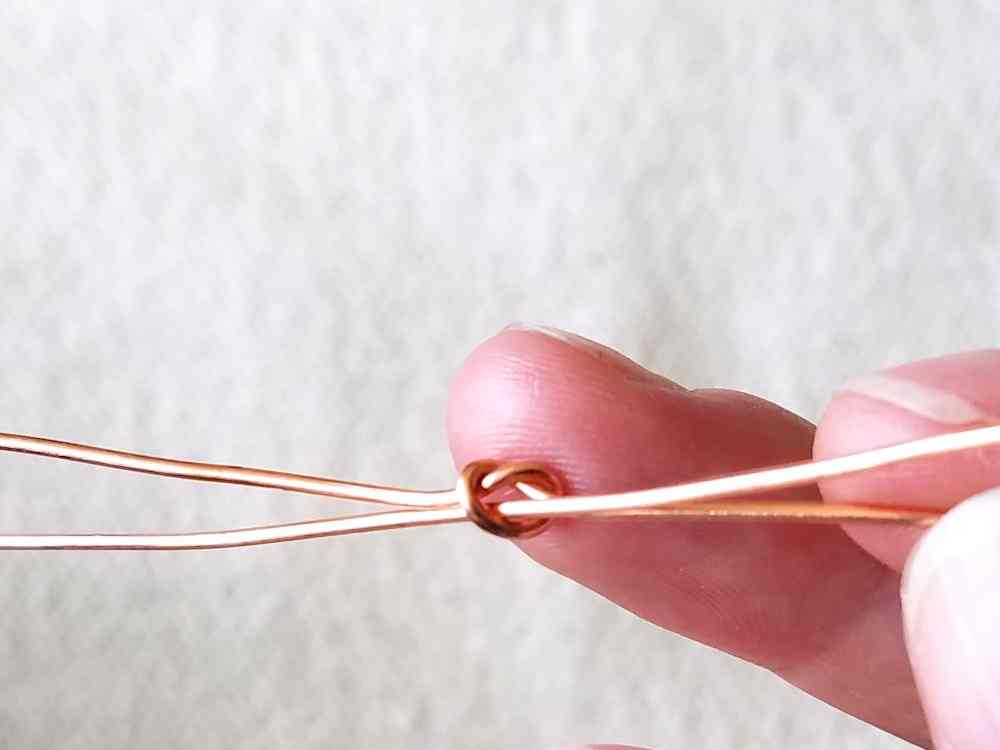
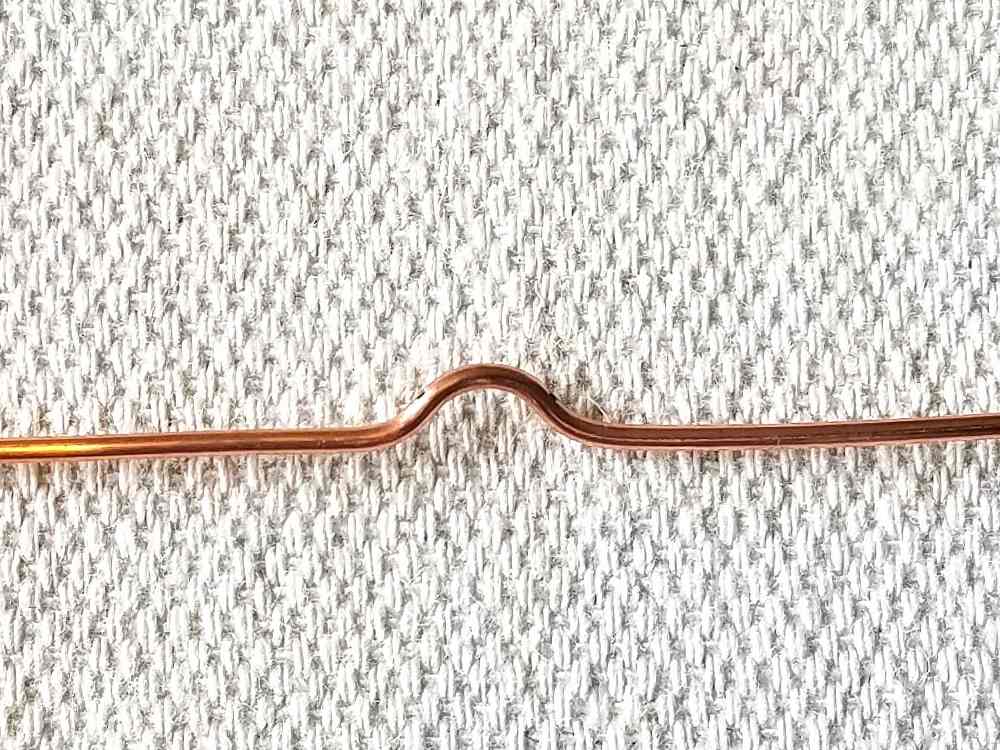
Repeat Steps 2 through 4 on the second core wire until you’re satisfied with the general position of the second knot. - Finish Tightening Both Knots
Use two pairs of pliers to pull each knot tight. If you’ve tied your knots correctly, they should snug up close together, and your two core wires should be roughly parallel.
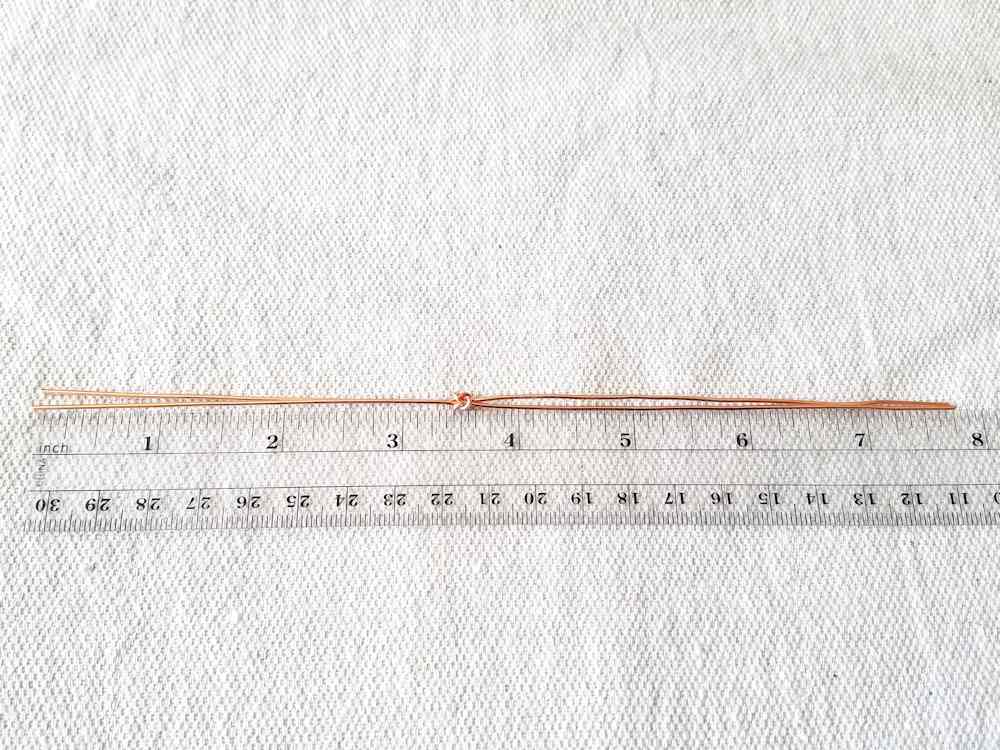
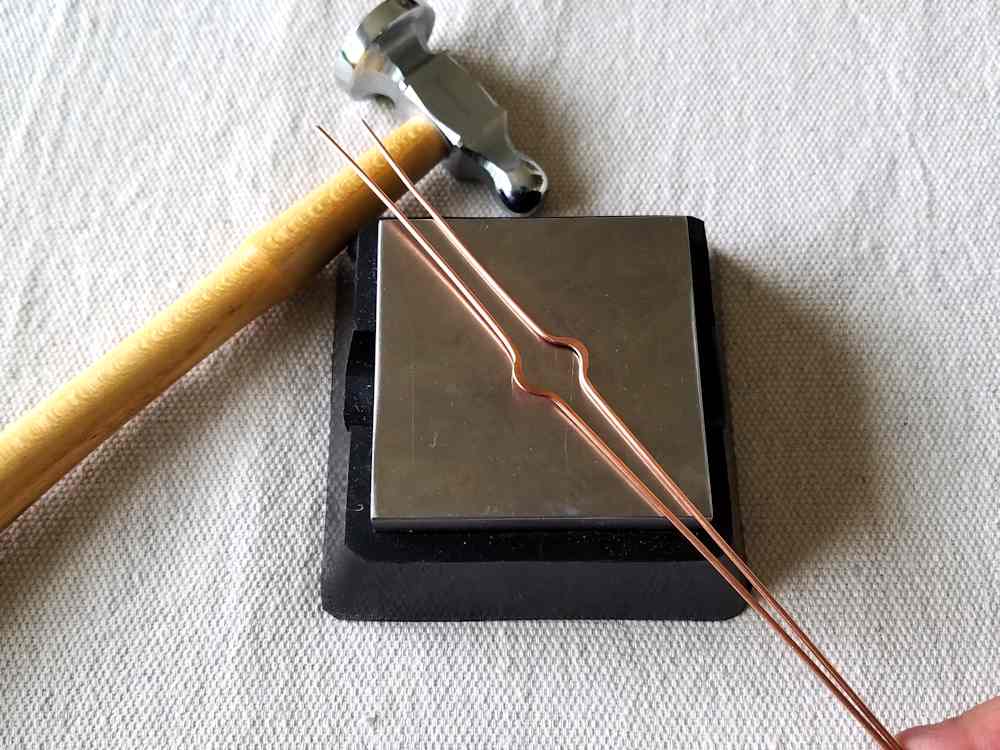
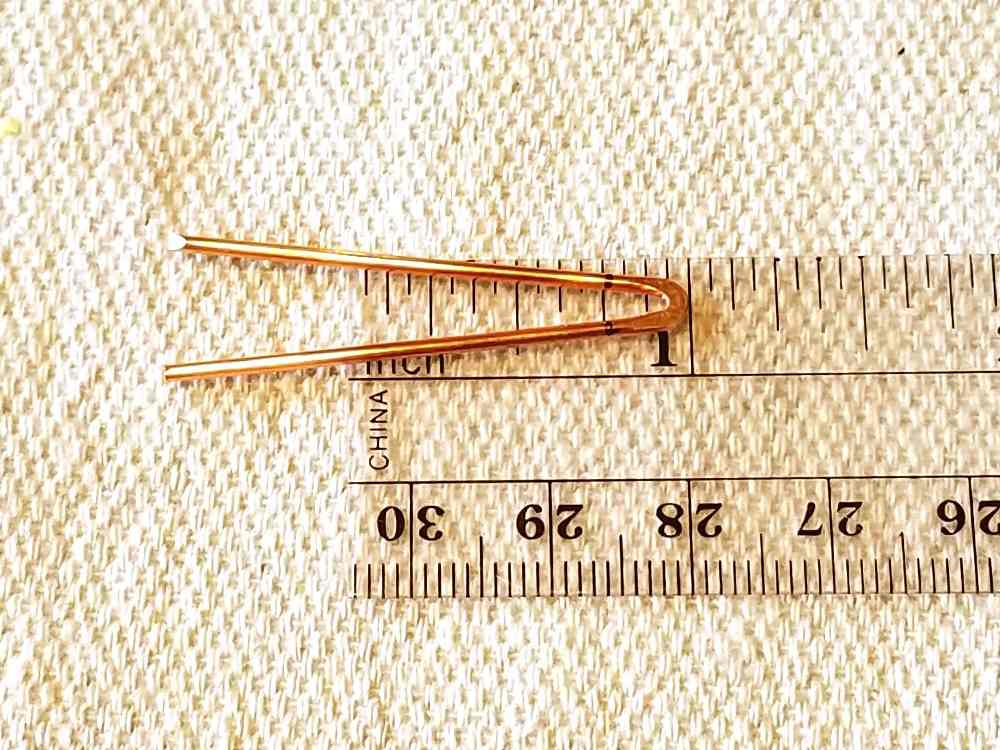
- Trim the Core Wires to Size
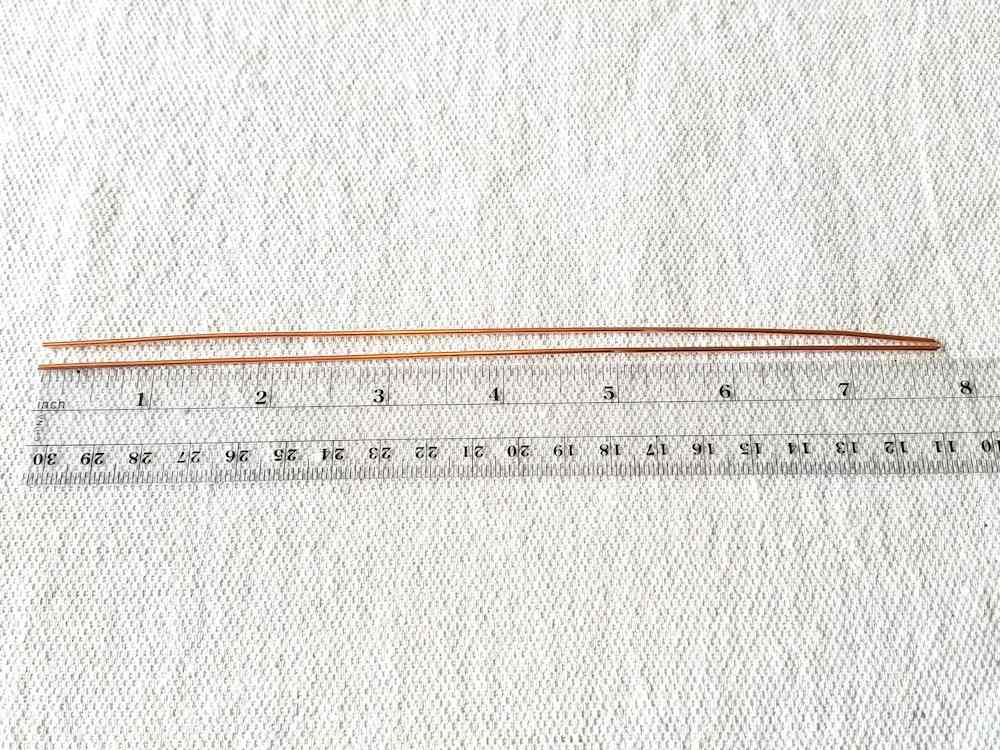
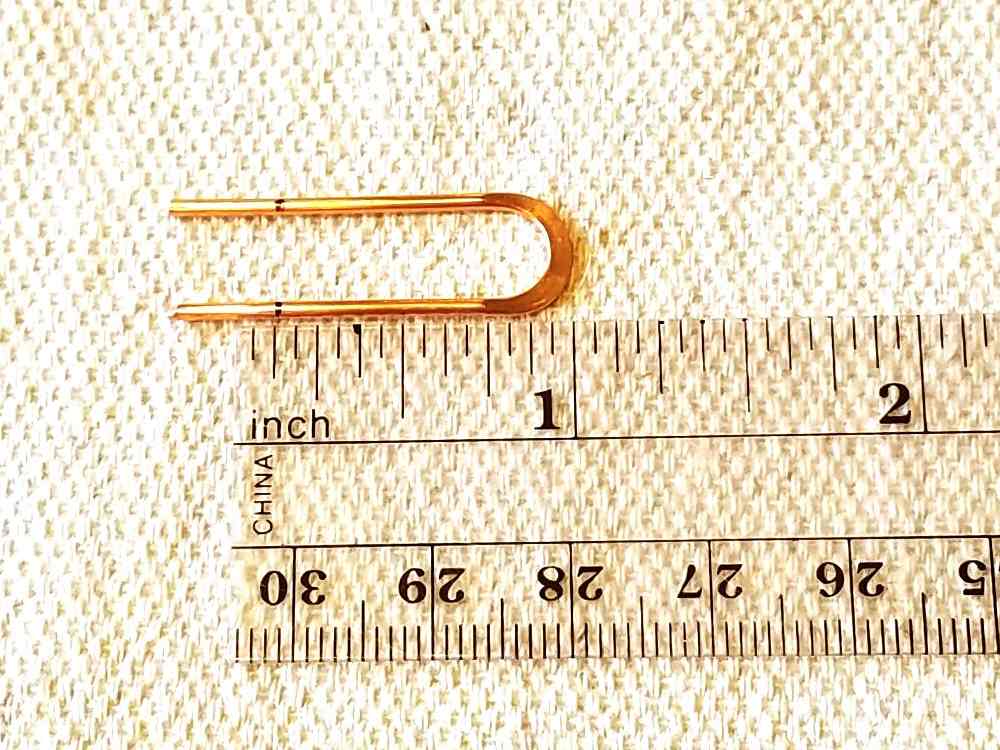
We’re now going to trim the core wires to 7.25-inches (7.75-inches – 8.25-inches). Remember to refer to the size chart at the end of this tutorial if you want to make a different size. Cut your core wires to the band length specified in the chart based on your wrist measurement and your fit preference. Determine where you want your knot to be, and then trim the core wires to the appropriate length for the bracelet size that you’re making.
I like to keep my knots slightly off center, as shown. Sometimes the core wires will dictate the knot placement. The two core wires need to be exactly the same length, so if your wires are offset by a significant margin, that can limit your knot placement.
Again, getting this knotting technique down takes practice. Don’t be afraid to generate some scrap wire while you master this technique. - Mark the Knotted Core Wires Where You Want to End the Weave
Measure and mark the two knotted core wires 3/8 of an inch from both ends. This is where you’ll break your weave later on in this tutorial.
- Prepare the 16ga Frame Wires
Measure and cut two pieces of 16ga half-hard wire to 7.25-inches (7.75-inches – 8.25-inches). Again, refer to the size chart for the correct band length if you’re making a different size than the three standard sizes listed here.
- Mark the Points Where the Frame Will Flare Out
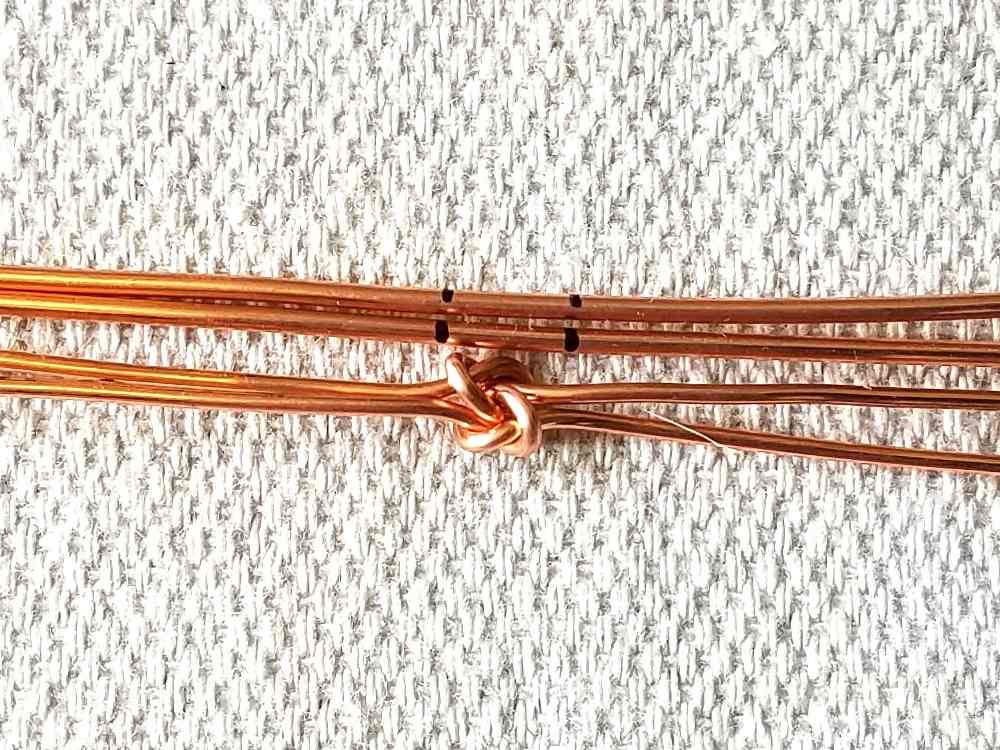
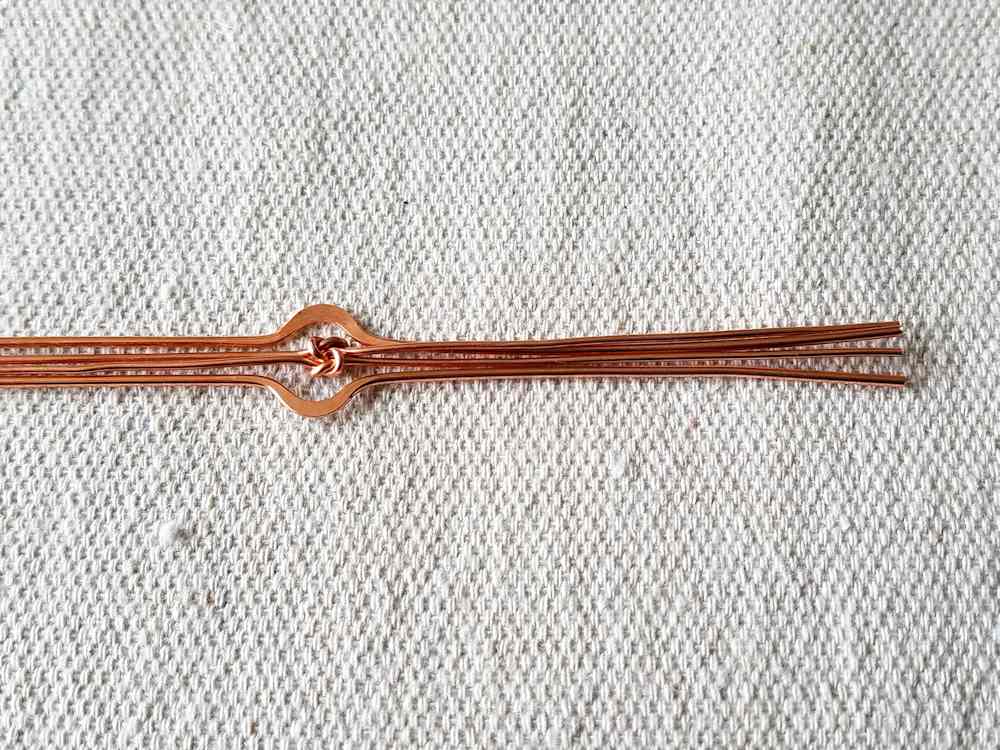
Lay the two 16ga wires next to the knotted 18ga wires. Be sure to align the ends of all four wires.
Using your permanent marker, mark the 16ga core wires on either side of the knot, as shown. We going to create bends that will frame the knot at those marks. - Begin Forming the First Frame Wire
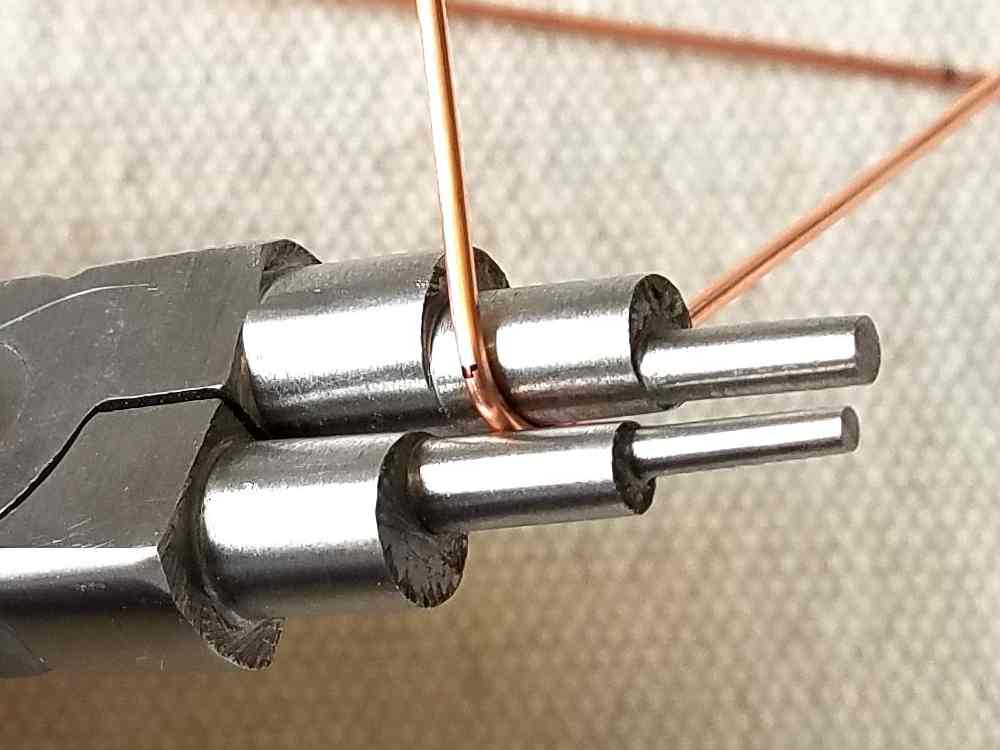
Using your stepped bail-making pliers, center the 6mm step between the two marks on one of the core wires. Then use your fingers to create a soft curve at that position on the wire.
- Continue Forming the First Frame Wire
Without removing your pliers, rotate the pliers slightly until the 4 mm step is centered on one of the marks you made in Step 10.
Use the 4 mm step to create another bend in the opposite direction of the first bend. - Finish Forming the First Frame Wire
Again, without removing your pliers, rotate the pliers so the 4 mm step is centered on the second mark that you made in Step 10 and repeat Step 12.
- Form the Second Frame Wire
When you’re finished, your core wire should look like the one shown here.
Repeat Steps 11 through 13 on the remaining core wire. - Work Harden the Bends in Your Frame Wires
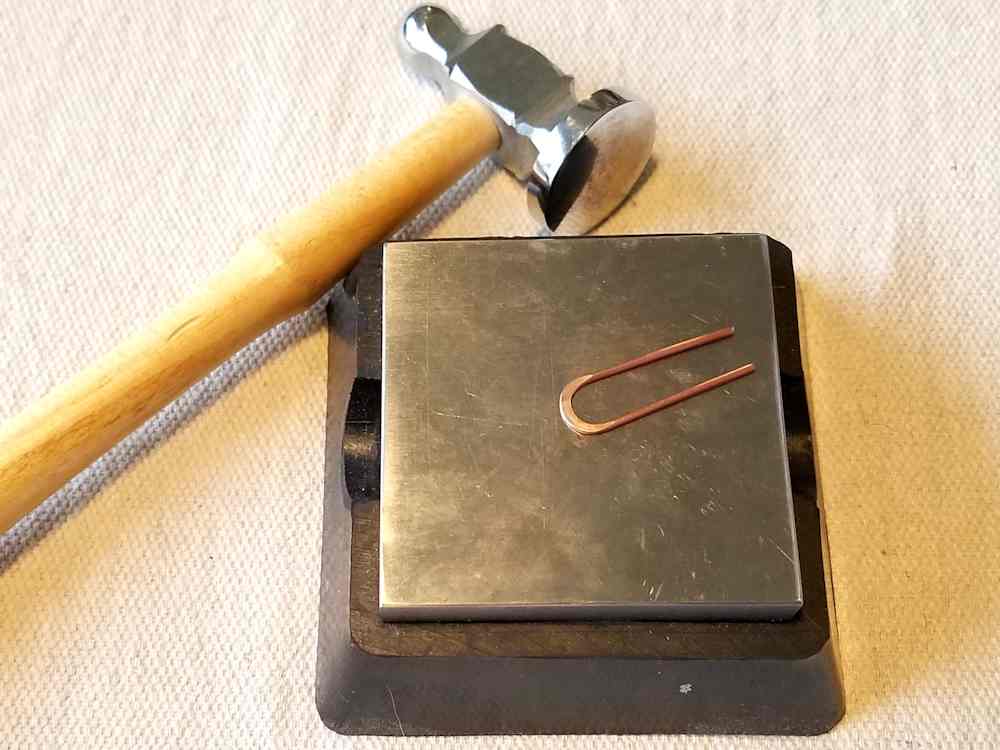
Use your chasing hammer and bench block to flatten one 16ga core wire, just at the bend. This will lock that shape into place and harden it.
Repeat on the remaining frame wire. When complete your two frame wires should look like those pictured here. - Trim Your Frame Wires to Length
Position your two frame wires next to the knotted core wires. Make sure the bumps frame the knot evenly and then trim both of the frame wires to the same length as the knotted core wires.
- Transfer Marks to the Frame Wires
Transfer the marks you made at 3/8 of an inch from each end of the knotted core wires to your frame wires. Again, this is where we’ll break the weave, which we’re going to do next.
- Prepare to Weave Your Core Wires
Cut a 12-foot (14-foot – 16-foot) length of dead soft 28ga wire.
TIP: Instead of cutting my weaving wires to length, I work off of a plastic bobbin filled with weaving wire.
Just wind several feet of small-gauge wire onto a plastic Kumihimo bobbin like the one shown here. I fill my bobbins between 1/4 and 1/3 full, which is probably between 50 and 100 feet of wire, depending on the gauge. If you wind too much wire on your bobbin, it will become heavy enough to slip and unwind as you work with it, which can be annoying. You want enough wire to finish several inches of weaving, but not so much that your bobbin becomes difficult to manage.
This is a tip that I picked up from Sarah Thompson of Sarah-n-Dippity a few years ago, and it’s a good one. If you struggle to keep your wire from kinking while you weave, give this technique a try! - Begin Weaving the Core Wires Together
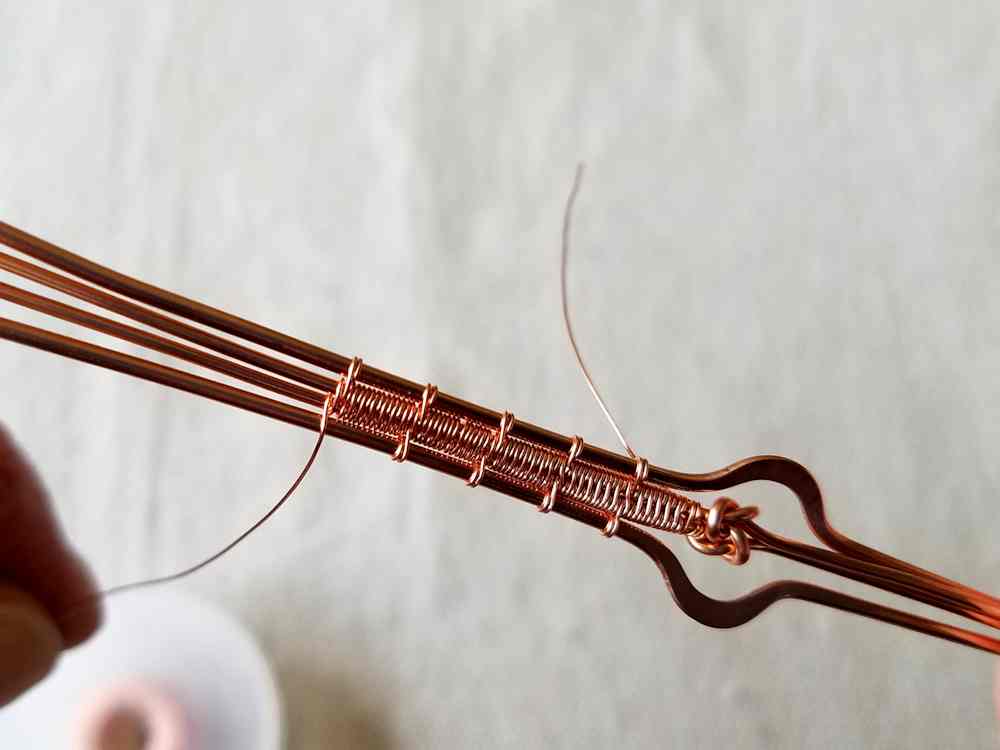
Starting as close as you can get to the knot, anchor your weaving wire with three wraps around one of the 18ga core wires. Leave a long enough tail that you can easily break later.
Then begin weaving the two knotted core wires together using the Modified Soumak weave. Complete six full pattern repeats, and then lash the two frame wires above and below the knotted core wires with a single pattern repeat.
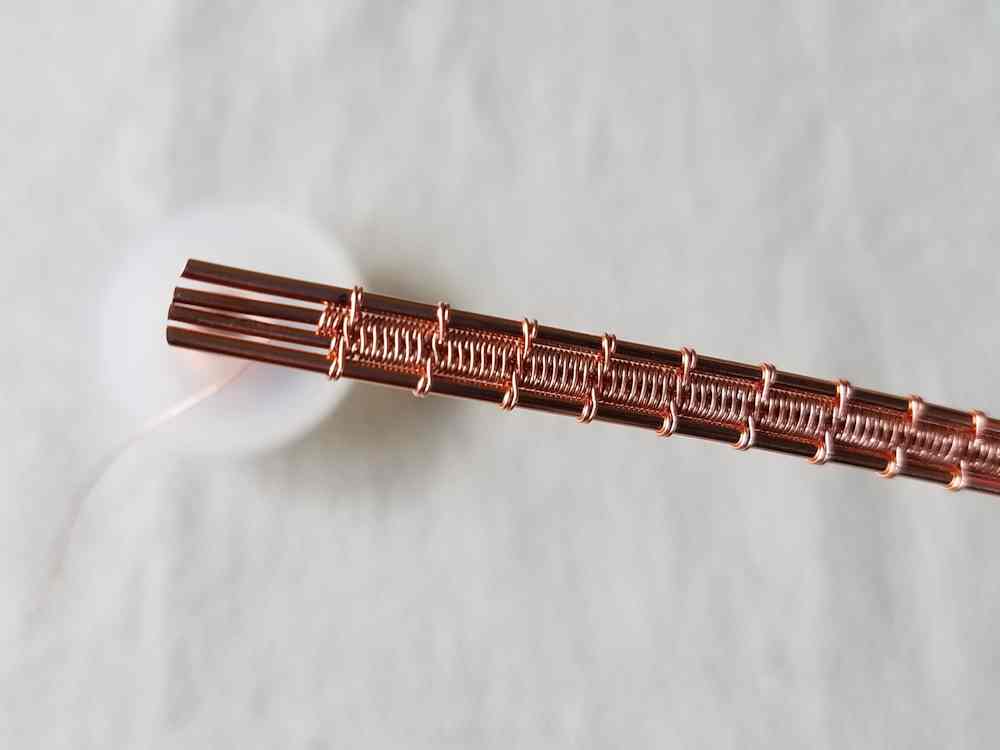
Continue weaving in this manner (six pattern repeats on the knotted core wires only, then one pattern repeat on all four core wires) until you reach the mark you made near the ends of the core wires. Secure the weaving wire with three wraps around one of the 18ga knotted core wires and break your weaving wire. - Finish Weaving Your Core Wires
Flip your core wires over and repeat Step 19 on the other side of the knot.
After breaking the weaving wire on the cut ends of the core wires, break both of the remaining tails on either side of the knot. - Prepare the Wires for the Clasp
Cut the following lengths of 16ga half-hard wire for your clasp:
– 1 piece at 3 inches (this will be the hook)
– 1 piece at 2.5 inches (this will be the loop)
– 2 pieces at 2 inches (these are your hinge pins) - Form the Hinge Pins
Measure and mark the 2-inch pieces of wire at 1/2 inch from one end.
Align the mark on one piece of wire with one edge of your flat nose plier jaws and grasp the wire firmly with the tips of your pliers.
Use your thumb to press the wire tightly all the way around the lower jaw of your pliers until the two ends of the wire are parallel to one another, as shown.
Repeat on the remaining 2-inch wire. - Begin Forming the Hook
Measure and mark the center of the 3-inch piece of 16 ga wire. Then, using your flat-nose pliers, form a sharp “V” at that mark. Continue working your wire into a neat point until the two ends of the wire are about 6 mm apart.
- Work Harden the Hook
Use your bench block and chasing hammer to flatten the tip of the “V”. Then measure and mark both arms of your hook 1/4-inch from the tip of the “V”. This is where you’ll bend the arms to form your hook.
- Continue Forming the Hook
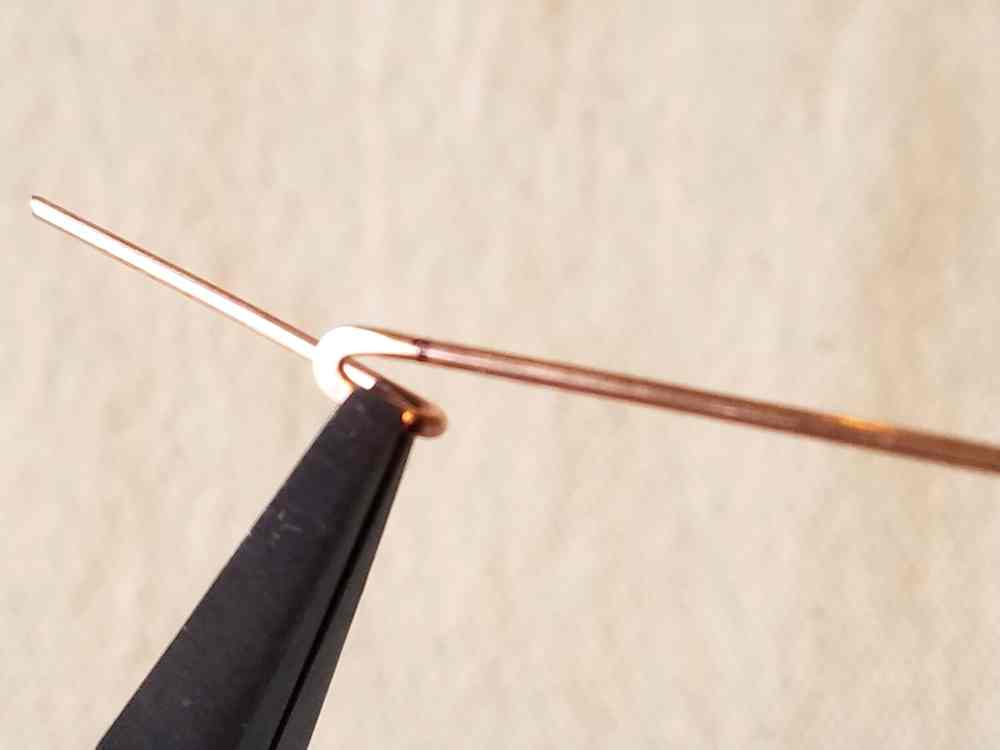
Align one mark on your wire with the edge of your flat-nose pliers. Grasp the wire firmly with the tips of your pliers.
Use your thumb to push the long end of the wire all the way around the lower jaw of your pliers, as you did for the hinge pins in Step 22. - Finish Forming the Hook
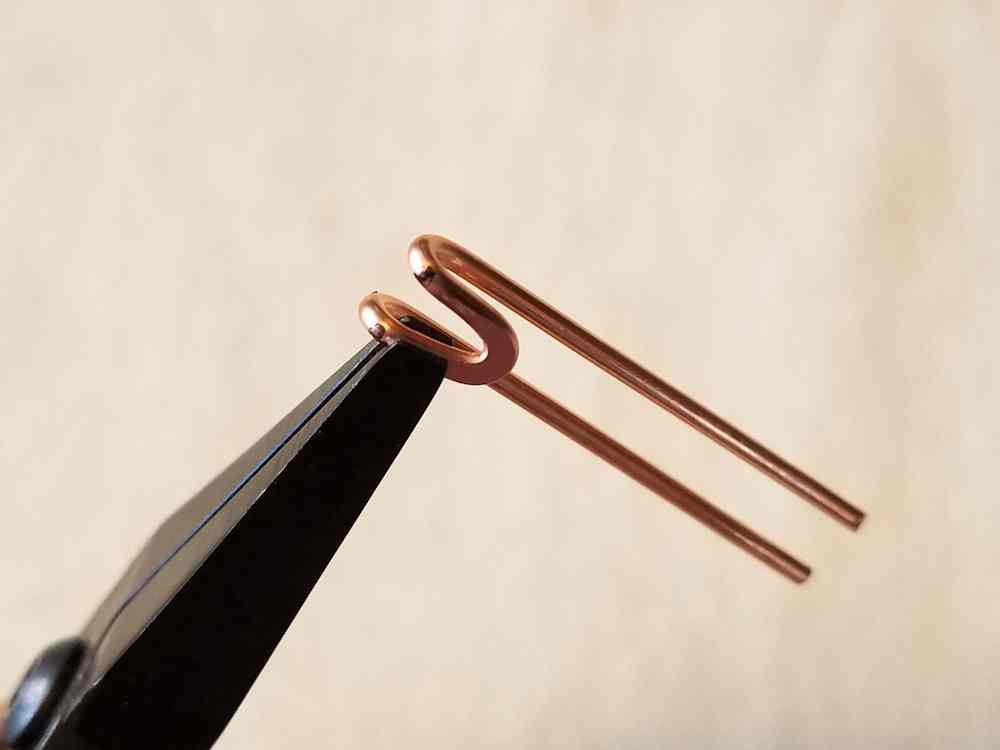
Flip your wire over and repeat Step 25 on the remaining arm of the “V”.
- Complete the Hook Component of the Clasp
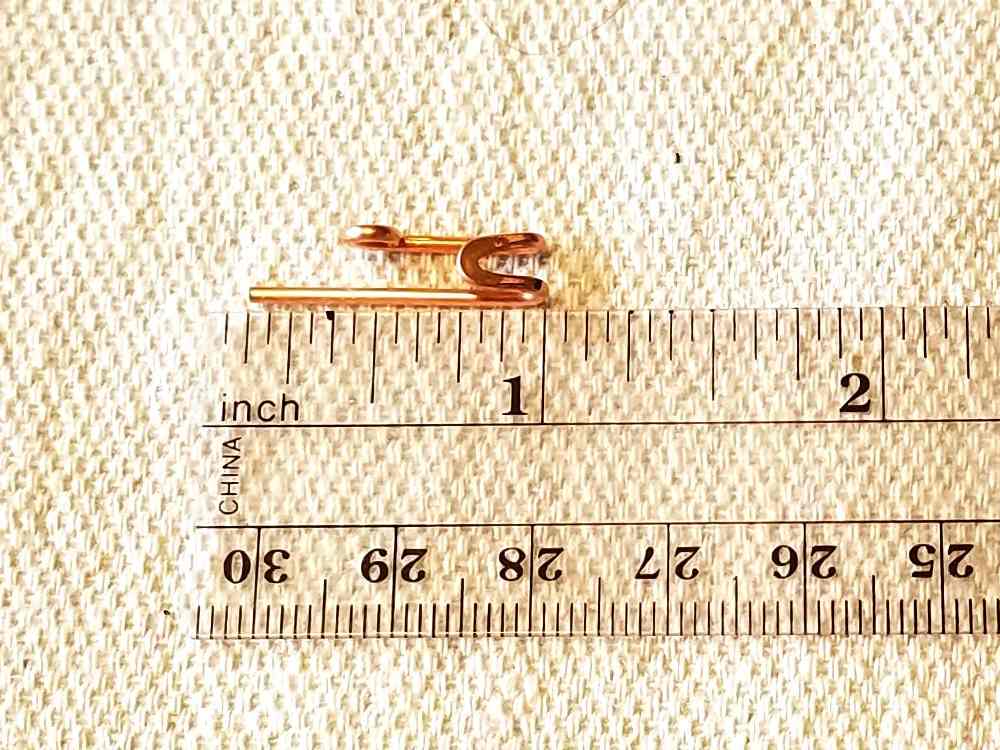
Measure and mark both arms of the hook at 7/8-inch from the front of the hook. Trim both arms at the marks.
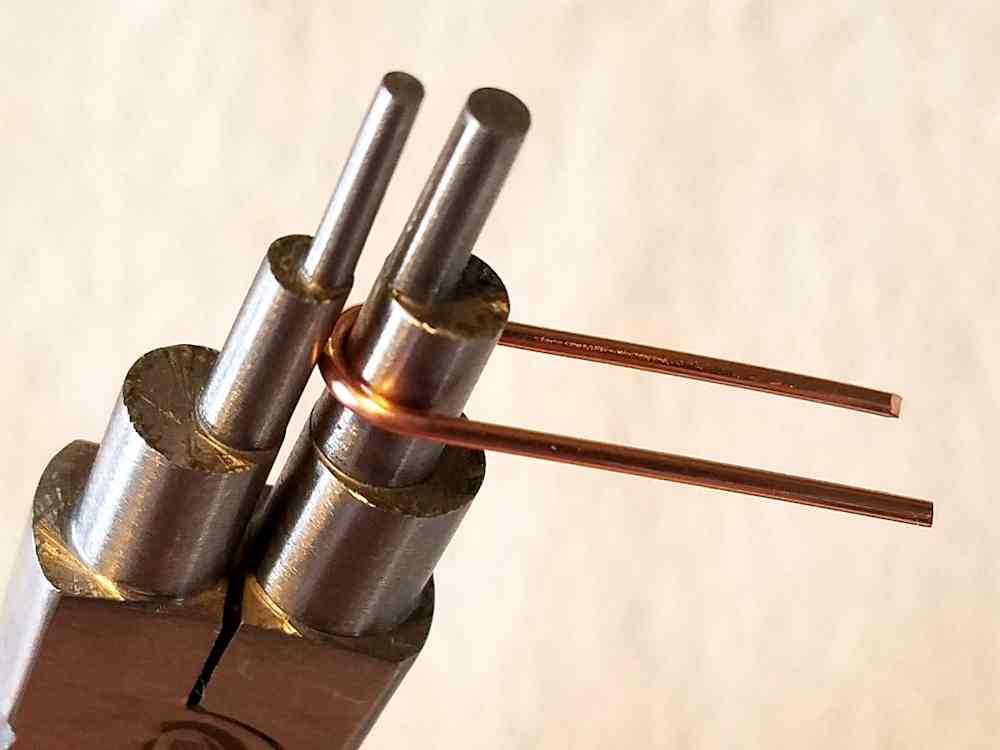
Use the 2 mm step on your Bail-making pliers to form a tight loop on both arms. Make sure the loops are on the same side as the catch point on your hook, as shown. - Begin Forming the Loop
Measure and mark the center of the remaining 2 1/2-inch piece of wire. Center the mark on the 6mm step of your bail-making pliers and bend both
end - Work Harden the Loop
Using your chasing hammer and bench block, flatten about 1/4-inch of the loop.
- Measure and Mark the Arms of the Loop
Measure and mark both arms of the loop at 7/8-inch from the tip of the loop, as shown.
- Finish the Loop Component of the Clasp
Trim the arms of the loop at the marks made in Step 30 and use the 2 mm step of your Bail-making pliers to form tight loops on both arms. Make sure both loops are facing the same direction, as shown.
- Form Loops on Both Ends of the Woven Band
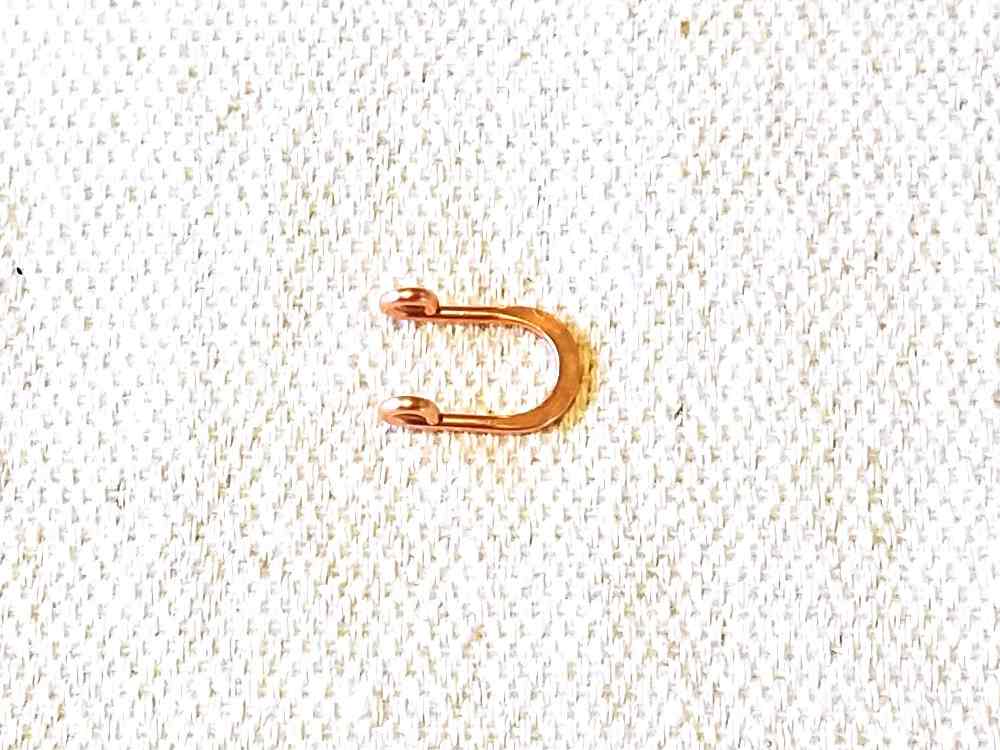
Use the 2 mm step on your bail-making pliers to form tight loops, as shown, on both ends of all four core wires. Make sure that all loops line up evenly so you can easily feed your hinge pin through the loops. Also, make sure that all loops are facing the same side of your bangle wires.
As we form the bracelet, you’ll want those loops to be on the inside (or wrong side) of the bracelet curve. So, if there is one side of the band that you like better than the other, mark it as your right side. Then be sure you form your loops on the wrong side. - Attach the Loop Component to the Woven Band
Line up the small loops on your Loop component with those on one end of your woven band.
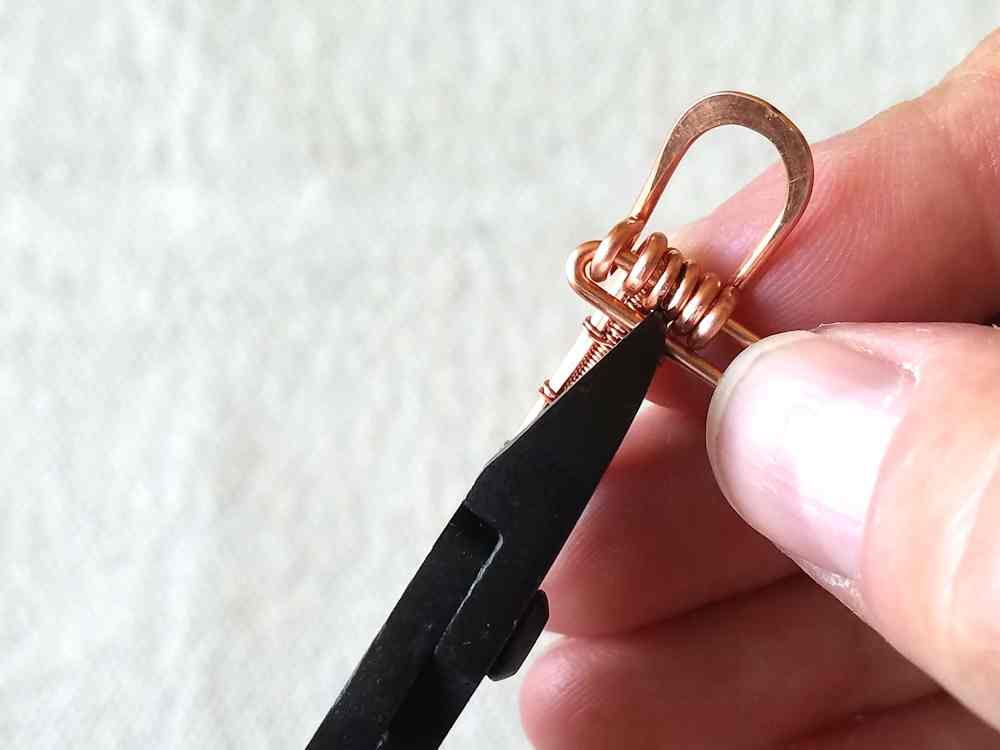
Feed one of your hinge pins through all six loops, as shown.
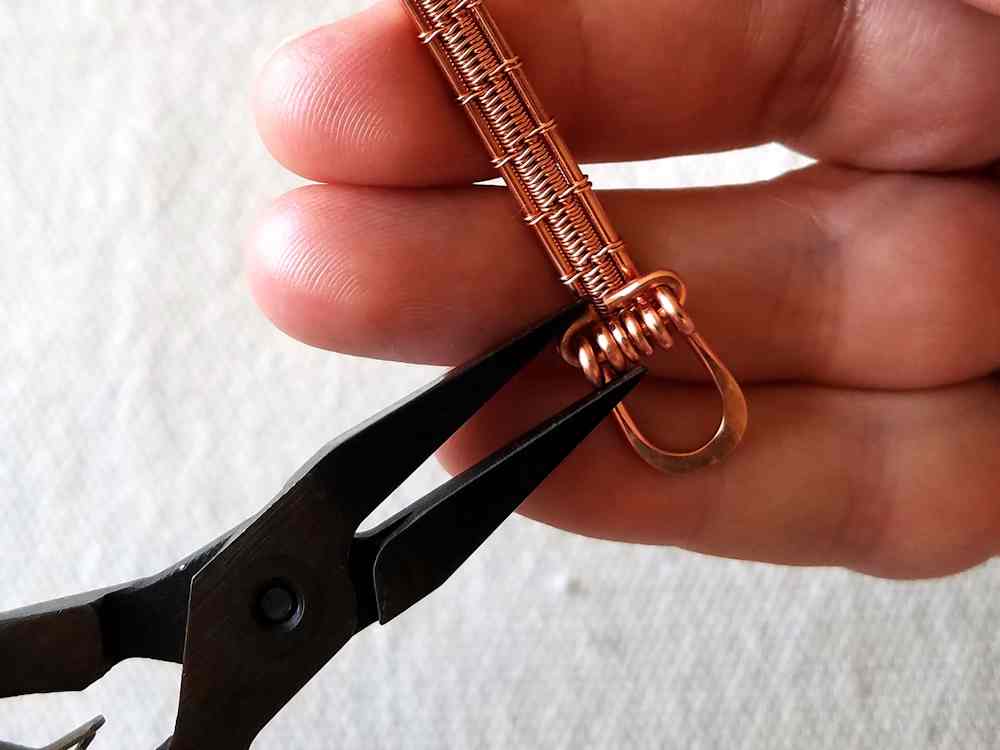
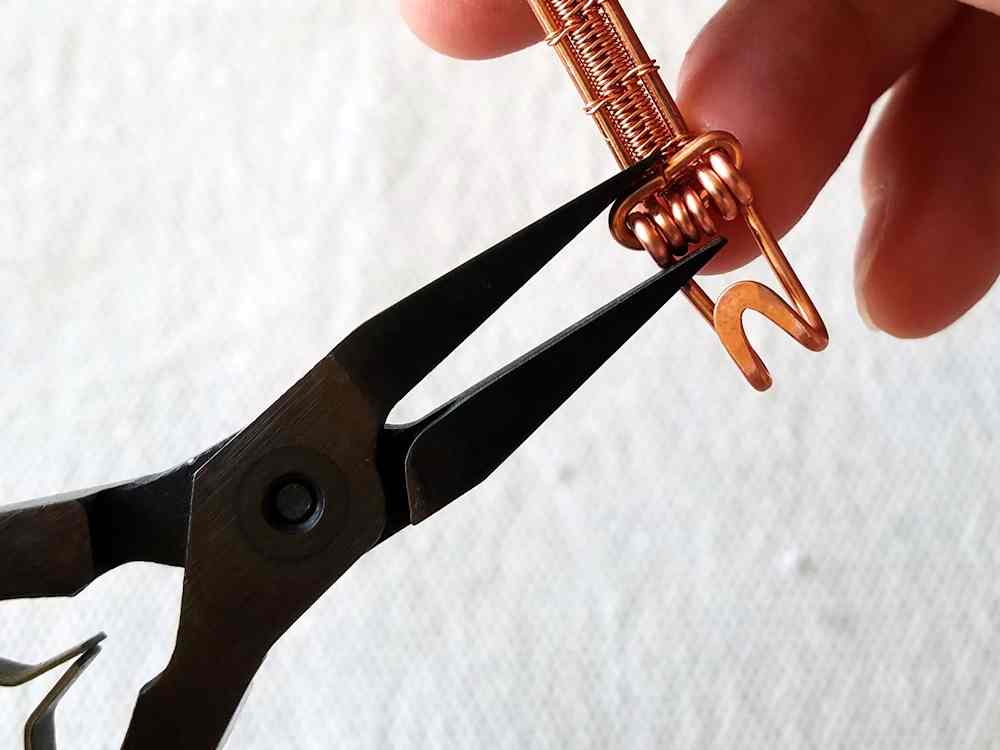
Trim the short end of the hinge pin at the center point between the two 18ga core wires. - Secure the Loop Component to the Lover’s Knot Bracelet Band
Bend the straight piece of the hinge pin around the small wire loops and trim at the center of the bangles.
Use your flat-nose pliers to tighten the bends on the hinge pin and make sure that the ends are aligned neatly. - Secure the Hook Component to the Lover’s Knot Bracelet Band
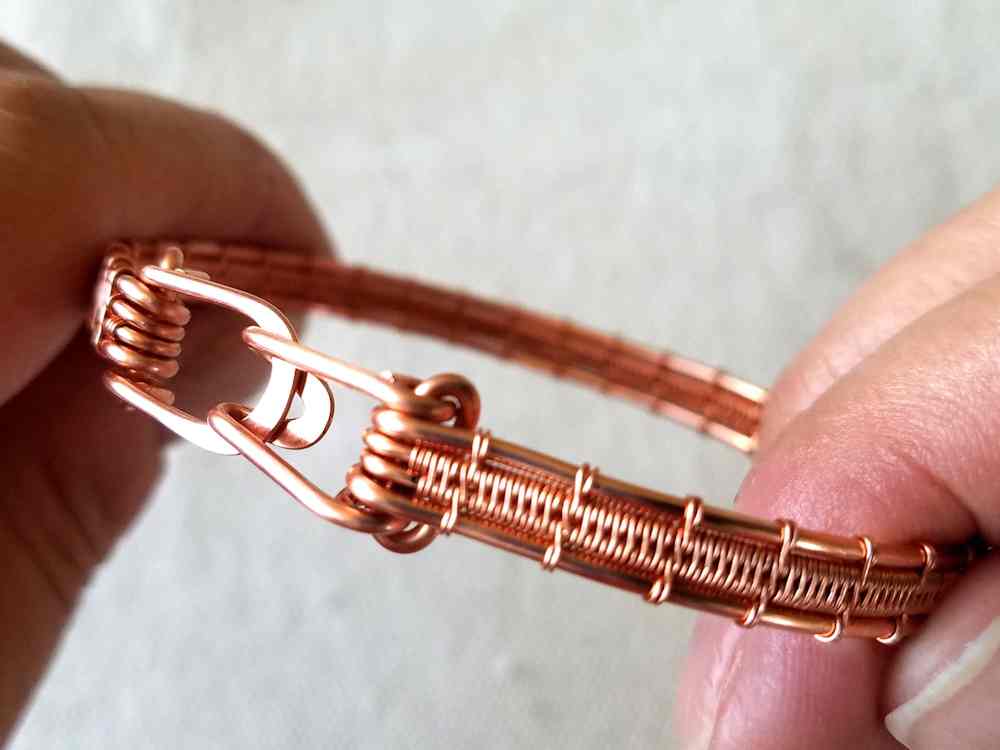
Repeat Steps 33 and 34 on the other end of the bracelet to secure the Hook component with the remaining hinge pin.
Make sure the catch on your hook is facing the wrong side of your bracelet. This will prevent the hook from catching on clothing and such while worn. - Form the Lover’s Knot Bracelet
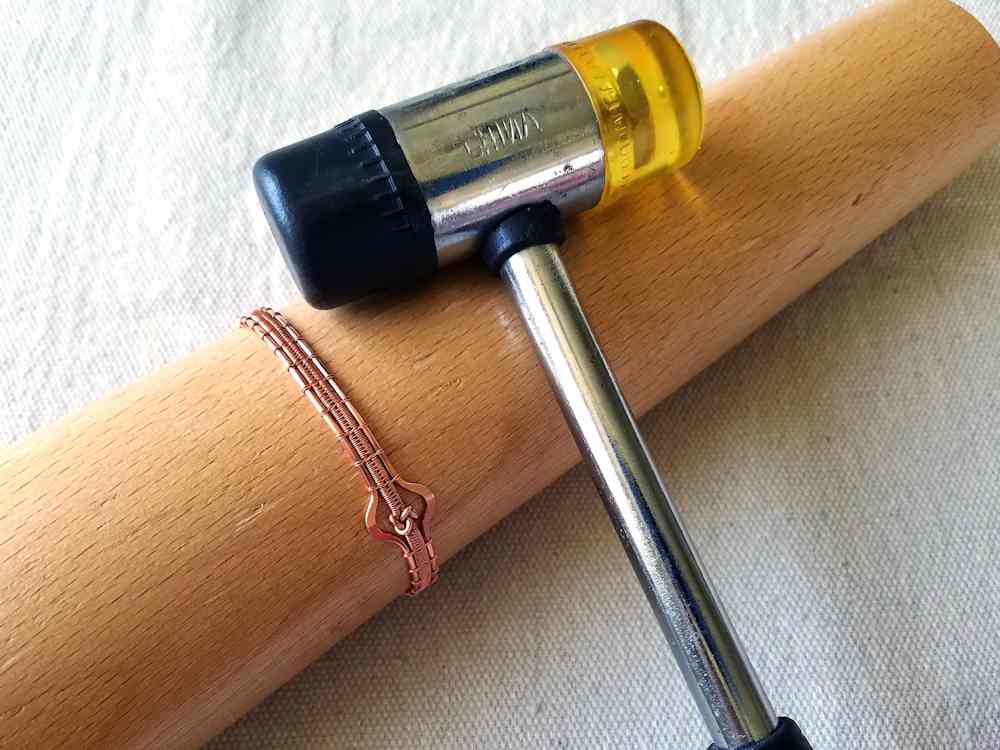
If you have a bracelet mandrel and a soft mallet, use them now to form your bracelet. I use a solid wood oval-shaped bracelet mandrel to form my bracelets, but this is something I did by hand for years. You don’t really need a bracelet mandrel or forming pliers to shape a wire woven bracelet, but these tools are worth the investment if you make a lot of bracelets.
The ends near the clasp often need to be shaped with the assistance of pliers. Wrap the jaws of your flat nose pliers with masking tape and use them to gently shape your bracelet. This trick will prevent tool marks on your finished bracelet while you form those stubborn ends near the clasp. - Make Any Final Adjustments to Your Bracelet
Try your bracelet on for size and test your clasp. Make any final adjustments as needed.
That’s it! Your new Lover’s Knot Bracelet is ready to finish and polish.


Finishing Your Lover’s Knot Stacked Bangle
I patina all of my copper and silver jewelry with Liver of Sulfur (LOS), and then I burnish the patinated pieces with super fine steel wool (Grade #0000) in a warm bath of water and original Blue Dawn dish soap. The steel wool brings back the bright copper highlights on the high spots.
Once that’s done, I rinse the jewelry thoroughly to remove any particles of steel wool, and then I put the jewelry in a tumbler barrel filled with warm water and a generous squirt of Blue Dawn. I tumble all of my finished jewelry for a minimum of two hours.
If you’re new to wire weaving, read this detailed tutorial that walks you through my 7-step patina process. If you’re wondering why I recommend tumble polishing specifically, check out this post. And if you already own a tumbler, make sure you clean your stainless steel shot regularly so you’ll always get the best finish on your tumble-polished jewelry.
One last bit of tumbler advice before you go. Always make sure that any beads or stones that you use for your jewelry are safe to tumble. I don’t recommend tumbling natural pearls, soft gemstones, or glass beads with polymer coatings, such as glass pearls and certain frosted-look glass. If you’re not sure if your beads can handle the tumbler, run a test tumble with a bead that you’re willing to sacrifice.
Variations of the Lover’s Knot Bracelet
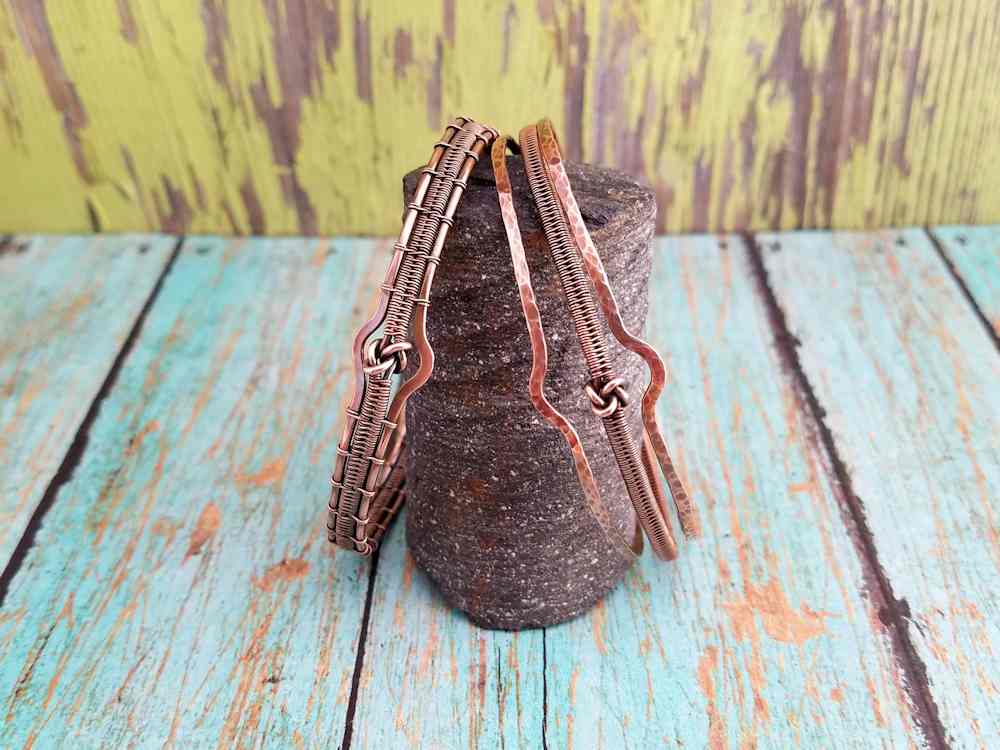
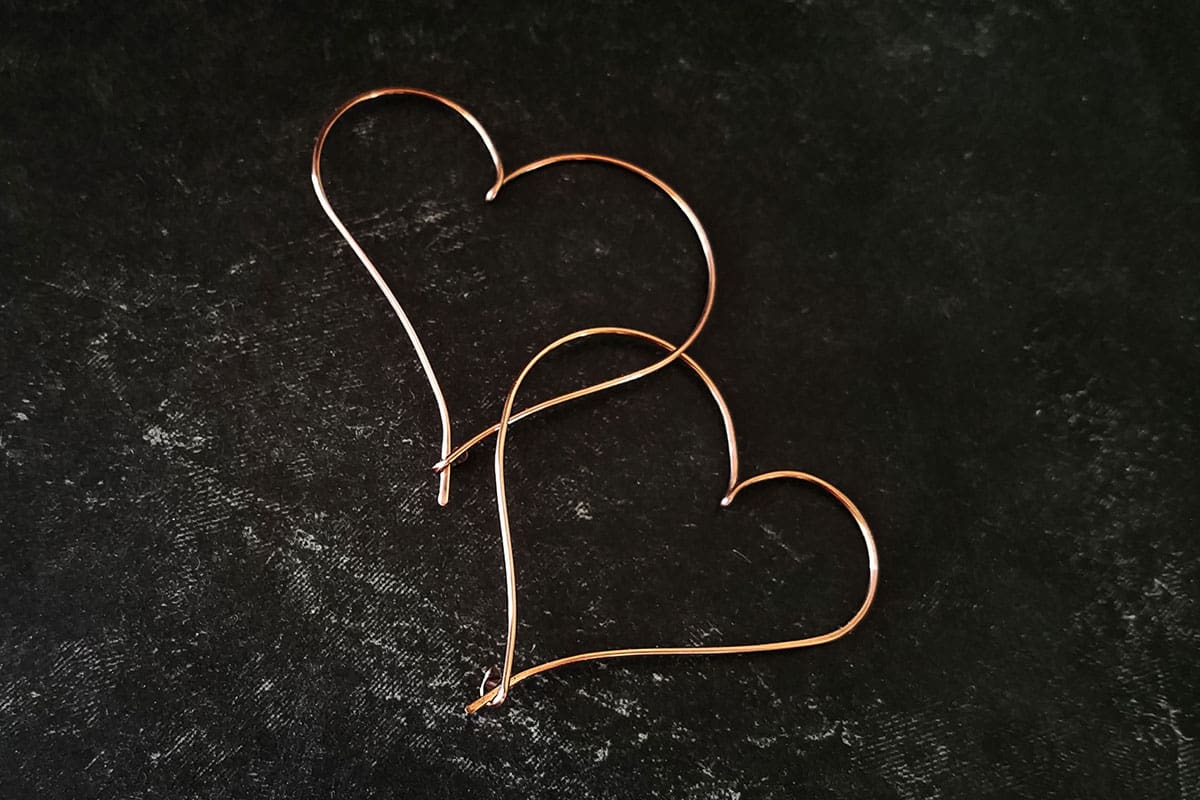
There are lots of things you can do to make this bracelet uniquely your own. One variation that I make frequently is very similar to this version only I don’t lash the two frame wires to the knotted core wires. This makes for a fun stacked bangle-style bracelet with a lot of movement. That style, the Lover’s Knot Stacked Bangle pictured above on the right, is available as a separate tutorial on my blog and in my shop.
Resizing Recommendations
Bracelet sizing is sort of an elusive art. People are very particular about how their bracelets fit, and no two wrists are alike. We’ve all grown accustomed to wearing ill-fitting bracelets when it comes to commercial jewelry, but the beauty of handcrafted jewelry is that it can be custom fitted. If you sell your wire jewelry, this can be both a marketing advantage and an operational challenge. You’ll need to decide how many different bracelet sizes you want to keep in stock and how willing you are to offer custom or semi-custom bracelet sizing as a service.
The other challenge with bracelet sizing is that tools do make a difference. I can repeatedly achieve the same size bracelet using these written instructions and my tools. Meanwhile, you can follow these instructions using your own tools, and end up with a slightly different sized bracelet. If you follow the instructions carefully, however, you should be able to repeat that same size over and over again.
Keep this consideration in mind as you refine your bracelet sizing skills. The finished bracelet sizes listed in this tutorial are based on the results that I achieve consistently with my tools. Your finished sizes may vary slightly, but if you always use the same measurements, you should be able to make multiple bracelets that are consistently the same size.
Also, make sure that you always finish your clasps exactly the same way. When your clasps are consistent, your bracelet measurements will be more predictable. And it’s super easy to adjust the overall bracelet size by simply shortening or lengthening the band.
Quick Reference Size Chart
The following chart will help you determine how long you need to make your band in order to achieve a perfect fit based on your wrist measurement and fit preference. There is an expanded version of this size chart in the printable PDF version of this tutorial, which includes all measurements for wrists up to 9 inches. Or just read the general sizing rules below to determine the accurate band length for larger wrists.
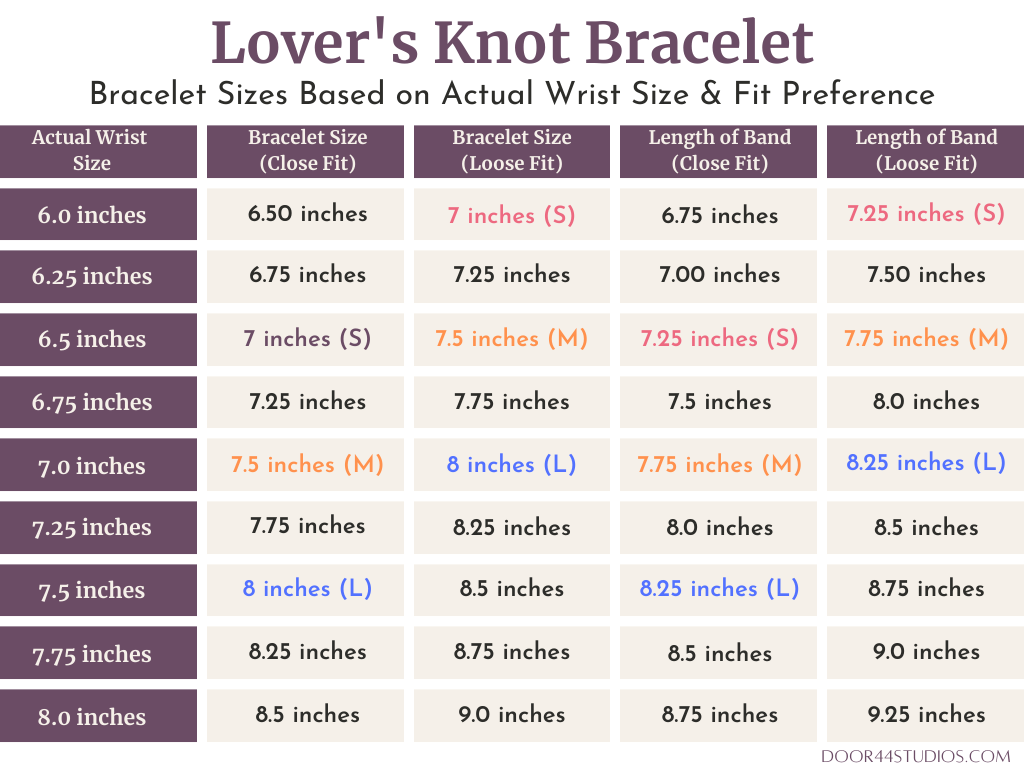
General Sizing Guidelines for the Lover’s Knot Bracelet
I break down bracelet fit into two general categories: close fit and loose fit. And I’ve learned through the years that most people’s fit preferences fall into one of these two categories. I personally prefer a close fit, which is why my bracelets tend to run small.
As a general rule, you’ll add 1/2-inch to the actual wrist measurement for a close fit and 1-inch for a loose fit. I have a 6 1/2-inch wrist, so I can wear either a Small (7-inch) or Medium (7 1/2-inch) bracelet. Because I prefer a close fit, however, I nearly always choose the Small size.
Here are the basic steps for sizing this bracelet perfectly every time:
- Measure your wrist using a flexible measuring tape. Let’s use my 6 1/2-inch wrist for our example.
- Decide if you want a close fit or a loose fit and add the appropriate length to your wrist measurement (1/2-inch for a close fit or 1-inch for a loose fit). We’ll choose a loose fit in this instance.
- 6 1/2-inch wrist + 1-inch for a loose fit = 7 1/2-inches. This is the target measurement for our finished bracelet.
- Add 1/4-inch to your finished bracelet measurement to determine the correct length for your knotted and woven band. 7 1/2-inch + 1/4-inch = 7 3/4-inches.
The example above happens to work out to a Medium size Lover’s Knot bracelet, and all of the measurements for that size are included in this tutorial. However, you can apply this same formula to any wrist measurement, and you’ll find that you can consistently achieve the perfect fit for any combination of wrist measurement and fit preference.
Discover More Behind Door 44
Thanks so much for joining me today. I hope you enjoyed creating my pretty Lover’s Knot Bracelet. If you’d like a printable PDF version of this tutorial, you can find it here.
Want more free wire jewelry tips and tutorials?
I like to share useful wire weaving tips and tricks on my social media channels, and we have some great conversations about wire jewelry in my private Facebook Group. Also, be sure to connect with me @door44studios on Instagram, and Facebook to keep up with everything that’s happening behind Door 44. And if you haven’t already done so, be sure to subscribe to my YouTube channel where you’ll find new wire jewelry videos weekly.
Until next time, go make something beautiful!

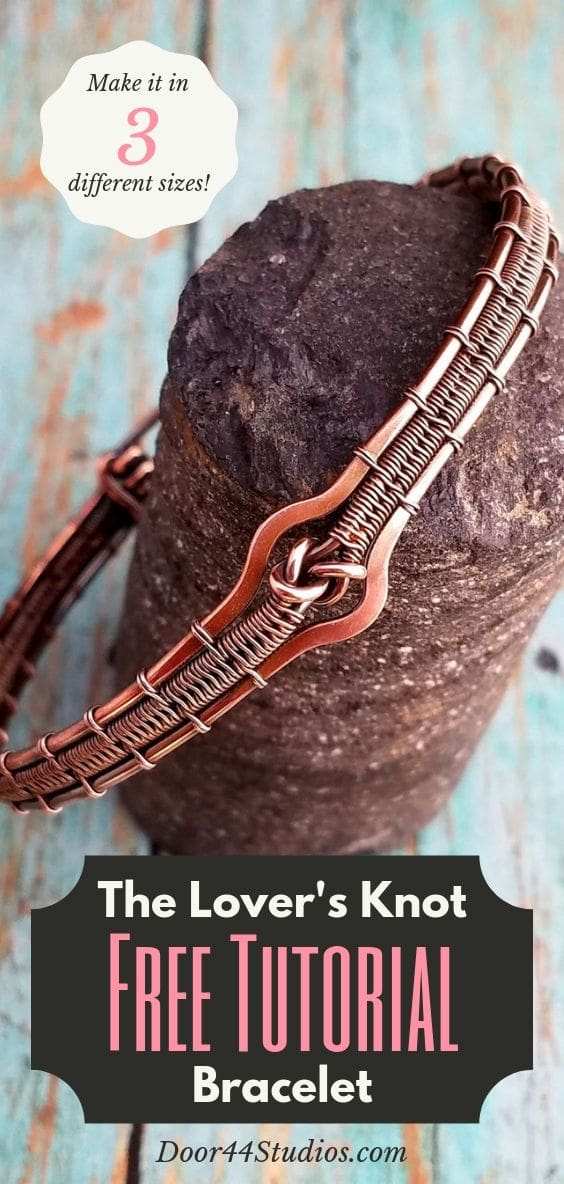
Pin the Lover’s Knot Bracelet Tutorial for Later
Wow! I am so excited to have found you. I have been wire weaving for three years and am constantly looking for new techniques. I am so impressed with your generosity!
Thank you, Gail! Welcome to Door 44 Studios. I’m happy to have you here. 🙂
Beautiful! Thank you for sharing! I plan to make a pair for hubs and myself. He loves matching special occasion jewelry.
This bracelet makes a beautiful his/hers matching pair. I’d love to see your finished work. Please be sure to share a picture and have fun making them!